
Manual


74
5 Digital Effects | Master Control
5.4 Graphic Equalizers
StudioLive™ AI-series Mixers
Owner’s Manual
5.4.1 The GEQ Menu
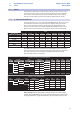
Each GEQ on your StudioLive is assigned to a specific bus: Main Left, Main Right, and
Auxes 1 through 14/10/6. The bus assignment cannot be changed. When the GEQ
menu is active, the meters and encoders of the Fat Channel become the controls for
the graphic EQ. As you touch a knob, you will notice that its band number, frequency,
and gain are displayed in the System menu. The 31 bands range from 20 Hz to 20 kHz.
The frequency for each band is fixed:
StudioLive 32.4.2AI: Bands 1 through 31 are controlled
by encoders 1-through 31, respectively.
StudioLive 24.4.2AI: Bands 5 through 28 are controlled by
encoders 1-24, respectively. When Band 4 or 29 is selected in the
Show Band field in the GEQ menu, the meters will flip.
StudioLive 16.4.2AI: Bands 9 through 24 are controlled by encoders 1-16,
respectively. When Band 8 or 25 is selected in the Show Band field in the GEQ
menu, the meters will flip. Notice that all meters have one LED illuminated to
display the current gain position for each band, and the meter for the selected
band in the Show Band field is inverted, meaning that all LEDs will be illuminated
except the LED displaying the current gain position for that band. The band
does not have to be selected in the Show Band field for its encoder to be active.
All encoders are active so you can make changes to all 31 bands at one time.
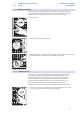
To open the GEQ menu, press the GEQ button.
Navigate to the Show GEQ field and use the Value knob to
scroll through the different graphic EQs. Use the Next and
Prev buttons to navigate through each GEQ screen and use
the Value knob to change a parameter.
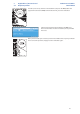
To flatten a GEQ curve, press the Recall button.