StudioLive AI Software Library Reference Manual ™ Universal Control-AI with Virtual StudioLive-AI and Smaart System Check Wizards | StudioLive Remote-AI for iPad | QMix -AI for iPhone /iPod touch Capture 2 | Studio One Artist ® ® ™ ™ ® ® ® ® www.presonus.
Table of Contents 1 Overview — 1 1.1 Introduction — 1 1.2 About This Manual — 1 1.3 Technical Support — 2 1.4 Summary StudioLive AI Software Library Features — 2 1.4.1 Virtual StudioLive-AI — 2 1.4.2 StudioLive Remote-AI for Apple iPad® — 3 1.4.3 QMix-AI for iPhone® and iPod touch® — 3 3.5 Step 5: Setting iOS Permissions — 17 3.5.1 StudioLive Remote for iPad Permissions — 18 3.5.2 QMix-AI for iPhone/iPod Touch Permissions — 18 4 Universal Control-AI and VSL-AI — 19 4.
4.9 4.8.2 Scene Recall Filters — 36 7 Capture 2 — 70 4.8.3 Link Channel Faders Preference — 36 7.1 Installation Instructions — 70 4.8.4 Default to Fader Locate Preference — 36 4.8.5 Enabling Lockout Mode — 36 Smaart System Check Wizards — 37 4.9.1 Smaart Room Analysis Wizard — 38 4.9.2 Smaart System Delay Wizard — 44 4.9.3 Smaart Output Check Wizard — 48 4.9.4 Go Remote — 49 4.9.5 Mic Position — 50 4.9.6 System Alignment Rules — 52 4.9.
8 Studio One Artist Quick Start — 98 8.1 Installation and Authorization — 98 8.1.1 Running the Studio One Installer — 98 8.1.2 Creating a User Account — 98 8.1.3 Activating Studio One Artist Online — 99 8.1.4 Activating Studio One Artist Offline — 100 8.1.5 Installing Bundled Content for Studio One Artist — 103 8.1.6 Installing Third-Party Content — 104 8.1.7 Enabling the Audio Driver — 104 8.2 Creating a New Song — 105 8.3 Creating Audio Tracks — 107 8.3.1 8.
1 1.1 Overview Introduction 1 Overview 1.1 Introduction StudioLive™ AI Software Library Reference Manual Your StudioLive™ AI mixer comes with a powerful software library that includes Capture™ 2 and Studio One® Artist. In addition, PreSonus Virtual StudioLive AI (VSL-AI) editor/librarian/remote-control software with Smaart Measurement Technology™ for Mac and Windows is a free download from the PreSonus Web site.
1 1.3 Overview Technical Support StudioLive™ AI Software Library Reference Manual Throughout this manual you will find Power User Tips. These tips provide useful hints on how to best use the StudioLive AI Software Library and take advantage of unique workflow functions and features. 1.3 Technical Support Many technical issues can arise when using a standard computer as a digital audio workstation (DAW) and when networking wireless devices.
1 1.
1 1.4 Overview SummaryStudioLiveAISoftwareLibraryFeatures StudioLive™ AI Software Library Reference Manual 1.4.4 Capture 2 Included with StudioLive is Capture 2, a digital-audio multitrack-recording application designed to make recording quick and easy. Perfect for live recording and for mixing your audio in real time to a stereo audio file, Capture 2 was designed to interface perfectly with StudioLive-series mixers, allowing instant setup and recording.
2 2.1 Connecting to a Computer Installation for Windows 2 Connecting to a Computer StudioLive™ AI Software Library Reference Manual The Universal Control-AI installer includes the ASIO/WDM (Windows) and Core Audio (OS X) drivers for the StudioLive AI-series mixers, as well as Universal Control-AI, and Virtual StudioLive-AI. We made the Universal Control-AI installer as simple and easy to follow as possible, and it will take you through each step of the installation process.
2 2.2 Connecting to a Computer Installation for Mac OS X 2.2 Installation for Mac OS X StudioLive™ AI Software Library Reference Manual The Universal Control-AI Installer will take you through each step of the installation process. Please read each message carefully, and be especially careful that you do not connect your StudioLive too soon. 1. After launching the installer, you will be directed to the Welcome screen. Click “Continue” and follow the onscreen instructions. 2.
2 2.4 Connecting to a Computer Using the StudioLive with Popular Audio Applications 2.4 Using the StudioLive with Popular Audio Applications StudioLive™ AI Software Library Reference Manual Below are basic driver-setup instructions for several popular audio applications. Complete setup instructions for PreSonus Studio One Artist and a brief tutorial on its features are located in Section 8 of this manual. Steinberg Cubase 4+ 1. Launch Cubase. 2. Go to Devices | Device Setup. 3.
2 2.5 Connecting to a Computer Digital Sends and Returns StudioLive™ AI Software Library Reference Manual Avid Pro Tools 9+ 1. Launch Pro Tools. 2. Got to Setup | Hardware and select PreSonus FireStudio from the Peripherals list. Click OK. 3. Go to Setup | Playback Engine and select PreSonus FireStudio from the menu at the top of the window. Click OK. Cakewalk Sonar 6+ 1. Launch Sonar. 2. Go to Options | Audio... and click on the Advanced tab. 3. Change the Driver Mode to “ASIO.” 4.
2 2.5 Connecting to a Computer Digital Sends and Returns StudioLive™ AI Software Library Reference Manual 2.5.2 Auxiliary Digital Sends Each StudioLive AI mixer features additional Digital Sends that can be routed in stereo pairs from the Setup tab in VSL-AI. Any combination of eight of the following stereo inputs and buses can be selected: •• Main Mix Left / Right •• Subgroup 1 and 2 •• Subgroup 3 and 4 •• Aux Send 1 and 2 •• Aux Send 3 and 4 •• Aux Send 5 and 6 •• Aux Send 7 and 8 (StudioLive 24.4.
2 2.6 Connecting to a Computer Using Plug-In Effects as Inserts StudioLive™ AI Software Library Reference Manual 2.5.3 Digital Returns Each StudioLive input is hard-coded to receive its respective digital return. Outputs 1 through 32/24/16 in your recording application route these playback streams to their respective channels on the StudioLive (that is, the software’s Output 1 always goes to StudioLive Channel 1 digital return and so on).
2 2.6 Connecting to a Computer Using Plug-In Effects as Inserts StudioLive™ AI Software Library Reference Manual 3. Once you have the routing set up in Studio One, drag-and-drop the Beat Delay plug-in onto your track and record-enable it. Software monitoring will be enabled automatically. 4. Press the Digital Return button on Channel 4 of your StudioLive. You can now monitor the analog signal from Channel 4 on your StudioLive with your inserted effect (in this case, Beat Delay).
3 3.1 Networking Your StudioLive AI mixer Step 1: Connect your StudioLive to your Network 3 Networking Your StudioLive AI mixer StudioLive™ AI Software Library Reference Manual Your StudioLive AI-series mixer provides you with two choices of connecting to a wireless router. You can either connect it directly to the router using an Ethernet cable, or connect it wirelessly using the included USB Wi-Fi adapter.
3 3.2 Networking Your StudioLive AI mixer Step 2: Connect your Computer to your Network StudioLive™ AI Software Library Reference Manual 4. Use the Value Encoder to scroll through the available networks. 5. When you have found the network you would like to use, press the Store button to join. Power User Tip: Your StudioLive AI mixer ships from the factory ready to connect to any wireless network named “studiolive” with a password of “studiolive”.
3 3.3 Networking Your StudioLive AI mixer Step 3: Connect your iPad to your Network 3.3 Step 3: Connect your iPad to your Network 1. Tap on the Settings icon in your iPad. 2. Tap on “General.” 3. Tap on “Network.” 4. Tap on “Wi-Fi.
3 3.3 Networking Your StudioLive AI mixer Step 3: Connect your iPad to your Network 5. StudioLive™ AI Software Library Reference Manual Under “Choose a Network,” find the same network you saved on your StudioLive from the list. Tap the network to select it. 6. Enter the password when prompted and tap Join. 7. Tap on the menu arrow to the right of the desired network’s name to open its network settings. 8. Turn Auto-Join to “On.
3 3.4 Networking Your StudioLive AI mixer Step4:ConnectyouriPhone/iPodtouchtoyourNetwork 3.4 Step 4: Connect your iPhone/iPod touch to your Network StudioLive™ AI Software Library Reference Manual 1. Tap on the Settings icon in your iPhone/iPod touch. 2. Tap on “Wi-Fi” making sure it is set to “On.” 3. Under “Choose a Network,” select the same network you saved on your StudioLive from the list. 4. Tap on the network to select it. 5. Enter the password when prompted and tap Join.
3 3.5 Networking Your StudioLive AI mixer Step 5: Setting iOS Permissions 3.5 Step 5: Setting iOS Permissions StudioLive™ AI Software Library Reference Manual Controlling your StudioLive remotely with StudioLive Remote-AI for iPad or QMix-AI for iPhone/iPod touch allows you to move about the venue freely. However, it can also put the full power of the StudioLive in multiple hands— some more adept than others.
3 3.5 Networking Your StudioLive AI mixer Step 5: Setting iOS Permissions StudioLive™ AI Software Library Reference Manual 3.5.1 StudioLive Remote for iPad Permissions When setting permissions for SL Remote-AI users, you will choose between giving full access to all SL Remote-AI functions or providing limited access to just a few aux-mix functions. In most cases, one iPad will be configured as front-of-house (FOH), and the others will be configured as aux mixes. Mix Permissions.
4 4.1 Universal Control-AI and VSL-AI Universal Control-AI Launch Window 4 Universal Control-AI and VSL-AI StudioLive™ AI Software Library Reference Manual Universal Control-AI includes two windows: the Launcher window and the Device window. For the StudioLive, the Device window is the Virtual StudioLive-AI (VSL-AI) application. VSL-AI provides bidirectional control of channel, subgroup, aux, and main-bus levels; Fat Channel parameters; aux mixes; effects; and the graphic EQs.
4 4.2 Universal Control-AI and VSL-AI VSL-AI: Browser StudioLive™ AI Software Library Reference Manual Safe Mode. Changes How the StudioLive Driver’s Buffer Size is Set. •• Low Latency. Input and output buffers are both identical to the Buffer Size setting. •• Normal Mode. Slightly increases the output buffer for typical operation. •• Safe Mode 1-2. Increases the output-buffer size for added stability. Block Size (Windows Only). Changes the StudioLive Buffer Size.
4 4.2 Universal Control-AI and VSL-AI VSL-AI: Browser StudioLive™ AI Software Library Reference Manual VSL-AI makes reorganizing all the scenes and presets stored on your StudioLive as easy as dragging-and-dropping a file. To load your StudioLive with new scenes and presets, simply drag any scene or preset from the On The Disk section of the browser to any position in the Device Memory section of the browser.
4 4.2 Universal Control-AI and VSL-AI VSL-AI: Browser StudioLive™ AI Software Library Reference Manual 4.2.1 VSL-AI: Panel Views VSL-AI allows you to customize your view based on your screen size and the amount of parameters you want to simultaneously view. The DSP, Aux, and FX panels of the VSL-AI window are individually available to hide or be shown depending on your needs. Additionally, you can choose to hide the Master and Fader sections.
4 4.3 Universal Control-AI and VSL-AI VSL-AI Overview Tab 4.3 VSL-AI Overview Tab StudioLive™ AI Software Library Reference Manual 4.3.1 Metering Controls At the bottom of the Panel Controls, you will find the Metering Controls. These controls correspond directly to the same controls available on your StudioLive AI mixer: Input Metering. Turns PFL input metering on and off. Switches the meters to display the pre-dynamics, pre-fader level of the input bus. GR Metering.
4 4.3 Universal Control-AI and VSL-AI VSL-AI Overview Tab StudioLive™ AI Software Library Reference Manual 4.3.2 DSP Panel & Channel Controls Digital Return Phantom Power Post EQ & Dyn Polarity Invert High Pass Filter Subgroup 1-4 Assign The Overview Tab provides the same controls for each channel that your StudioLive mixer does. The diagram to the left illustrates the available channel controls. The DSP Panel displays microviews of each of the Fat Channel components.
4 4.3 Universal Control-AI and VSL-AI VSL-AI Overview Tab StudioLive™ AI Software Library Reference Manual 4.3.3 Aux Panel When the Aux Panel opens, you will notice the Aux Masters view to the far right of the panel. The Masters view displays the controls for each aux bus as the controls appear on the StudioLive. The Masters view also displays the send levels for the Aux Flip Mode Channels (Main Digital Return, Tape Input, Aux In A and B, FXA, FXB, FXC, FXD, and Talkback).
4 4.3 Universal Control-AI and VSL-AI VSL-AI Overview Tab StudioLive™ AI Software Library Reference Manual 4.3.4 FX Panel The FX panel provides an overview of the FX send levels for all four FX buses on every channel. Power User Tip: To quickly set up an FX mix, use your mouse to set the send level for Channel 1. Right-click on the Channel 1 send level and sweep your mouse across the other channel sends for that FX bus. The send level will be copied to every other channel for that FX bus.
4 4.3 Universal Control-AI and VSL-AI VSL-AI Overview Tab StudioLive™ AI Software Library Reference Manual Copy Channel (Drag-and-Drop) At the top of the VSL-AI window, you will see the Copy Channel handle. This handle follows the selected channel and lets you drag-and-drop all the Fat Channel and bus assignments for that channel onto another channel or bus. Note: Channel bus assignments are only copied from channel to channel.
4 4.4 Universal Control-AI and VSL-AI VSL-AI: Fat Channel Tab StudioLive™ AI Software Library Reference Manual Mute Groups The Mute Groups tab in the Quickview mirror the functionality of the Mute Groups section on the StudioLive 32.4.2AI. See Section 4.7 in the StudioLive AI Mixers Owner’s Manual for details. Quick Scene Like the StudioLive 32.4.2AI, VSL-AI allows you to save scenes to Quick Scene buttons for easy recall. See Section 5.3.6 in the StudioLive AI Mixers Owner’s Manual for details.
4 4.5 Universal Control-AI and VSL-AI Loading Scenes and Presets from VSL-AI 4.5 Loading Scenes and Presets from VSL-AI StudioLive™ AI Software Library Reference Manual As stated in earlier, the browser window in VSL-AI functions in much the same way as the browser in Studio One. To load a scene or preset from the browser window, simply select it and drag it over the mixer or channel on which you wish to load it.
4 4.5 Universal Control-AI and VSL-AI Loading Scenes and Presets from VSL-AI StudioLive™ AI Software Library Reference Manual If you drag the preset over any of the component microview, VSLAI will load only that component (e.g., if you drag a preset over the compressor microview, only the compressor will be loaded). 4.5.4 Loading an FX Preset To load an FX preset, select it from the browser window and drag it onto the FX Master section on the FX Panel.
4 4.6 Universal Control-AI and VSL-AI VSL-AI: GEQ Tab StudioLive™ AI Software Library Reference Manual Note: You must be in the GEQ menu page and have the graphic EQ you wish to control selected in order to use the encoders on your StudioLive to control each graphic EQ in VSL-AI. See the Section 5.4 in the StudioLive AI Mixers Owner’s Manual for details. 4.6 VSL-AI: GEQ Tab The StudioLive AI Mixers feature a graphic EQ for each of the aux buses and a stereo graphic EQ for the main bus.
4 4.7 Universal Control-AI and VSL-AI Enabling Smaart Analysis (GEQ and PEQ) StudioLive™ AI Software Library Reference Manual 4.7.1 Time-Frequency Spectrograph Clicking on the Spectrograph button (from the Fat Channel EQ or GEQ tab) will launch the Time-Frequency Spectrograph. This spectrograph provides a three-dimensional view of your audio in which x = frequency, y = time, and color = decibel level. Any signal below the lower dynamic-range threshold is black.
4 4.7 Universal Control-AI and VSL-AI Enabling Smaart Analysis (GEQ and PEQ) StudioLive™ AI Software Library Reference Manual 4.7.2 RTA Clicking on the RTA button (from the Fat Channel EQ or GEQ tab) will launch a real-time analyzer in which x = frequency and y = amplitude. An RTA provides a close visual representation of what you are hearing. It provides a view of the long-term spectrum of the signal—for example, the onethird-octave spectrum long-term average of a musical performance.
4 4.7 Universal Control-AI and VSL-AI Enabling Smaart Analysis (GEQ and PEQ) StudioLive™ AI Software Library Reference Manual 4. Slowly bring the aux output level up until you hear (and see) feedback. Note: Ringing out stage monitors will produce feedback. If you are not careful, you can produce a lot of feedback. Do not make sudden gain boosts; go slowly and carefully to avoid causing any damage to speakers and ears. 5.
4 4.8 Universal Control-AI and VSL-AI VSL-AI: Setup Tab 4.8 VSL-AI: Setup Tab StudioLive™ AI Software Library Reference Manual The Setup tab allows you to customize VSL-AI and your StudioLive, route your auxiliary digital inputs, and set some user preferences. 4.8.1 Auxiliary Inputs Router In additions to the 32/24/16 input channels, the StudioLive AI-series mixers allow you to route any 16 of 27/23/19 buses and other inputs. This is done via the Auxiliary Inputs Router on the Setup tab.
4 4.8 StudioLive™ AI Software Library Reference Manual Universal Control-AI and VSL-AI VSL-AI: Setup Tab 4.8.2 Scene Recall Filters Your StudioLive allows you to decide which group of parameters you would like to recall with a scene. The Scene Recall menu on the Setup tab corresponds directly with the Scene Recall menu on your StudioLive. See Section 5.3.4 in the StudioLive AI Mixers Owner’s Manual for details. 4.8.
4 4.9 StudioLive™ AI Software Library Reference Manual Universal Control-AI and VSL-AI Smaart System Check Wizards 4. To lock your StudioLive, press the System button in the Digital Effects | Master Control section. 5. Navigate to the Lockout menu. Your StudioLive cannot be locked unless this page is active. 6. To lock your StudioLive, press the Select buttons that correspond to the 5-digit password you have set.
4 4.9 StudioLive™ AI Software Library Reference Manual Universal Control-AI and VSL-AI Smaart System Check Wizards Clicking on the Smaart button at the top of the VSL-AI window will launch Smaart System Check mode. While in this mode you can launch any of the following wizards: •• SRA: Smaart Room Analysis generates a frequency-response trace and overlays it on the parametric EQ in VSL-AI so you can adjust your system to get rid of unwanted anomalies in the room.
4 4.9 Universal Control-AI and VSL-AI Smaart System Check Wizards StudioLive™ AI Software Library Reference Manual 1. To launch the Room Analysis wizard, click on the Room Analysis tab. 2. You will be instructed to connect a measurement microphone to the Talkback input on the back of your StudioLive AI mixer. WARNING: Power down unit before removing option card 3. Set the Talkback trim pot on the back of your mixer to 12 o’clock. WARNING: Power down unit before removing option card 4.
4 4.9 StudioLive™ AI Software Library Reference Manual Universal Control-AI and VSL-AI Smaart System Check Wizards Basic Analysis 1. Select Basic Analysis from the pull-down menu. 2. Place your microphone on-axis in front of the speaker you want to analyze. If you are analyzing a stereo bus, place your microphone on-axis in front of the Left speaker. See Section 4.9.5 for tips in choosing the best primary mic position. 1 3. Click OK when your microphone is properly placed. 4.
4 4.9 StudioLive™ AI Software Library Reference Manual Universal Control-AI and VSL-AI Smaart System Check Wizards 7. Click Analyze to generate the frequency-response trace. 8. Adjust the EQ to shape the frequency-response into the correct trend for your application. (See Sections 4.9.6 and 4.9.7 for best practices.) In general, you do not want to boost any frequencies, and you do not want to make any cuts greater than 6 dB. The frequency-response trace will refresh as you make your changes. 9.
4 4.9 Universal Control-AI and VSL-AI Smaart System Check Wizards StudioLive™ AI Software Library Reference Manual 3. Click OK when your microphone is properly placed. 4. Raise the fader until the pink-noise output through your speaker is louder than the ambient noise floor in the room. At the appropriate measurement level, you should not hear the air conditioning, traffic noise from the street, etc. 5. To mute the pink noise at any time, simply click on the Speaker icon. 6.
4 4.9 StudioLive™ AI Software Library Reference Manual Universal Control-AI and VSL-AI Smaart System Check Wizards 10. Click Analyze to generate the second frequency-response trace. 11. Place your microphone in a different off-axis position in front of the same speaker. See Section 4.9.5 for tips in choosing the best secondary mic positions. 3 12. Click OK when your microphone is properly placed. 13. Click Analyze to generate the third frequency-response trace. 14.
4 4.9 StudioLive™ AI Software Library Reference Manual Universal Control-AI and VSL-AI Smaart System Check Wizards 4.9.2 Smaart System Delay Wizard Using multiple sets of speakers in a live performance can make a huge difference in the quality of the sound. Rather than relying on a pair of front-of-house speakers to fill the entire room, you can create listening zones throughout the room so that your front-of-house system only needs to be loud enough to cover the front of the room.
4 4.9 StudioLive™ AI Software Library Reference Manual Universal Control-AI and VSL-AI Smaart System Check Wizards In the above example, you see three sets of speakers: main front-of-house, sidefills for the middle of the room, and rear fills for the back. As a general rule, you should set the delay on a satellite system based on its distance from the next closest system to the mains.
4 4.9 StudioLive™ AI Software Library Reference Manual Universal Control-AI and VSL-AI Smaart System Check Wizards 5. From the bottom pull-down menu, select the speaker output to which you’d like to align. This can be your main outputs or any of the subgroup outputs, even if the subgroup outputs have been delayed. 6. Click OK to start the wizard. 7. Place your microphone on-axis in front of the speaker you want to delay. See Section 4.9.5 for tips in choosing the best primary mic position. 1 8.
4 4.9 Universal Control-AI and VSL-AI Smaart System Check Wizards StudioLive™ AI Software Library Reference Manual 11. Click Analyze. 12. If necessary, adjust the pink noise level for your delay system (the speaker you want to delay) so that it is louder than the ambient noise floor in the room. 13. Click Analyze to calculate the delay time. 14. When the wizard is finished, you will be shown the measured delay time. 15. Click Apply to set that measure delay time on the subgroup out. 16.
4 4.9 StudioLive™ AI Software Library Reference Manual Universal Control-AI and VSL-AI Smaart System Check Wizards Once you have positioned and delayed your satellite system, you will want to match the output levels of the main and delay systems. To do this, use an SPL meter to match the output of the main and delay systems at the delay-system measurement position.
4 4.9 Universal Control-AI and VSL-AI Smaart System Check Wizards StudioLive™ AI Software Library Reference Manual 4.9.4 Go Remote At any point during any of the Smaart System Check wizards, you can switch over to iPad control using SL Remote-AI. This allows you to continue to the next step of the wizard without having to walk back to front-ofhouse, which is especially useful when placing your measurement mic. 1.
4 4.9 StudioLive™ AI Software Library Reference Manual Universal Control-AI and VSL-AI Smaart System Check Wizards 4.9.5 Mic Position The SRA and SSD wizards do all of the calculations and complex routing through the StudioLive for you. Two very important decisions are up to you: Where to place the mic and, in the case of the SRA wizard, what to do with the frequency-response trace. Improper mic placement can create “problems” in your trace that actually don’t exist in your sound system.
4 4.9 StudioLive™ AI Software Library Reference Manual Universal Control-AI and VSL-AI Smaart System Check Wizards A word of caution about ground bounce: Ground reflections become an issue when a speaker is flown and angled down. The proper mic position, in this case, will also catch the reflection of the signal off the floor. Reflection arrives ~4ms late...
4 4.9 Universal Control-AI and VSL-AI Smaart System Check Wizards StudioLive™ AI Software Library Reference Manual •• Do a multi-point measurement. Enough measurement positions will randomize the effect of the floor bounce. 4.9.6 System Alignment Rules The visual result of a sound-system test can be a powerful tool; however, like any powerful tool, you must be responsible about how you wield it. Here are few basic principles to follow: Solve the problem at its source.
4 4.9 StudioLive™ AI Software Library Reference Manual Universal Control-AI and VSL-AI Smaart System Check Wizards 4.9.7 Using the Trace: Spotting the Trend As discussed in the previous section, many factors can affect the response of a sound system: the room, system configuration, electronics, wiring, and more. Part of understanding what you see is knowing what you should not be seeing—or at least having a basic idea of what to expect.
4 4.9 StudioLive™ AI Software Library Reference Manual Universal Control-AI and VSL-AI Smaart System Check Wizards Music Playback/Reproduction Subs Speech Intelligibility 100 Hz 2 to 4 kHz Power User Tip: The amplitudes depicted in the trend examples shown here are guidelines: examples of very general slopes required for different applications.
4 4.9 Universal Control-AI and VSL-AI Smaart System Check Wizards StudioLive™ AI Software Library Reference Manual What about all the other bumps and dips? Remember: The frequency-response trace is not a video game. You don’t need to put a filter on every bump or dip in your trace when a few carefully placed filters will achieve a much better result. This is also why the wizard overlays the trace on your parametric EQ.
5 4.9 StudioLive Remote-AI for iPad Smaart System Check Wizards 5 StudioLive Remote-AI for iPad StudioLive™ AI Software Library Reference Manual StudioLive Remote-AI (SL Remote-AI) for iPad provides an unprecedented level of remote control over your StudioLive. With SL Remote-AI, you can adjust level, pan, dynamics, bus routing, FX mixes, aux mixes, and GEQ settings from an Apple iPad via a wireless network. All you need is a Wi-Fi router and an Apple iPad, and you’re ready to get started.
5 5.1 StudioLive Remote-AI for iPad Overview Page 5.1 Overview Page StudioLive™ AI Software Library Reference Manual The Overview page in StudioLive Remote-AI corresponds directly with most of the controls on the Overview page in VSL-AI.
5 5.1 StudioLive Remote-AI for iPad Overview Page StudioLive™ AI Software Library Reference Manual To make changes to the Fat Channel dynamics processing, tap on any of the microviews. This will launch the Fat Channel zoomed view, with that component in focus; for example, if you tap on the Compressor microview, the Fat Channel zoom will open with the Compressor in focus. You can switch between the dynamics components in the zoomed Fat Channel view by swiping your finger to the left or right.
5 5.2 StudioLive Remote-AI for iPad Aux Mix Page StudioLive™ AI Software Library Reference Manual Metering. Displays the Signal Level for Each Channel. To the left of the fader, you will see the meter for the channel. The meter will follow the meter mode selected on the StudioLive or from VSL-AI. The meter mode cannot be changed from SL Remote-AI. 5.1.
5 5.2 StudioLive Remote-AI for iPad Aux Mix Page StudioLive™ AI Software Library Reference Manual 5.2.1 Aux Mix Select and Aux Mixing To create an aux mix using StudioLive Remote-AI, tap anywhere in the Aux Mix Select tab for that aux. The selected Aux Mix tab will be highlighted to alert you that its individual channel-send levels will be displayed below. •• The Gate, Compressor, and EQ microviews function the same for auxes as they do for channels and mains.
5 5.2 StudioLive Remote-AI for iPad Aux Mix Page StudioLive™ AI Software Library Reference Manual 5.2.3 FX Mix Select and FX Bus Mixing To create an effects mix using SL Remote-AI, tap anywhere in the FX Mix Select tab for that FX bus. The selected FX Mix tab will be highlighted to alert you that its individual channel-send levels will be displayed below. •• The Gate, Compressor, and EQ microviews function the same for auxes as they do for channels and mains.
5 5.3 StudioLive Remote-AI for iPad GEQ Page 5.3 GEQ Page StudioLive™ AI Software Library Reference Manual The Main GEQ page provides a focused view for the stereo 31-band graphic EQ available on the main bus. GEQ On/Off Button. Turns a Graphic EQ On or Off. By default, each graphic EQ is turned off. To enable a graphic EQ, tap the GEQ On. Power User Tip: If you are making adjustments to a graphic EQ, and you can’t hear your changes, make sure it is on! GEQ Flatten Button.
5 5.4 StudioLive Remote-AI for iPad Scenes Page StudioLive™ AI Software Library Reference Manual Draw Tool. Allows You to Draw an EQ Curve with Your Finger. SL Remote-AI provides flexible control over your graphic EQ settings. You can control each band individually, or several bands at once, via the sliders, or you can simply draw in an EQ curve and fine-tune from there. To enable EQ-curve drawing, tap the Draw button and slide your finger over the graphic EQ bands.
5 5.5 StudioLive Remote-AI for iPad Settings Page StudioLive™ AI Software Library Reference Manual Default to Fader Locate. Activates Fader Locate on StudioLive when Fader is Moved Remotely. With the Default to Fader Locate preference enabled, Fader Locate will automatically engage when a fader is moved remotely in StudioLive Remote-AI. This preference allows you to quickly sync your StudioLive when you return to the board.
5 5.6 StudioLive Remote-AI for iPad Channel Zoom Page 5.6 Channel Zoom Page StudioLive™ AI Software Library Reference Manual The Channel Zoom page opens automatically when you turn your iPad to the Portrait view. This page provides you with a look at every controllable parameter for a channel or bus.
6 6.1 QMix-AI for iPhone and iPod Touch Aux Mix Page 6 QMix-AI for iPhone and iPod Touch StudioLive™ AI Software Library Reference Manual QMix-AI for iPhone and iPod touch puts each musician’s monitor (aux) mix in his or her own hands. With QMix-AI, you can adjust each StudioLive channel’s auxsend level to taste and can create a group of channels that you simultaneously control with the amazing Wheel of Me.
6 6.2 QMix-AI for iPhone and iPod Touch Wheel of Me StudioLive™ AI Software Library Reference Manual Channel Send Levels. Sets the Channel Send Levels to the Selected Aux Bus. To adjust the send levels for any channel, tap anywhere in the channel’s level control and move your finger up or down while maintaining constant contact with the screen.
6 6.2 QMix-AI for iPhone and iPod Touch Wheel of Me StudioLive™ AI Software Library Reference Manual Once you’ve identified these channels as your “Me” channels, the Wheel of Me will increase or decrease the level of these channels concurrently, allowing you to create a DCA group of your most critical channels in your monitor mix. To return to the Wheel of Me, tap the Aux button in the upper left-hand corner. Wheel of Me. Controls the Level of the Me Channels.
6 6.3 QMix-AI for iPhone and iPod Touch Settings Page 6.3 Settings Page StudioLive™ AI Software Library Reference Manual To open the Settings page, tap on the Settings button on the Aux Mix page or Wheel of Me page. From the Settings page, you can customize QMix-AI scrolling and metering. Scroll by Page. Scrolls through Channels by Page. When the Scroll by Page option is enabled, the mixer will scroll through channels by entire pages, rather than by individual channels.
7 7.1 Capture 2 Installation Instructions 7 Capture 2 StudioLive™ AI Software Library Reference Manual PreSonus® Capture™ 2 is a multitrack digital-audio recording application designed to make recording with StudioLive™ mixers quick and easy. With the look and feel of a digital multitrack hard-disk recorder, it is instantly familiar.
7 7.1 Capture 2 Installation Instructions 3. StudioLive™ AI Software Library Reference Manual Once Capture has been copied to your hard drive, it is ready to use. Simply open your Application folder and double-click on the Capture 2 icon. 7.1.2 Windows The Windows® installer for Capture 2 was designed with easy-to-follow onscreen instructions to make the installation process quick and simple. 1. When you launch the Capture.exe file, a Welcome screen will launch.
7 7.2 Capture 2 Start Page 7.2 Start Page StudioLive™ AI Software Library Reference Manual You will be taken to the Start page when Capture 2 is launched. The Start page allows you to create a new Session, open a Session stored on your computer, view recent Sessions, and verify that your StudioLive is properly communicating with its driver. In addition, you can begin recording instantly by clicking the Record Now button. 7.2.
7 7.2 StudioLive™ AI Software Library Reference Manual Capture 2 Start Page 7.2.2 Creating a Session Below the Name Scheme fields, you will find the New Session button. Click on the New Session button to create an empty Session. Power User Tip: A Session is a Capture file in which you record, arrange, and edit your audio files. Session files should not be confused with audio files. Think of a Capture Session as you would a StudioLive scene.
7 7.2 StudioLive™ AI Software Library Reference Manual Capture 2 Start Page You can choose a different file location by clicking on the Browse button and browsing to a new location. The last known save location will appear as the default the next time you create a new Session. Power User Tip: The Name Scheme fields have been added to Capture 2 to help keep your Sessions organized and to make your archived library of live performances more easily searchable.
7 7.2 StudioLive™ AI Software Library Reference Manual Capture 2 Start Page 7.2.4 Audio Device, Networking, and Sample Rate Audio Device and Sample Rate Capture 2 was created for use with PreSonus StudioLive-series mixers and fully functions only with them. The Audio Device menu displays the currently selected audio driver. When a StudioLive is connected to your computer via FireWire, you should select “PreSonus” from the Audio Device list.
7 7.2 StudioLive™ AI Software Library Reference Manual Capture 2 Start Page You will then see your StudioLive listed at the bottom of the Start page, and the icon will show your StudioLive AI mixer. Power User Tip: You can also control your StudioLive AI mixer over FireWire by launching Universal Control-AI and running it in the background. VSL-AI does not need to be launched. 7.2.5 Options Menu The Options button can be found just above the bottom of the Start page. This launches the Options menu.
7 7.2 Capture 2 Start Page StudioLive™ AI Software Library Reference Manual Power User Tip: The higher the Pre-Record buffer is set, the more RAM Capture 2 will require. For example, a 32-track recording with a Pre-Record buffer of 1 minute will require approximately 800 MB more RAM than the same recording set with a buffer of 5 seconds.
7 7.3 Capture 2 The Session Page 7.3 The Session Page StudioLive™ AI Software Library Reference Manual Capture 2 features a single-window user interface so you don’t need to manage multiple windows and views. When a new Session is created, or an existing Session is opened, you will be taken to the Session page. This page contains all of the necessary tools to record and edit multitrack audio. Capture 2 takes full advantage of the StudioLive’s bidirectional FireWire bus and hardwired configuration.
7 7.3 StudioLive™ AI Software Library Reference Manual Capture 2 The Session Page 7.3.1 Track Column Along the left side of the Session page, you will find the Track column. The Track column contains a dedicated audio track for each audio input into Capture 2 from the StudioLive AI mixer, including a stereo track to record any of the auxiliary digital sends (see Section 2.5.4), and provides the following essential functions: Track Naming.
7 7.3 StudioLive™ AI Software Library Reference Manual Capture 2 The Session Page Track Controls. Each track in the Track column features the same controls. Power User Tip: The track number to the left of each track in the list corresponds directly to the same channel number on your StudioLive AI mixer. •• Record Arm Button. Next to each track number is the Record Arm button. When this button is active, Capture 2 is ready to record audio that is routed to the track. •• Track Mute.
7 7.3 Capture 2 The Session Page StudioLive™ AI Software Library Reference Manual 7.3.3 Time Display The Time Display provides you with critical information about your recording. •• Session Name. Displays the name of the current Session. •• Record Duration. Displays how long the current Session has been recording. •• Cursor Time. Displays the current timeline position of the playback cursor. •• Remaining Time.
7 7.3 Capture 2 The Session Page StudioLive™ AI Software Library Reference Manual Scrolling To scroll left and right through time in your Session, click-and-drag the horizontal scroll bar near the bottom of the Edit window. You can also scroll through your Session by clicking and dragging the Timeline Ruler left or right. Locate Selection To jump the playback cursor to the beginning of any audio event, press L on the keyboard or select Session>Locate Selection. 7.3.
7 7.3 Capture 2 The Session Page StudioLive™ AI Software Library Reference Manual Move an Event. To move an audio event using the Arrow tool, click anywhere on the event and drag left, right, up, or down. Dragging the event left or right will move the event backward or forward in time. When dragging an event left or right beyond the viewable arrangement, hold [Space Bar] on the keyboard to speed up the scrolling. Dragging the event up or down will move the event to another track.
7 7.3 Capture 2 The Session Page StudioLive™ AI Software Library Reference Manual Size an Event. Events can be thought of as windows into audio files and musical performances, where what you see is what you hear. You can resize events to make them shorter or longer so that only a portion of the audio or musical data is seen and heard. To size any event using the Arrow tool, float the mouse to the left or right edge of the event to reveal the Sizing tool.
7 7.3 Capture 2 The Session Page StudioLive™ AI Software Library Reference Manual The Range tool can be useful in several ways: •• You can use the Range tool to select the content of several audio events across multiple tracks for a specific portion of a song (say, an amazing drum groove) and then use the Arrow tool to move that section of audio to another section of a song (say, to replace a drum groove).
7 7.3 Capture 2 The Session Page StudioLive™ AI Software Library Reference Manual 7.3.6.5 Common Editing Actions Like most software applications, Capture 2 supports basic cut, copy, and paste actions. Once you’ve selected an event, or a range of events, you can perform these actions as follows: •• Cut: Press [Ctrl]/[Cmd]+X on the keyboard to cut the current selection or select Edit>Cut. •• Copy: Press [Ctrl]/[Cmd]+C on the keyboard to copy the current selection or select Edit>Copy.
7 7.3 Capture 2 The Session Page StudioLive™ AI Software Library Reference Manual 7.3.6.7 Bounce Selection Once you have edited an audio file, you may wish to create a new audio file that includes all of your edits. To do this, use the Range tool to select the events you would like to merge as described in Section 7.3.6.2 and press [Ctrl]/[Cmd]+[B] on the keyboard or go to Edit>Bounce Selection. 7.3.
7 7.3 Capture 2 The Session Page StudioLive™ AI Software Library Reference Manual When this button is engaged, the lower three-quarters of the Session page will display detailed metering for every track. While in this mode, the Marker Lane, transport, mode buttons, and editing tools will still be visible. 7.3.8 Markers and the Marker List The Marker Lane. The Marker Lane is located just below the Timeline Ruler. It displays any markers you have created.
7 7.3 Capture 2 The Session Page StudioLive™ AI Software Library Reference Manual Naming Markers. To rename a marker, double-click on the marker in the Marker Lane, type in a new name, and then press [Enter] on the keyboard. Moving Markers. To move a marker, click on it in the Marker Lane and drag it to the desired location. Marker List. At the bottom of the Marker List, you will find three buttons: Adding Markers. Click on Add Marker to add a marker at the current playback-cursor position.
7 7.4 Capture 2 Recording a Session in Capture 7.4 Recording a Session in Capture StudioLive™ AI Software Library Reference Manual Setting Input Levels. Setting the proper input level is critical to making a good live mix and a good recording. The basic idea is to set the input gain on the StudioLive AI mixer as high as possible without overloading the input. Overloading the input will cause clipping (digital distortion), which is particularly unpleasant and will ruin the recording.
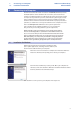
7 7.5 Capture 2 Virtual Soundcheck StudioLive™ AI Software Library Reference Manual 2. From your empty Session, click on the Soundcheck Mode button in the upper right corner of the Session page. 3. Capture will automatically search your computer for Sessions and will open a list from which you can choose a Session to use for virtual soundcheck. Power User Tip: Sessions that match the metadata tags entered on the Start page will be listed first.
7 7.6 Capture 2 Saving and Loading StudioLive AI Mix Scenes StudioLive™ AI Software Library Reference Manual 8. The track labels from the soundcheck Session are automatically loaded into your blank recording Session. Power User Tip: If you have Sync Names engaged, all your track names will be broadcast to your StudioLive AI mixer, VSL-AI, SL Remote-AI, and QMix-AI. 7.6 Saving and Loading StudioLive AI Mix Scenes In Capture 2.
7 7.7 Capture 2 Importing and Exporting Audio Files StudioLive™ AI Software Library Reference Manual 3. Click on Open to import the file into your Session. 4. An audio event for the imported file will be created and placed on the currently selected track in your Session, at the current playback-cursor position. Power User Tip: When browsing for files in the Import File menu, it is possible to listen to the audio files in the Preview Player.
7 7.8 Capture 2 Mixing Your Capture Sessions StudioLive™ AI Software Library Reference Manual Format. In the middle section of the Export to Audio File menu, select the format of the mixdown audio file. Choose from WAV or AIFF and choose the desired resolution and sample rate. If you wish to put your audio on a standard audio CD, the format should be a WAV file with 16-bit resolution and a 44.1 kHz sample rate. Options.
7 7.8 Capture 2 Mixing Your Capture Sessions StudioLive™ AI Software Library Reference Manual 3. Enable all the digital returns on your StudioLive AI mixer. 4. In Capture 2, select the Auxiliary Stereo Track and arm it to record. 5. Bring the playback-cursor position to the beginning of the Session by clicking the Return to Zero button in the transport. 6.
7 7.8 Capture 2 Mixing Your Capture Sessions StudioLive™ AI Software Library Reference Manual 7.8.4 Mixing a Capture 2 Session in a Different Recording Application For users who wish to mix their Capture 2 Session in a DAW other than Studio One, there are several ways in which to import your Capture 2 Session. Save a Capture 2 Session as OpenTL Many audio-recording programs can open OpenTL (Open Track List) files.
7 7.9 Capture 2 Capture 2 Key Commands 7.
StudioLive™ AI Software Library Reference Manual 8 8.1 Studio One Artist Quick Start Installation and Authorization 8 Studio One Artist Quick Start Your StudioLive AI mixer comes with Studio One Artist recording and production software. Whether you are about to record your first album or your fiftieth, Studio One Artist provides you with all of the tools necessary to record and mix a great performance.
8 8.1 Studio One Artist Quick Start Installation and Authorization StudioLive™ AI Software Library Reference Manual If your computer is not connected to the Internet, skip to Section 8.1.4 “Activating Studio One Artist Offline.” If you already have a PreSonus user account, you can skip to Section 8.1.3 “Activating Studio One Artist Online.” 4. Fill out the user registration form. You will be asked to create a username and password.
8 8.1 Studio One Artist Quick Start Installation and Authorization StudioLive™ AI Software Library Reference Manual 3. Click on the Activate button to finish the activation process. Please skip to Section 8.1.5 for instructions on installing content. 8.1.4 Activating Studio One Artist Offline 1. Click on the Activate Offline Link. 2. Write down the Activation Code listed under Step 3 in the onscreen instructions. You will need this for Step 9. Activation Code: ____________________________________ 3.
8 8.1 Studio One Artist Quick Start Installation and Authorization StudioLive™ AI Software Library Reference Manual 4. Fill out the PreSonus Registration form. 5. Once you have created your user account, log in and click on the Software Registration button. 6. Enter the Product Key located on the Studio One Artist disc wallet and click “Submit.” 7. Click on the Activate Software button. 8. Enter the Activation Code you wrote down in Step 2.
8 8.1 Studio One Artist Quick Start Installation and Authorization StudioLive™ AI Software Library Reference Manual 9. Click on the Download License button. 10. A file called “Studio One 2 Artist.license” will be saved onto your computer. You will need to copy this onto a piece of removable media and transfer it onto the computer on which you want to run Studio One Artist. 11. After installing Studio One Artist, launch the program, and the Activate Studio One menu will appear. 12.
8 8.1 Studio One Artist Quick Start Installation and Authorization StudioLive™ AI Software Library Reference Manual 8.1.5 Installing Bundled Content for Studio One Artist The Studio One Artist bundle includes all that you need to begin producing music. This includes an array of demo and tutorial material, instruments, loops, samples, and other third-party content. Upon completing the Studio One Artist installation and activation process, the Studio One Content Installer will appear. 1.
8 8.1 Studio One Artist Quick Start Installation and Authorization StudioLive™ AI Software Library Reference Manual 8.1.6 Installing Third-Party Content To install any of the third-party content, click on the arrow button next to its name in the content list (Celemony Melodyne Trial and Native Instruments Komplete Player). Notice that next to Native Instruments Komplete a serial number is listed. You will need this number to authorize the plug-in the first time you open it.
8 8.2 Studio One Artist Quick Start Creating a New Song StudioLive™ AI Software Library Reference Manual Selecting a Different Audio Driver from the Start Page. If you do not see “PreSonus FireStudio” on the Start page when you launch Studio One, click on the Configure Audio Devices link in the Setup area to open the Audio Setup Options window. In the Audio Device menu, select “PreSonus FireStudio.” Click the Apply button and then OK.
8 8.2 Studio One Artist Quick Start Creating a New Song StudioLive™ AI Software Library Reference Manual 4. Make sure the Sample Rate matches the rate set on your StudioLive mixer. You can also determine the length of your Song and the type of time format you would like to use (Notation Bars, Seconds, Samples, or Frames). 5.
8 8.3 Studio One Artist Quick Start Creating Audio Tracks StudioLive™ AI Software Library Reference Manual 12. If you would like the same inputs to be available every time you launch Studio One Artist, click the “Make Default” button. 13. Click on the Outputs tab, and you will see all of the available outputs on your StudioLive. We recommend that you create a mono output for each of your StudioLive’s digital returns and a stereo output for the Main Digital Return on your StudioLive. 14.
8 8.3 StudioLive™ AI Software Library Reference Manual Studio One Artist Quick Start Creating Audio Tracks Once you have added your tracks, you can assign the input by simply clicking on the input to which a track is currently assigned. This will bring up the inputs list. You can also access the audio I/O setup from here. If you would like to add a track for each of the available inputs and have the routing automatically assigned, simply go to Track | Add Tracks for All Inputs. 8.3.
StudioLive™ AI Software Library Reference Manual 8 8.4 Studio One Artist Quick Start Adding Virtual Instruments and Plug-in Effects to Your Song 8.4 Adding Virtual Instruments and Plug-in Effects to Your Song You can add plug-ins and instruments to your Song by dragging-and-dropping from the browser.
8 8.5 Studio One Artist Quick Start Recording in Studio One Artist StudioLive™ AI Software Library Reference Manual 8.4.2 Drag-and-Drop Effects To add a plug-in effect to a track, click the Effects button and select the plug-in or one of its presets in the effects browser, then drag the selection over the track to which you would like to add the effect. 8.4.
8 8.5 Studio One Artist Quick Start Recording in Studio One Artist StudioLive™ AI Software Library Reference Manual 4. Select Record Enable on your track in Studio One Artist. 5. Turn up the Channel 1 level while speaking/singing into the microphone. You should see the input meter in Studio One Artist react to the input. 6. Adjust the gain so the input level is near its maximum without clipping (distorting). 7. Connect a set of headphones to the StudioLive headphone output 8.
8 8.5 Studio One Artist Quick Start Recording in Studio One Artist StudioLive™ AI Software Library Reference Manual 9. Enable the Main bus in the monitor bus on your StudioLive so you can monitor through headphones or using the Control Room Outs on your StudioLive and your studio monitors. In Studio One, click Record. 10. Sing or speak into the microphone. 11. When you are done, click the Stop button in Studio One or press the Space bar to stop the recording. 12.
8 8.6 Studio One Artist Quick Start Mixing Capture Sessions in Studio One Artist 8.6 Mixing Capture Sessions in Studio One Artist StudioLive™ AI Software Library Reference Manual Capture and Studio One were designed to work with one another, as well with as the StudioLive AI mixers and the rest of the software applications in the StudioLive AI Software Library. Built into Studio One 2.6 and later is a Native Effects™ plug-in version of the StudioLive AI Fat Channel.
8 8.6 Studio One Artist Quick Start Mixing Capture Sessions in Studio One Artist StudioLive™ AI Software Library Reference Manual If your Capture Session has a StudioLive AI mix scene saved with it, your Studio One mixer will load the scene, complete with all your Fat Channel settings, fader levels, FX sends, mutes, solos, pan settings, and bus assignments. This allows you to mix your Capture sessions with the same Fat Channel settings you used live, even when you’re away from your StudioLive AI mixer.
Dinner is Served Added bonus: PreSonus’ previously Top Secret recipe for… Redfish Couvillion Ingredients: •• •• •• •• •• •• •• •• •• •• •• ¼ C Vegetable oil ¼ C flour 1 onion diced 1 clove garlic minced 1 green pepper diced 3 celery stalks diced 1 14oz can diced tomatoes 1 bottle light beer 2 bay leaves 1 tsp thyme 2 lbs Redfish fillets Cooking Instructions: 1. 2. 3. 4. 5. 6. 7. In a heavy saucepan or large skillet, heat oil on medium high and slowly add flour a tablespoon at a time to create a roux.
StudioLive AI Software Library Reference Manual ™ Universal Control-AI with Virtual StudioLive-AI and Smaart System Check Wizards | StudioLive Remote-AI for iPad | QMix -AI for iPhone /iPod touch Capture 2 | Studio One Artist ® ® ™ ™ ® ® ® ® 18011 Grand Bay Ct. • Baton Rouge, Louisiana 70809 USA • 1-225-216-7887 www.presonus.