MultiPad 4 Diamond 7.85 3G PMP7079D3G_QUAD|PMP7079E3G_QUAD Tablet PC User Manual Version 1.0 www.prestigio.
About this user manual This user manual is specially designed to detail the device’s functions and features. -- Please read this manual before using the device to ensure safe and proper use. -- Descriptions are based on the device’s default settings. -- Images and screenshots may differ in appearance from the actual product. -- Prestigio continuously strives to improve its products. Due to software upgrading, some contents in this user manual may be different from your product.
Contents 1.
7.
Receive data via Bluetooth ���������������������������������������������������������������������������������������������������38 Send data via Bluetooth ��������������������������������������������������������������������������������������������������������38 12.
1. Unboxing 1 Open your package • Prestigio MultiPad • Travel charger • Carrying case • USB cable • OTG cable • Quick start guide • Legal and safety notices • Warranty card Your tablet at a glance Headset jack Front camera Power button Rear camera Volume button Touch screen Memory card slot SIM card slot Speaker Micro USB port Microphone Buttons Button Definition Function Power • Press and hold to power on or off your tablet. • Press to lock or unlock the screen display.
2. Getting started Congratulations on your purchase and welcome to Prestigio. To get the most from your product and enjoy all Prestigio has to offer, please access: http://www.prestigio.com/catalogue/MultiPads More details about your product, please access: http://www.prestigio.com/support 2 Please read the "Legal and safety notices" on your package before use. • Do not cover the antenna area with your hands or other objects. This may cause connectivity problems.
Power on your tablet Press and hold the Power button for a few seconds to power on your tablet. 1. When turning on the device for the first time, follow the on-screen instructions to set up your device. 2. After setting up your tablet, there is an Installer Prestigio wizard appears on the screen. It offers you some third-party apps, tap the apps you want to install on your tablet. Follow the on-screen instructions to install the apps. 3. It might take a certain time for your tablet to install the apps.
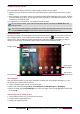
Remove an item on the Home screen 1. Tap and hold an item to remove. 2. The Remove option appears at the top of the Home screen. 3. Drag the item to the Remove option. 4. When the Remove option turns red, release the item. List menu All yours apps' icons can be found on the list menu. You also can find all the widgets of the apps on the list menu. On home screen, tap to open list menu. The list menu can have multiple panels. To view other panels, swipe left or right.
3. Basics 3 Finger tips Only use your fingers to use the touch screen. Tap Tap and hold To open an application, to select a menu item, to Tap and hold an item for more than 2 seconds press an on-screen button, or to enter a to access available options. character using the on-screen keyboard, tap it with a finger. Swipe Quickly swipe your finger vertically or horizontally across the screen to go to other Home pages, scroll through documents, and more.
Scroll Flick Drag up or down to scroll. On some screens, such Flick left or right on the Home screen or the as webpages, you can also scroll side to side. Applications screen to see another panel. Flick up or down to scroll through a webpage or a list, such as contacts. Motion gesture Rotate your tablet for a better view For many screens, you can automatically change the screen orientation from portrait to landscape by turning your tablet sideways.
lways use authentic accessories as they enable your tablet to perform at its peak. A Nonauthentic accessories (eg. chargers) may damage your tablet. • You can use the tablet while it is charging. • The only way to turn off the charger is to unplug it, so it is advisable to use an easily accessible power socket. Optimize your battery performance Here are some steps to help you optimize your battery performance. -- Always ensure that your tablet profile is appropriately set to meet your actual usage.
unlock the screen every time your tablet is powered on or when it’s idle for a certain period of time. 1. On home screen, tap to open list menu. 2. Tap Settings > Security > Screen lock. Setting a slide unlock 1. On home screen, tap to open list menu. 2. Tap Settings >Security > Screen lock > Slide. Setting a face unlock 1. On home screen, tap to open list menu. 2. Tap Settings > Security > Screen lock > Face Unlock. 3. Fit your face in the frame to be captured. Setting a pattern 1.
When you get a new notification, you can open the Notifications panel to see what event notification or new information you have received. You can also quickly access settings from the Notifications panel. -- To open the Notifications panel, slide down from the top of the screen. -- To close the Notifications panel, drag up the bar that is on the bottom of the screen. -- To dismiss the notification, tap .
-- Timeout: adjust the screen timeout. -- Auto rotation: allow or prevent the interface from rotating when you rotate the device. -- Audio profiles: switch to General, Silent, Meeting or Outdoor profiles quickly. Enter text Use the onscreen keyboard to enter text, such as contact information, mail, and web addresses. Depending on the app and the language you’re using, the keyboard may correct misspellings, predict what you’re typing, and even learn as you use it.
Copy and paste text 1. After you have selected the text you want to copy, tap . The selected text is then copied to the clipboard. 2. In a text entry field, press at the point where you want to paste the text. 3. Tap Paste. Move a text 1. After you have selected the text you want to cut, tap . The selected text is then cut to the clipboard. 2. In a text entry field, press at the point where you want to paste the text. 3. Tap Paste.
Status icons The icons in the status bar at the top of the screen give information about your tablet: Icons What it means Icons What it means Silent mode activated. 3G network connected. Vibration mode activated. Wi-Fi connected. Flight mode activated. Roaming (outside of normal service area). Battery power level. Bluetooth is activated. Call in progress. Connected to PC. Missed call. Wired microphone headset connected. New SMS or MMS. Wired headset connected. GPRS network connected.
4. Web & network You can connect your tablet to Internet and browse a webpage on the website. Connect to Internet 4 Your tablet connects to the Internet whenever necessary, using a Wi-Fi connection (if available) or your mobile operator's data connection. Data connection You can use your mobile operator's data connection. Some apps and services may transfer data over your mobile operator's cellular network, which may result in additional fees. Contact your mobile operator for details.
1. On the home screen or list menu, tap Settings. -- Or, tap on Quick Setting list. 2. Tap More... > Mobile networks > Data roaming. 3. Tap to turn on or off data roaming. Keep track of your data usage If you're on a limited data allowance, it's important to keep track of the activities and apps that usually send and receive data, such as browsing the web, syncing online accounts, and sending email or sharing status updates.
Connect to a wireless network 1. On the home screen or list menu, tap Settings, and then tap Wi-Fi to turn it on. 2. Detected Wi-Fi networks will be listed in the Wi-Fi networks section. 3. Tap the desired Wi-Fi network you want to connect. -- If you selected a secured network, you’ll be asked to enter the network key or password. T he next time your tablet connects to a previously accessed secured wireless network, you won’t be asked to enter the key or other security information again.
Add a VPN connection You must first set a lock screen PIN or password before you can use credential storage and set up the VPN. 1. On the home screen or list menu, tap Settings. 2. Tap More... > VPN. 3. Tap to add VPN profile. 4. Enter the VPN settings and set them up according to the security details your network administrator gave you. 5. Tap Save. Connect to a VPN 1. On the home screen or list menu, tap Settings. 2. Tap More... > VPN. 3. Tap the VPN that you want to connect to. 4.
Edit a bookmark 1. While viewing a webpage, tap . 2. Tap Bookmarks. 3. On the Bookmarks tab, tap and hold the webpage you want to edit. 4. Tap Edit bookmark on the pop up screen. 5. Enter your changes, and then tap OK. View Browsing history 1. While viewing a webpage, tap . 2. Tap History. 3. On the History tab, tap a time period to see a list of webpages you’ve visited. Download files You can download files and apps directly from your favorite websites.
5. Apps 5 Play store Use the Google Play store to purchase and download applications and games that are able to run on your tablet. Choose from a wide variety of free and paid apps ranging from productivity apps, entertainment, to games. -- On the home screen or list menu, tap . • A Google Wallet™ payment service is required to purchase a paid app. You will be asked to confirm method of payment when you purchase an app. • The name of the Play Store app may differ depending on your region.
6. Mail Use this application to send or view email messages. Learn to send or view email messages via your personal or company email account. 6 Set up an email account 1. On the home screen or list menu, tap Email, do one of the following: -- If this is your first time to add an email account in Mail, just move to the next step. -- If you’ve already added an email account in Mail, then tap > Settings > ADD ACCOUNT. 2. Enter the email address and password for your email account. 3.
Reply to a mail 1. On the home screen or list menu, tap Email. 2. Switch to the email account that you want to use. 3. In the email account inbox, tap the email message. 4. Tap , and then compose your mail. 5. Tap to send the mail. Delete mails 1. On the home screen or list menu, tap Email. 2. Switch to the email account that you want to use. 3. Tap the desired mail, and then tap . Gmail Use this application to quickly and directly access the Google Mail service.
Send a mail by Gmail 1. On the home screen or list menu, tap Gmail. 2. Tap . 3. Fill in one or more recipients. -- If you want to loop in more recipients in a carbon copy (Cc) or blind carbon copy (Bcc) of the email message, tap +CC/BCC. 4. Enter the subject, and then compose your mail. -- Add a picture or video: tap . 5. Tap to send the mail. Reply to a mail by Gmail 1. On the home screen or list menu, tap Gmail. 2. In the email account inbox, tap the email message. 3.
7. Camera With your tablet, you can take both photos and videos as desired. In addition to the rear camera on the back, there’s a camera on the front for video calls and self-portraits. The LED flash on the back gives you extra light when you need it. -- To use the camera, on the home screen or list menu, tap Camera. Your camera at a glance 7 Scroll to select capture mode. Switch to video recording. Capture a photo. Switch between the front and rear camera. Change the camera settings. Image preview.
Take a photo of yourself 1. Tap Camera to turn on the camera. 2. On the screen, tap . 3. Tap to capture the photo. Set self timer 1. Tap Camera to turn on the camera. 2. Tap to customize your camera. 3. On the pop up window, tap > Self timer, select your time span. 4. When you’re ready to take a photo, tap . The photo will be captured after the set time span. Take a panoramic photo You can capture anything wide or tall in a single photo by using your tablet. 1. Tap Camera to turn on the camera.
-- Freely zoom in or out. -- Tap to pause video recording. -- To capture an image from the video while recording, tap 4. To stop recording, tap . . Camera scenes A scene is a collection of settings to suit the lighting and environment. Use Normal and let the camera automatically determine optimal settings, or choose from a wide selection of scenes before you start taking photos. Predefined settings make point-and-shoot photos easier to take. 1. Tap Camera to turn on the camera. 2.
8. Multimedia Your tablet provides you several entertainment ways. You can view the photos taken by the camera. You can also enjoy music and video playing. 8 Gallery Use Gallery to view all your photos and videos on your tablet. -- To open your gallery, on the home screen or list menu, tap Gallery. • Some file formats are not supported depending on the software installed on the device. • Some files may not play properly depending on how they are encoded. View your photos View photos in the album 1.
4. Press the volume button to adjust the volume. 5. Tap to select more options. Edit your photos When viewing a photo, tap and use the following functions: • Delete: Delete the photo. • Slideshow: Start a slideshow with the images in the current folder. • Edit: Launch Paper Artist to edit the photo. • Rotate left: Rotate anticlockwise. • Rotate right: Rotate clockwise. • Crop: Resize the orange frame to crop and save the photo in it. • Set picture as: Set the photo as wallpaper or contact image.
Share your photos You can share your photos with another device via email, MMS or Bluetooth. Share photos by Email 1. On the home screen or list menu, tap Gallery. 2. Browse to the photo that you want to share. 3. Tap to open the drop-down list, and then tap Email. 4. Choose an Email account. 5. Compose your message. 6. Tap to send the mail. If you have multiple email accounts, the default email account will be used. Share a photo by MMS 1. On the home screen or list menu, tap Gallery. 2.
Watch a video by using video player 1. On the home screen or list menu, tap Video Player. 2. Tap the video that you want to watch. 3. Tap the on-screen controls to control the video playback. 4. Press the volume button to adjust the volume. 5. Tap to select more options. Share your videos You can share your photos with another device via email, MMS or Bluetooth. Share videos by Email 1. On the home screen or list menu, tap Video Player. 2. Tap the video that you want to share. 3.
-- Tap Songs, browse all songs. -- Tap Now playing, check the song is playing now. Listen to music 1. On the home screen or list menu, tap Music. 2. Tap a song from the category. 3. Use the following keys to control playback: More options. Turn on shuffle. Select play mode: Repeat one, Repeat all or Off. Back to current playlist. Pause and resume playback. Skip to the next song. Tap and hold to move forwards quickly. Skip to the previous song. Tap and hold to move backwards quickly.
Delete a playlist 1. On the home screen or list menu, tap Music. 2. Tap Playlists to view all your playlists. 3. Tap and hold the playlist you want to delete. 4. Select Delete on the pop up screen. Delete a song 1. On the home screen or list menu, tap Music. 2. Tap a song from the category. 3. Tap to select Delete. FM radio You can listen to radio programs by using your tablet. • To use the FM radio, on the home screen or list menu, tap FM Radio.
2. Tune to your desired radio station. 3. Tap > Record FM. 4. Tap to stop recording. 5. Enter a name for the voice and tap Save. Voice recorder Use Voice Recorder to capture information during lectures, interviews, or even to create your own audio log. Record a voice memo 1. On the home screen or list menu, tap Sound Recorder. 2. Hold the microphone near the sound source. 3. Tap to start recording a voice clip. 4. Tap to pause voice recording. (Tap to resume voice recording.) 5.
9. Phone Learn to use calling functions, such as making and answering calls, using options available during a call or customising and using call-related features. 9 Make a call 1. Tap Phone to open the dial pad, enter your number directly. Or enter the first few digits of a phone number, then choose a contact. 2. Tap . You also can use the following methods to make a call: -- Make a call from the history of incoming and outgoing calls and messages. -- Make a call from the contacts list.
View contacts Do the following methods to view the contact list: -- On the home screen, tap People. -- Or on the list menu, tap People. Search for a contact 1. Go to People to view the contact list. 2. Scroll up or down the contact list. 3. Tap and enter the first few letters of the name in the search bar. 4. Select the contact from the option list. Call a contact 1. Go to People to view the contact list. 2. Scroll the list to select your desired contact. -- Tap the number area to call the contact.
Add contacts to a group 1. Go to People to view the contact list. 2. Tap to open drop-down list, and then tap Groups. 3. Tap to add contacts to a group. 4. Enter your group’s name, and tap to add contacts. Import/Export contacts 1. Go to People to view the contact list. 2. Tap > Import/export. 3. Select the contacts storage. 4. Follow the on-screen steps to finish. Delete contacts 1. Go to People to view the contact list. 2. Tap > Delete contact. 3. Choose the desired contacts. 4.
1. During a call, tap to enter a phone number or select a contact from your phonebook. 2. Tap to dial the number. 3. The second number is dialled, and the first call is put on hold at this time. -- You can tap -- Tap to toggle between 2 calls. to add the contact to a conference call. Make an emergency call In some regions, you can make emergency calls even if you don’t have a SIM card installed or your SIM card has been blocked.
10. Messages Messages let you exchange text messages with other SMS and MMS devices via your cellular connection. Your sent and received messages are neatly grouped into conversations, by contact name or phone number. 10 Send a message 1. On the home screen or list menu, tap Messaging. 2. Tap to start composing a new message. 3. Use the following methods to add recipients: -- Enter a phone number. -- Tap , select contacts, and then tap OK. 4. Enter the text message in the text box. 5.
-- Enter a phone number. -- Tap , select contacts, and then tap OK. 5. Enter more text if you wanted. 6. Tap to send the message. Delete messages Delete a message 1. On the home screen or list menu, tap Messaging. 2. The messages screen displayed. 3. Tap a contact (or phone number) to view the exchange of message with that contact. 4. Tap and hold a message. 5. In the pop up window (Message options), select Delete. Delete a conversation 1. On the home screen or list menu, tap Messaging. 2.
11. Bluetooth Your tablet can connect to a compatible Bluetooth device for exchanging data. Bluetooth creates a direct wireless connection between two devices over short distances. 11 Do not use the Bluetooth feature for illegal purposes (for example, pirating copies of files or illegally tapping communications for commercial purposes). Turn on or off Bluetooth 1. On the home screen or list menu, tap Settings. 2. Tap to turn on or off Bluetooth.
12. eReader Prestigio With the eReader Prestigio, you can easily and quickly download and read eBooks on your tablet. -- On the home screen or list menu, tap eReader Prestigio. Your eReader at a glance View your bookshelf. Change different search item. 12 Find eBooks in your library. Go to Bookstore. Search eBooks by keyword. eBooks. Edit your collections. Edit your bookshelf. Download an eBook You can download eBooks by using eReader Prestigio.
Add a bookmark 1. While reading an eBook, tap . 2. Tap , and then tap New bookmark. 3. The certain page is added to bookmark. Open the bookmark You can continue reading your eBook from the certain page which you have added to bookmark. 1. While reading an eBook, tap . 2. Tap . 3. In This book or All books tab, tap your desired bookmark. Search for a content You can search for certain content in the eBook, for example, a word, a sentence or a paragraph, etc. 1. While reading an eBook, tap . 2. Tap .
13. Travel & maps Use this application to pinpoint the location of your tablet, search for places, or get directions. Google maps 13 About Google Maps Google Maps lets you track your current location and receive detailed directions to your destination. It also provides a search tool where you can locate places of interest or an address on a map, or view locations at street level. -- On the home screen or list menu, tap Maps. • To find your location with Google Maps, you need to enable location sources.
14. My files and storage My files Use this application to access all kinds of files stored on your tablet, including photos, videos, songs, and sound clips. -- On the home screen or list menu, tap ES File Explorer. 14 View my files 1. On the home screen or list menu, tap ES File Explorer. 2. Tap to choose a storage source. 3. Select a folder to open it. Search for a file 1. On the home screen or list menu, tap ES File Explorer. 2. Tap to choose a storage source. 3. Tap , and enter key word. 4.
15. Utilities Clock Use the clock app to set alarms, check the time in any location in the world, measure the duration of an event, or set a timer. -- On the home screen or list menu, tap Clock. 15 World clock You can add a city to the world clock screen. 1. On the home screen or list menu, tap Clock. 2. Tap . 3. Scroll through the list and tap the city that you want to add. Alarm You can set up one or more alarms. Set an alarm 1. On the clock screen, tap . 2. Tap > Add alarm. 3.
Calendar You can create your event and make a plan on your calendar. • On the home screen or list menu, tap Calendar. View the calendar On the home screen or list menu, tap Calendar to check the calendar. Tap calendar to Day, Week, Month or Agenda view. to change your Create an event 1. Go to Calendar, select a date. 2. Tap to create a new event. 3. Edit reminder settings. 4. Tap Done to save the event. Manage your events Edit an event You can only edit events you have created. 1.
Google search Use this application to search not only the Internet, but also apps and their contents on your tablet as well. -- On the home screen or list menu, tap Google. S ome apps, such as Contacts or Emails, have their own search function, which you can use to search only within those apps. Search on the web or your tablet 1. Tap the search field, and then enter a keyword. 2. Select one of the suggested keywords that appear.
16. Set up your tablet Use this app to control and customize tablet settings . -- On the home screen or list menu, tap Settings. 16 Wireless & Networks SIM management -- Check your SIM card information. -- Set the SIM card for data connection. Wi-Fi Activate the Wi-Fi feature to connect to a Wi-Fi network and access the Internet or other network devices. Bluetooth Activate the Bluetooth feature to exchange information over short distances.
Device Audio profiles • Tap to edit the profiles. Or, tap to add your customized profiles. -- Select the profiles of the phone. -- Set the volume, type for ringtong and notification. Display Change the settings to control the display and backlight on your device. Storage View memory information for your device and memory card. You can also format the memory card. Formatting a memory card permanently deletes all data from it.
System Date & time Access and alter the following settings to control how the device displays the time and date. -- Automatic date & time: Automatically update the time and date when moving across time zones. -- Automatic time zone: Set to receive time zone information from the network when you move across time zones. -- Set date: Set the current date manually. -- Set time: Set the current time manually. -- Select time zone: Set the home time zone. -- Use 24-hour format: Display time in 24-hour format.
17. Specifications 17 Item Specification Processor Quad Core ARM Cortex A7 16GB/32GB eMMC+1GB DDR3, Micro SD slot supports up to 32GB Android 4.2 1.2GHz Mali 400 MP, 286MHz 7.85” Ratio 4:3 IPS, Capacitive multi-touch panel (support up to 5 points) 768*1024 Pixels WCDMA + GSM (WCDMA: 900/2100; GSM: 850/900/1800/1900) Micro USB 2.0, Micro SD (micro SDHC compatible) WiFi (802.11 b/g/n) Support Bluetooth 3.0 Front 0.3MP FF, Rear 2.0MP FF Support Support 4700mAh Li-ion Poly battery 200*139*8.
18. Troubleshooting The tablet does not switch on Remove/reinstall the battery. Then charge the tablet until the battery icon stops scrolling. Unplug the charger and try to switch the tablet on. 18 The display shows BLOCKED when you switch on the tablet Somebody tried to use your tablet but didn’t know the PIN code nor the unblocking code (PUK). Contact your service provider. The display shows IMSI failure This problem is related to your subscription. Contact your operator.
When charging, the battery icon shows no bar and the outline is flashing Only charge the battery in an environment where the temperature does not go below 0°C (32°F) or above 45°C (113°F). In other cases please contact your tablet supplier. The display shows SIM failure Check that the SIM card has been inserted correctly. If the problem persists, your SIM card may be damaged. Contact your operator.
Another Bluetooth device is not located -- Ensure that the Bluetooth wireless feature is activated on your device. -- Ensure that the Bluetooth wireless feature is activated on the device you wish to connect to, if necessary. -- Ensure that your device and the other Bluetooth device are within the maximum Bluetooth range (10 m). A connection is not established when you connect the device to a computer -- Ensure that the USB cable you are using is compatible with your device.