MultiPhone 4322 DUO PAP4322 DUO Android Smartphone User Manual Version 1.1 www.prestigio.
About this user manual This user manual is specially designed to detail the device’s functions and features. -- Please read this manual before using the device to ensure safe and proper use. -- Descriptions are based on the device’s default settings. -- Images and screenshots may differ in appearance from the actual product. -- Prestigio continuously strives to improve its products. Due to software upgrading, some contents in this user manual may be different from your product.
Contents 1.
Take a photo of yourself �������������������������������������������������������������������������������������������������������26 Take a panoramic photo �������������������������������������������������������������������������������������������������������26 Take a group shot ������������������������������������������������������������������������������������������������������������������26 Take continuous shots �����������������������������������������������������������������������������������������������
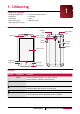
1. Unboxing Open your package • Prestigio MultiPhone • Earphones • AC adapter • Quick start guide • Legal and safety notices • Li-ion rechargeable battery • USB cable • Pouch • Warranty card 1 Your phone at a glance Headset jack Earpiece Micro USB port Front camera Rear camera Power button Volume button Speaker Touch screen Home key Menu key Back key Microphone Buttons Button Definition Function Power • Press and hold to power on or off your phone.
2. Getting started Congratulations on your purchase and welcome to Prestigio. To get the most from your product and enjoy all Prestigio has to offer, please access: http://www.prestigio.com/catalogue/MultiPhones 2 More details about your product, please access: http://www.prestigio.com/support Please read the "MultiPhone legal and safety notices" on your package before use. • Do not cover the antenna area with your hands or other objects. This may cause connectivity problems or drain the battery.
Remove the SIM card: Push the SIM card in to eject it from its slot, and remove it. Insert a memory card You can expand the memory of your phone and store more additional multimedia files by adding a micro-SD card. Depending on the memory card manufacturer and type, some memory cards may not be compatible with your device. 1. Insert a memory card with the gold-coloured contacts facing downwards. 2. Push the memory card into the slot until it locks in place.
Replace the back cover 1. Align the back cover onto the top part of your phone. 2. Press the sides and the bottom part of the back cover against your phone to lock the cover into place. You will hear a click when the back cover is locked in place. Power on your phone Press and hold the Power button for a few seconds to power on your phone. 1. When turning on the device for the first time, follow the on-screen instructions to set up your device. 2.
Status bar Applications and widgets Tap to enter the list menu Shortcut Set wallpaper Pick your favorite photo as your Home wallpaper. Choose from the available wallpapers, or use any photo you've taken with the camera. 1. On the Home screen, tap > Wallpaper. 2. Select one of the following: Gallery, Live wallpapers or Wallpapers. 3. Select an image and tap Set wallpaper. Or, select an image, resize it by dragging the frame, and then tap CROP. Add an app icon to home screen 1.
Applications tab Tap to enter app shop Widgets tab Applications USER MANUAL MultiPhone PAP4322 DUO 6
3. Basics 3 Finger tips Only use your fingers to use the touch screen. Tap Tap and hold Swipe Slide Zoom in Zoom out To open an application, to select a menu item, to press an on-screen button, or to enter a character using the on-screen keyboard, tap it with a finger. Quickly swipe your finger vertically or horizontally across the screen to go to other Home pages, scroll through documents, and more. Spread two fingers apart on a webpage, map, or image to zoom in a part.
Scroll Drag up or down to scroll. On some screens, such as webpages, you can also scroll side to side. Flick Flick left or right on the Home screen or the Applications screen to see another panel. Flick up or down to scroll through a webpage or a list, such as contacts. Motion gesture Rotate your phone for a better view For many screens, you can automatically change the screen orientation from portrait to landscape by turning your phone sideways.
lways use authentic accessories as they enable your battery to perform at its peak. A Nonauthentic accessories (eg. chargers) can damage your battery and even your phone. • You can use the phone while it is charging. • Keeping the charger plugged to the phone when the battery is fully charged will not damage the battery. The only way to turn off the charger is to unplug it, so it is advisable to use an easily accessible power socket.
Load files from your PC 1. Connect your phone to the PC by using the USB cable. 2. Slide to open notification panel, tap Connected as USB Storage. 3. Tap to select USB storage in USB computer connection screen. 4. Slide to open notification panel again, tap USB connected. 5. Tap to turn on USB storage. 6. Transfer files between your phone and the PC. Connect with Windows Media Player 1. Connect your phone to the PC by using the USB cable. 2.
Setting a face unlock 1. On home screen, tap to open list menu. 2. Tap >Security > Screen lock > Face Unlock. 3. Fit your face in the frame to be captured. Setting a pattern 1. On home screen, tap to open list menu. 2. Tap >Security > Screen lock > Pattern. 3. Draw a pattern by connecting four dots or more, and then draw the pattern again to verify it. Setting a PIN 1. On home screen, tap to open list menu. 2. Tap >Security > Screen lock > PIN. 3.
Using Quick Settings The Quick Settings tab lets you easily turn on Airplane mode, Wi-Fi, and more, and also provides a quick shortcut to change the mode and set the brightness, auto rotation if swipe the tab. You can view your phone’s current status and use the following options: -- Brightness: adjust the brightness of the screen. -- Timeout: adjust the screen timeout. -- Auto rotation: allow or prevent the interface from rotating when you rotate the device.
2. Tap >Language & input > Default. 3. Choose the desired input method. Use the Android keyboard Tap a text field to bring up the keyboard, then tap keys on the keyboard. You can enter the text in QWERTY keyboard. Enter text As you type, each letter appears above your thumb or finger. The letter isn’t entered until you choose your desired word. -- Type uppercase: tap the Shift key before tapping a letter. -- Type lowercase: tap the Shift key again and then tap a letter. -- Enter numbers: tap .
Move a text 1. After you have selected the text you want to cut, tap . The selected text is then cut to the clipboard. 2. In a text entry field, press and hold at the point where you want to paste the text. 3. Tap Paste. You can tap to select all the text you have entered. Use widgets Widgets put at-a-glance important information and media content up front on your Home screen. Some widgets are already added to your Home screen for your convenience.
Status icons The icons in the status bar at the top of the screen give information about your phone: Icons What it means Icons What it means Silent mode activated. 3G network connected. Vibration mode activated. Wi-Fi connected. Flight mode activated. Roaming (outside of normal service area). Battery power level. Bluetooth is activated. Call in progress. Connected to PC. Missed call. Wired microphone headset connected. New SMS or MMS. Wired headset connected. GPRS network connected.
4. Phone Learn to use calling functions, such as making and answering calls, using options available during a call or customising and using call-related features. 4 Make a call 1. Tap to open the dial pad, enter your number directly. Or enter the first few digits of a phone number, then choose a contact. 2. Tap or . You also can use the following methods to make a call: -- Make a call from the history of incoming and outgoing calls and messages. -- Make a call from the contacts list.
View contacts Do the following methods to view the contact list: -- On the home screen, tap . -- Or on the list menu, tap . Search for a contact 1. Go to to view the contact list. 2. Scroll up or down the contact list. 3. Tap and enter the first few letters of the name in the search bar. 4. Select the contact from the option list. Call a contact 1. Go to to view the contact list. 2. Scroll the list to select your desired contact. -- Tap the number area to call the contact.
Add contacts to a group 1. Go to to view the contact list. 2. Tap to view contact groups. 3. Tap to add contacts to a group. 4. Enter your group’s name, and tap to add contacts. Import/Export contacts 1. Go to to view the contact list. 2. Tap > Import/export. 3. Select the contacts storage. 4. Follow the on-screen steps to finish. Delete contacts 1. Go to to view the contact list. 2. Tap > Delete contact. 3. Choose the desired contacts. 4. Tap OK to delete the contacts.
1. During a call, tap to enter a phone number or select a contact from your phonebook. 2. Tap to dial the number. 3. The second number is dialled, and the first call is put on hold at this time. -- You can tap -- Tap to toggle between 2 calls. to add the contact to a conference call. Make an emergency call In some regions, you can make emergency calls even if you don’t have a SIM card installed or your SIM card has been blocked.
5. Messages Messages let you exchange text messages with other SMS and MMS devices via your cellular connection. Your sent and received messages are neatly grouped into conversations, by contact name or phone number. 5 Send a message 1. On the home screen or list menu, tap . 2. Tap to start composing a new message. 3. Use the following methods to add recipients: -- Enter a phone number. -- Tap , select contacts, and then tap . 4. Enter the text message in the text box. 5.
4. Use the following methods to add recipients: -- Enter a phone number. -- Tap , select contacts, and then tap . 5. Enter more text if you wanted. 6. Tap to send the message. Delete messages Delete a message 1. On the home screen or list menu, tap . 2. The messages screen displayed. 3. Tap a contact (or phone number) to view the exchange of message with that contact. 4. Tap and hold a message. 5. In the pop up window (Message options), select Delete. Delete a conversation 1.
6. Mail Use this application to send or view email messages. Learn to send or view email messages via your personal or company email account. 6 Set up an email account 1. On the home screen or list menu, tap , do one of the following: -- If this is your first time to add an email account in Mail, just move to the next step. -- If you’ve already added an email account in Mail, then tap > Settings > ADD ACCOUNT. 2. Enter the email address and password for your email account. 3.
Reply to a mail 1. On the home screen or list menu, tap . 2. Switch to the email account that you want to use. 3. In the email account inbox, tap the email message. 4. Tap , and then compose your mail. 5. Tap to send the mail. Delete mails 1. On the home screen or list menu, tap . 2. Switch to the email account that you want to use. 3. Tap the desired mail, and then tap . Gmail Use this application to quickly and directly access the Google Mail service.
Search for a mail 1. On the home screen or list menu, tap . 2. Tap to display the search bar. 3. Enter the first few letters of the mail sender or subject in the search bar. 4. Select the mail from the list. Send a mail in Gmail 1. On the home screen or list menu, tap . 2. Tap . 3. Fill in one or more recipients. -- If you want to loop in more recipients in a carbon copy (Cc) or blind carbon copy (Bcc) of the email message, tap > Add Cc/Bcc. 4. Enter the subject, and then compose your mail.
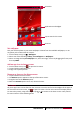
7. Camera With your phone, you can take both photos and videos as desired. In addition to the rear camera on the back, there’s a camera on the front for video calls and self-portraits. The LED flash on the back gives you extra light when you need it. -- To use the camera, on the home screen or list menu, tap . 7 Your camera at a glance Switch between the front and rear camera. Image preview. Change the flash setting. Capture a photo. Scroll it to zoom in or zoom out. Tap to select capture mode.
Take a photo of yourself 1. Tap to turn on the camera. 2. On the screen, tap . 3. Tap to capture the photo. Set self timer 1. Tap to turn on the camera. 2. Tap to customize your camera. 3. On the pop up window, tap > Self timer, select your time span. 4. When you’re ready to take a photo, tap . The photo will be captured after the set time span. Take a panoramic photo You can capture anything wide or tall in a single photo by using your phone. 1. Tap to turn on the camera. 2.
Do not move your phone during HDR capturing. Record a video 1. Tap to turn on the camera, and then tap . 2. When you’re ready to start recording, tap . 3. While recording, use the following actions: -- To capture an image from the video while recording, tap 4. To stop recording, tap . . Camera scenes A scene is a collection of settings to suit the lighting and environment.
Video settings: -- Time lapse interval: Set the time lapse interval. -- Video quality: Set the quality level for videos. -- Store location: Set the camera to include location information for your videos. To use this feature, you must activate location services. -- EIS: Adjust the EIS level. -- Focus mode: Select to use either type of focus mode. -- Video duration: Select time and size limit for the file. -- Microphone: Enable or disenable microphone while recording a video.
8. Multimedia Your phone provides you several entertainment ways. You can view the photos taken by the camera. You can also enjoy music and video playing. 8 Gallery Use Gallery to view all your photos and videos that are on your phone. -- To open your gallery, on the home screen or list menu, tap . • Some file formats are not supported depending on the software installed on the device. • Some files may not play properly depending on how they are encoded. View your photos View photos in the album 1.
3. Tap the on-screen controls to control the video playback. 4. Press the volume button to adjust the volume. 5. Tap to select more options. Edit your photos When viewing a photo, tap and use the following functions: • Slideshow: Start a slideshow with the images in the current folder. • Edit: Launch Paper Artist to edit the photo. • Rotate left: Rotate anticlockwise. • Rotate right: Rotate clockwise. • Crop: Resize the orange frame to crop and save the photo in it.
Add photo effects 1. On the home screen or list menu, tap . 2. Browse to the photo that you want to edit. 3. Tap > Edit, and then tap . 4. Tap an effect to apply to the photo. 5. Tap Save. The enhanced photo is saved as a copy. The original photo remains unedited. Share your photos You can share your photos with another device via email, MMS or Bluetooth. Share photos by Email 1. On the home screen or list menu, tap . 2. Browse to the photo that you want to share. 3.
4. Select Wallpaper. 5. You’ll see a crop box around the photo. -- Drag the crop box over the part of the photo you want to crop. -- Press and hold the edge of the crop box. When directional arrows appear, drag your finger inward or outward to resize the crop box. 6. Tap CROP to set the photo as your wallpaper. Video player You can use the video player on your phone to watch the videos. Watch a video by using video player 1. On the home screen or list menu, tap . 2.
Music player You can listen to your favourite music with the music player. The Music app is a central hub for your favorite music whether it is on your phone or streamed through a music service. -- To use the music player, on the home screen or list menu, tap . • Some file formats are not supported depending on the device’s software version. • Some files may not play properly depending on the encoding used. Browse music 1. From the Home screen, tap . 2.
Set a song as ringtone 1. On the home screen or list menu, tap 2. Tap a song from the category. 3. Tap to select Use as ringtone. . Your playlist Create a playlist You can make your own playlist. 1. On the home screen or list menu, tap . 2. Tap a song from the category. 3. Tap to select Add to playlist. 4. On the pop up screen, tap New to create a new playlist. 5. Enter a title and tap Save. Rename the playlist 1. On the home screen or list menu, tap . 2.
More options. Open the channel list. Use headset or speaker to listen to FM radio. Turn off FM radio. Skip to previous channel. Skip to next channel. Decrease the frequence by 0.1MHz. Increase the frequence by 0.1MHz. Turn off FM -- You can use other apps while listening to the radio. -- To turn off FM Radio completely, tap > Exit. Record radio programs You can record a radio program when listen to it. 1. On the home screen or list menu, tap . 2. Tune to your desired radio station. 3.
Voice Recorder can run in the background while you do other things on your phone, except when you open other apps that also use audio functions. Play a voice memo 1. On the home screen or list menu, tap 2. Tap to open recording file list. 3. Select your voice memo and tap it. . Delete a voice memo 1. On the home screen or list menu, tap . 2. Tap to open recording file list. 3. Tap and hold the voice memo you want to delete. 4. Tap to delete the file.
9. Web & network You can connect your phone to Internet and browse a webpage on the websit. Connect to internet 9 Your phone connects to the Internet whenever necessary, using a Wi-Fi connection (if available) or your mobile operator's data connection. Data connection You can use your mobile operator's data connection. Some apps and services may transfer data over your mobile operator's cellullar network, which may result in additional fees. Contact your mobile operator for details.
1. On the home screen or list menu, tap . -- Or, tap > System settings. 2. Tap Data usage. 3. On the Mobile tab, turn on Mobile data, select Set mobile data limit to automatically disable your data connection when you reach the set limit. 4. Tap Data usage cycle, you can set a particular time interval to see how much data you've used. 5. Drag the red line marker to set your monthly data limit.
T he next time your phone connects to a previously accessed secured wireless network, you won’t be asked to enter the key or other security information again. Forget the wireless network Any network that has ever been used, including the current network, can be forgotten so your phone will not automatically connect to it. 1. On the home screen or list menu, tap , and then tap Wi-Fi. 2. Tap the wireless network you've been connected. 3. Tap Forget.
1. On the home screen or list menu, tap . 2. Tap More... > VPN. 3. Tap Add VPN profile. 4. Enter the VPN settings and set them up according to the security details your network administrator gave you. 5. Tap Save. Connect to a VPN 1. On the home screen or list menu, tap . 2. Tap More... > VPN. 3. Tap the VPN that you want to connect to. 4. Enter your log in credentials, and then tap Connect. When you’re connected, the VPN connected icon appears in the notification area of the status bar.
View Browsing history 1. While viewing a webpage, tap . 2. Tap History. 3. On the History tab, tap a time period to see a list of webpages you’ve visited. Download files You can download files and apps directly from your favorite websites. Files and apps downloaded from the Web can be from unknown sources. To protect your phone and personal data, we strongly recommend that you download and open only the files you trust. 1. On the home screen or list menu, tap . 2.
10. Bluetooth Your phone can connect to a compatible Bluetooth device for exchanging data. Bluetooth creates a direct wireless connection between two devices over short distances. 10 Do not use the Bluetooth feature for illegal purposes (for example, pirating copies of files or illegally tapping communications for commercial purposes). Turn on or off Bluetooth 1. On the home screen or list menu, tap . -- Or, tap > System settings. 2. Tap to turn on or off Bluetooth.
11. Apps Play store Use the Google Play store to purchase and download applications and games that are able to run on the your phone. Choose from a wide variety of free and paid apps ranging from productivity apps, entertainment, to games. -- On the home screen or list menu, tap . 11 • A Google Wallet™ payment service is required to purchase a paid app. You will be asked to confirm method of payment when you purchase an app. • The name of the Play Store app may differ depending on your region.
Uninstall an app 1. On the home screen or list menu, tap -- Or, tap > Manage apps. 2. Tap the app you want to uninstall. 3. Tap Uninstall. > Apps. • For different apps, the options maybe vary. • You can not uninstall the essential apps and system app, such as Contacts, Settings and etc.
12. eReader Prestigio With the eReader Prestigio, you can easily and quickly download and read eBooks on your phone. -- On the home screen or list menu, tap . 12 Your eReader at a glance Find eBooks in your library. Go to Bookstore. View your bookshelf. Change different search item. Search eBooks by keyword. eBooks. Edit your collections. Edit your bookshelf. Download an eBook You can download eBooks by using eReader Prestigio. Some eBooks are free to download, and some eBooks need a payment.
Add a bookmark 1. While reading a eBook, tap . 2. Tap , and then tap New bookmark. 3. The certain page is added to bookmark. Open the bookmark You can continue reading your eBook from the certain page which you have added to bookmark. 1. While reading a eBook, tap . 2. Tap . 3. In This book or All books tab, tap your desired bookmark. Search for a content You can search for a certain content in the eBook, for example, a word, a sentence or a paragraph, etc. 1. While reading a eBook, tap . 2.
13. Travel & maps Use this application to pinpoint the location of your phone, search for places, or get directions. Find a location 13 About Locations Use this application to search for nearby restaurants, banks, bus stops, and more. -- On the home screen or list menu, tap . • If you are in an area where there are a lot of surrounding buildings, locations may have a hard time pinpointing your location. • This application may not be available depending on the region or service provider.
3. Enter the place you want to search for. 4. Select the desired place in the result list. 5. Tap to get directions to the place. 6. Choose how you want to get to your destination. 7. Tap get directions. 8. The map opens showing the route to your destination. Get directions by setting a start and end location 1. On the home screen or list menu, tap , and tap to enter map view. -- Or, tap on the home screen or list menu. 2. Tap to get directions. 3. Choose your start point and end point. 4.
Clear the map After searching on a map, you can clear away the various markers drawn on it. Tap > Clear Map. Get help If you need help or have questions about Maps or Latitude, tap > Help. Maps settings You can set up the Google maps, tap > Settings while viewing the maps.
14. My files and storage My files Use this application to access all kinds of files stored on your phone, including photos, videos, songs, and sound clips. -- On the home screen or list menu, tap 14 . View my files 1. On the home screen or list menu, tap 2. Tap to choose a source storage. 3. Select a folder to open it. . Search for a file 1. On the home screen or list menu, tap . 2. Tap to choose a source storage. 3. Tap , and enter key word. 4.
Erase SD card 1. On the home screen or list menu, tap -- Or, tap > System settings. 2. Tap Storage. 3. Select Erase SD card. . Formatting a memory card permanently deletes all data from it. The actual available capacity of the internal memory is less than the specified capacity because the operating system and default applications occupy part of the memory.
15. Utilities 15 Clock Use the clock app to check the time or set alarms. -- On the home screen or list menu, tap . Night mode You can use your tablet as a clock at night. 1. On the home screen or list menu, tap . 2. Tap and hold blank area on the screen to enter night mode. Alarm You can set up one or more alarms. Set an alarm 1. On the clock screen, tap . 2. Tap to add a new alarm. 3. Scroll the digit list to set the alarm time. 4. Tap OK. 5.
1. While viewing the calendar, tap to change your calendar to Agenda view. 2. Tap the event your want to edit, and then tap . 3. Make your changes to the event. 4. Tap Done. I f you're editing an event that repeats, you'll be asked whether you want to edit just that occurrence or all occurrences of that event. Delete an event 1. While viewing the calendar, tap to change your calendar to Agenda view. 2. Tap the event your want to delete, and then tap .
Mark the task as done or undone -- Select the task on the TODO category, tap to mark the task as done. -- Select the task on the DONE category, tap to mark the task as undone. Delete a task 1. On the home screen or list menu, tap . 2. Tap the task your want to delete, and then tap . Google search Use this application to search not only the Internet, but also apps and their contents on your phone as well. -- On the home screen or list menu, tap .
16. Set up your phone Use this app to control and customize phone settings . -- On the home screen or list menu, tap . Or, tap > System settings. 16 Wireless & Networks SIM management -- Check your SIM card information. -- Set your default SIM card. -- Set the SIM card for data connection. The device supports two (2) SIM cards for voice calls and data transfer.
-- Preferred networks: Selected a preferred network. -- Network mode: Select a network type. -- Access Point Names: Set up access point names (APNs). -- Network operators: Search for available networks and select a network for roaming. Device Audio profiles • Tap the desired profile to edit it. Or, tap to add your customized profiles. -- Select the profiles of the phone. -- Set the volume, type for ringtong and notification. Display Change the settings to control the display and backlight on your device.
Accounts Add and manage your Email, Google, Facebook and Twitter accounts. System Date & time Access and alter the following settings to control how the device displays the time and date. -- Automatic date & time: Automatically update the time and date when moving across time zones. -- Automatic time zone: Set to receive time zone information from the network when you move across time zones. -- Set date: Set the current date manually. -- Set time: Set the current time manually.
17. Specifications 17 Item Specification Processor High Performance Dual Core Cortex 1.2 GHz Memory OS Display Resolution Band Interfaces Communications Battery Dimensions Weight RAM 512MB DDR2 + eMMC 4GB, Micro SD slot supports up to 32GB Android 4.1 4.3" WVGA, Capacitive multi-touch 480*800 WCDMA + GSM (UMTS:900/2100 MHz; GSM:850/900/1800/1900) Micro USB 2.0, Micro SD (micro SDHC compatible) WiFi (802.11 b/g/n), Bluetooth 3.0+HS, 2G+3G 1500 mAh Li-Ion battery 130*67.7*10.
18. Troubleshooting The phone does not switch on Remove/reinstall the battery. Then charge the phone until the battery icon stops scrolling. Unplug the charger and try to switch the phone on. 18 The display shows BLOCKED when you switch on the phone Somebody tried to use your phone but didn’t know the PIN code nor the unblocking code (PUK). Contact your service provider. The display shows IMSI failure This problem is related to your subscription. Contact your operator.
When charging, the battery icon shows no bar and the outline is flashing Only charge the battery in an environment where the temperature does not go below 0°C (32°F) or above 50°C (113°F). In other cases please contact your phone supplier. The display shows SIM failure Check that the SIM card has been inserted correctly. If the problem persists, your SIM card may be damaged. Contact your operator.
Another Bluetooth device is not located -- Ensure that the Bluetooth wireless feature is activated on your device. -- Ensure that the Bluetooth wireless feature is activated on the device you wish to connect to, if necessary. -- Ensure that your device and the other Bluetooth device are within the maximum Bluetooth range (10 m). A connection is not established when you connect the device to a computer -- Ensure that the USB cable you are using is compatible with your device.