
Digital ProFry InstructIons


Slide the control assembly down (Fig. F) as far as it goes making sure both guides are
in the tracks. Note: The appliance will only operate when both guides are properly
positioned in the tracks.
4. Fill removable pot with cooking oil up to the MAX level marking (approximately 4
1
⁄
2
quarts), which is located on the inside of the removable pot (Fig. A1, page 2). The amount
of oil must always be between the MIN and MAX level markings inside the removable
pot (Fig. A1). Never exceed the MAX level mark.
5. Place the cover on the deep fryer.
6. Attach the cord to the unit by aligning the magnetic plug end with the two electrical pins
located on the back of the control unit (Fig. A2, page 2). The plug can be attached in either direction.
Important: The magnetic cord was designed to detach easily from the fryer. As a result, if it is bumped or touched
during use it could possibly detach causing the unit to stop heating. Avoid contact with cord during operation. If
contact occurs, verify that the cord is still properly connected.
7. Plug cord into a 120 volt wall outlet. The unit will beep two times when you plug it in.
Always make sure fryer and cord are out of reach of children.
8. Press the Temp Set button on the control panel (Fig. G) to set the desired temperature. The temperature range for this deep
fryer is 300˚ to 375˚. Each time you press the Temp Set button, the temperature will increase by 25˚. The recommended
setting for most frying is
375˚; therefore, to set the
fryer to 375˚, press the Temp
Set button four times. (See
page 7 for proper cooking
temperatures.)
9. Press the Heat Start/Cancel
button on the control panel
(Fig. G) to start heating the
oil. (The unit will beep once
whenever the Heat Start/
Cancel button is pressed.)
The red signal light will
come on, indicating that the
unit is heating. (Preheat time
is approximately 15 to 17
minutes.)
10. While oil is heating:
A. Prepare food for cooking, making sure to remove excess moisture from food by blotting with toweling—moist foods
cause excess foaming, spattering, and/or overflow.
B. Assemble basket handle for frying, see pages 2 and 3.
To insure against accidental detachment of handle from basket during use, always make sure both pegs are in the
bracket holes and the handle bars are in the brackets (Fig. C and D, page 3).
C. While frying basket is sitting on countertop, fill basket up to
2
⁄
3
full with food.
Note:
The black cover vents may expand and appear to change shape when the fryer is heating. When the cover cools, the
vents will contract and appear to return to their original position. Both the expansion and contraction are normal.
11. When the selected temperature is reached, the red light will go out, the green light will come on, and the unit will beep five
times. The unit is now ready to cook food.
12. Set the timer by pressing the “+” or “– ” buttons on the control panel (Fig. G). Holding down either of these buttons will
increase or decrease the display time rapidly. The timer can be set for 1 to 30 minutes. Refer to page 7 for recommended
times.
Note: The timer works independent from the unit; it does not turn on or off power to the heating element.
13. Remove cover.
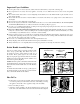
Fig. F
Fig. G
DIGITAL CONTROL PANEL
4
Frying temperature
digital display
Countdown timer
digital display
Red/Green
signal lights
Time
Start/Cancel
Time
Set
Heat
Start/Cancel
Temp
Set