
User's Manual

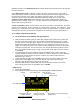
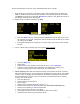
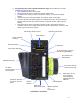
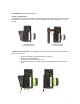
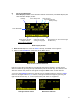
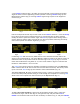
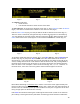
Table Of Contents

10
To calibrate a new lens:
• Name the lens
• Use the Edit function to enter the lens focus data.
To name the lens, go to the Lens selection screen (FIG 7), press Choose, select All lenses
(Fig 8), and select a manufacturer’s folder to store the lens data (Fig 9).
Press the New Lens key (Fig 10) and you will be asked to select the lens name (Fig 13 ).
The lens name is entered by using the Nav key to select the characters in the table (Fig
14), and shifting the character places with the arrow keys ( ). When finished, press
Enter and the lens name (Test) appears in the selected manufacturer’s folder (Fig 15).
To complete calibrating the lens named “Test”, press Edit (Fig 15). Select Calibrate with
the Nav key (Fig 16), and press OK or ENTER). The close focus distance for the lens is
entered in Fig 17 by using the Nav key to scroll through the list shown on the left of the
screen, setting the lens to the same distance with the focus knob, and pressing Enter. If
the close focus distance mark of the lens is not listed, choose the next greater distance
that is on the list. For example if a lens has focus markings at 8”, 9”, 10”….choose 9” as
the close focus, since this is the next greater distance which appears on the list.
Note: When calibrating a
close-focus lens
, choose a close focus mark approximately one
full turn of the lens ring (or less) from the infinity mark, rather than the minimum focus of
the lens. The six calibration points provide excellent accuracy for a single turn of the lens.
Using a larger span can diminish this accuracy.
Press Next and continue entering the remaining focus distances (a total of six distances
plus infinity). Pressing the Nav Key left allows re-entering previous distance calibrations.
Fig 10 Fig 11 Fig 12
Fig 13 Fig 14 Fig 15
Fig 16 Fig 17