
User's Manual


5
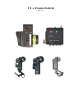
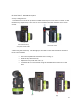
A. Set-up the Motor driver (MDR3) and Digital Motors.
a. Slide the motor brackets onto the matte box support rods. Position the motors and
brackets so that the motor gears mesh with the corresponding lens gears. Couple
the lens motors to the lens gears. Adjust the motor positions relative to the lens to
have minimum backlash and tighten the handles of the motor brackets. Do not
couple the motor to the lens too tightly or binding will result. Check that the motor
brackets do not flex or slip on the matte box support rods. For normal lenses, the
Torque adjustment switches can be set in the middle position of their range.
Connect the motor cables from the motors to the MDR3.
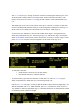
b. Use the designated camera cable to connect the MDR3 to the camera accessory
receptacle. (See pages 24, 25 for the cable list). Connect the power cable from the
MDR3 to the camera or battery power receptacle. Important: check that camera is
capable of supplying sufficient current for the MDR3. This information is usually
provided the camera manufacturer in their specifications. A conservative estimate of
the maximum MDR3 current requirement is 1A per motor at 24VDC or 2A/motor at
12VDC.
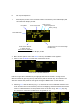
c. Apply power to the MDR3. Press the reset button. The motors will calibrate
themselves to the mechanical span of the lens rings.
d. Select the MDR wireless channel with the channel selection switches either on the
top cover or the side channel display.
B. HU3 Set-up
a. Install the FM500 battery.
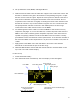
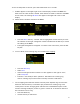
b. Press the Power Switch momentarily. The main display screen will appear.
Main
Display Screen
Lens Selection
Shows focus distance
in digital format
(Lens must be calibrated)
All functions are accessed through
the Menu key
Focus Ring Letter
Host MDR
Radio Channel
Signal Strength bars
Battery Charge