
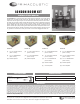
Room Kit User Manual

www.primacoustic.com
2 3
INSTALLING SURFACE IMPALING CLIPS AND WALL PANELS
Primacoustic surface impaling clips are designed to provide the installer with a simple and effective method of mounting panels onto
walls. The mounting clips feature a series of sharp impaling heads that penetrate the panels for secure semi-permanent mounting without
causing serious wall surface defacement.
Step 1: Use a bubble-level to make a straight pencil line where the top of the panel(s) will be. Measure along this line and carefully mark
where the corners of each panel will be. If you are planning to space panels apart include the gap measurement between panels.
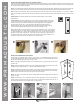
Step 2: Hold the surface impaler clips up to the wall and mark the screw hole locations. Precise mounting is not necessary. Impaler
clips can be located anywhere within the panel space. Below is a guide for locating surface impaler clips and how many to use for each
panel.
Scatter Blocks: one surface impaler each. Use twelve surface impalers to mount twelve
Scatter Blocks.
Control Columns: two surface impalers each. Use sixteen surface impalers to mount eight
Control Columns. Using the included drill bit, make holes and install the wall anchors that will
support each impaler clip. Follow the instructions on the packaging for anchor installation.
Once the plastic anchors are in, mount the impaler clips with the included screws. For
additional security apply a golf-ball sized dab of construction adhesive to each impaler tip.
This will prevent the panel from being easily removed once the adhesive is dry.
Step 3: Tilt the panel so the top edge is touching the wall. Carefully line it up on the straight
line and edge marks you made in step #1. Placing a bubble-level on top of the panel will help
you keep it straight as you guide it onto the impaler clips. Once you have lined up the panel
squarely, bring the back of the panel in contact with all of the impaler tips. Apply pressure in
and down onto the clips. The panel will slide onto the Impalers and sink down about one inch.
If alignment is off, the panel may be nudged up to ¼” to make it level.
12 x 12
Scatter Block
12 x 48
Control Column
1
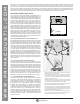
INSTALLING CORNER BASS TRAP PANELS
Primacoustic corner impalers make it easy to mount the 24” x 48” Broadband panels across room
corners to form effective bass traps. Like the surface impaling clips, the corner impalers feature sharp
tips that penetrate the panel and hold it securely in place.
Step 1: At the approximate panel location mark a vertical pencil line 17” (432mm) out from the corner
on either side.
Step 2: Mark the screw/anchor locations for corner impalers along the edge of the pencil line. Corner
impalers should be approximately 6” - 8” from the panel top/bottom edges.
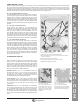
Step 3: Install the included wall anchors for each Corner Impaler. Follow the instructions on the anchor
packaging for drywall, brick and concrete walls. Use the included screw to mount the corner impalers.
Special holes in the impaler clips allow your screw driver to pass through.
Step 4: Once the corner impalers are in place, carefully rotate the sharp impaling tips so they all point
up at a 45° angle.
Step 5: Lift the panel so it is in contact with all of the corner impaler tips. Once you have it lined up
squarely, apply even pressure in and down onto the clips. The panel will sink down about one inch. If
alignment is off, the panel may be nudged up to ¼” to make it level.
17” (432mm)
17” (432mm)
2 3 4
5
1
17” (432mm)