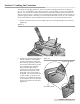
3 Loading the Label Stock 4 Loading the Container 9 Applying the Label 12 Label Path Diagram 15 Troubleshooting and Maintenance 16 Specifications © 2009 All rights reserved 18 Quick Start Unpacking and Setup
Notices: The information in this document is subject to change without notice. NO WARRANTY OF ANY KIND IS MADE WITH REGARD TO THIS MATERIAL, INCLUDING, BUT NOT LIMITED TO, THE IMPLIED WARRANTIES OF MERCHANTABILITY AND FITNESS FOR A PARTICULAR PURPOSE. No liability is assumed for errors contained herein or for incidental or consequential damages in connection with the furnishing, performance, or use of this material. This document contains proprietary information that is protected by copyright.
Section 1: Unpacking and Setup Thank you for purchasing the AP360 or AP362 Label Applicator (hereafter referred to as "Label Applicator"). Bottles, cans etc. will collectively be referred to as "containers." This manual applies to two label applicator models. The AP362 has a Control Panel that allows you to count labels and apply two labels to the same container. The AP360 does not have a Control Panel or two-label capability.
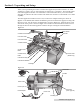
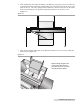
Section 2: Loading the Label Stock 1. Remove the Roll Bar and Roll Guides from the Label Applicator. The Roll Guides and Roll Drag Arm are removable and adjustable. They are held in place magnetically. (Figure 2-1.) Figure 2-1. 2. Remove one Roll Guide and the Roll Drag Arm from the Roll Bar. 3. Place the label stock roll on the Roll Bar with one side against the upright of the remaining Roll Guide. Place it on the Roll Bar with the loose end of the stock feeding underneath the roll. (Figure 2-2.
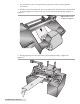
4. Place the Roll Drag Arm under the Roll Bar. The Roll Drag Arm may be placed on either side of the Roll Bar but the rounded tip of the Roll Drag Arm should be located in the center of the inside of the core. The arm is spring loaded so that there is downward pressure on the inside of the roll. This helps prevent application alignment problems near the end of a roll. (Figure 2-3.) Figure 2-3. 5.
. Now position the stock to correspond with the general area where it will be applied to the container. 7. Pull the loose end of the label stock forward and then push it into the Feed Area from the back of the label applicator. The labels will come out just underneath the Peel Edge. (Figure 2-5.) Figure 2-5. Tip! See Section 5 for a Label Path diagram. 8. Pull approximately 12 inches of label stock out beyond the Peel Edge. (Figure 2-6.) Figure 2-6.
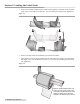
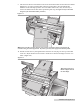
9. Take the loose label stock and feed it between the Liner Idler Roller and the Liner Drive Roller. (Figure 2-7.) In order to feed the label stock between the rollers, the Liner Idler Roller should be in the unclamped position. For some thicker label stock, it may be necessary to remove the labels from the liner before performing this step. (See Figure 2-10 for a detailed diagram of the Liner Idler Roller positions.) Figure 2-7.
11. If necessary, adjust the position of the liner on the Peel Edge left/right to align the liner with the label stock roll. Also, adjust the Label Sensor using the Label Sensor Bracket so that the Label Sensor Flag is roughly centered on the label stock. (Figure 2-9.) Figure 2-9. 12. Push the Liner Idler Roller into the clamped position. (Figure 2-10.) Figure 2-10. Clamped Position Unclamped Position 13. The labels are now ready for application.
Section 3: Loading the Container The AP360/362 can apply labels to a variety of containers including wine bottles, soda bottles, jars, cans, etc. Depending on the container type that you are labeling, you have several different options. You may use the Container Pressure Arm to hold the containers against the rollers, but that may not be necessary. You may use one or both of the Container Guides. Use these steps as a guide for applying labels.
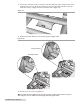
3. Place the container on the Container Idler Roller and Container Drive Roller. Orient the container with the top to the left or the right, depending on the orientation of your labels on the label stock roll. (Figure 3-3.) Figure 3-3. Tip! Both Container Guides may be used, but for maximum efficiency, typically only one is used to position the container. 4. Adjust the Container Guides so the labels will be placed in the desired location on the container.
Important Note: For bottles with a neck such soda, beer or wine bottles only one Container Guide can be used. Move the unused Container Guide to the far right or left side of the labeling area. For cans or other containers that do not have a tapered neck, both Container Guides can be used, if desired. 6. With the container in place, move the Container Pressure Arm right or left until it is roughly centered on the container. Push down on the arm until the roller on the end of the arm touches the container.
Section 4: Applying the Label A. Apply the Label 1. Power on the Label Applicator using the Power Switch. This can be done at any point with or without the container in place. 2. Place the container on the rollers using the instructions in Section 3. Important Note: For label stock 6” and wider, it may be necessary to reduce the speed of the Label Applicator. The AP360/362 includes a half-speed mode that generates more power from the motors for wider label stock.
4. Press the Foot Switch to apply the labels. Both labels will be applied without pressing the Foot Switch again. To set a value for another memory location, repeat this procedure. Note: The distance values are approximate. Adjusting the position of the Container Idler Roller will affect the actual distance between the labels on the container. C. Calculate distances for two-label mode.
E. Change the Unit of Measure between Metric and English. The AP362 can display measurements in both centimeters and inches. Follow these steps to switch between the two. English (Inches): 1. 2. 3. Turn off the unit. Press and hold both the "Mode" button and the "+" button while you switch on the unit. While the unit is booting up a "-" will appear as the first digit of the firmware version number on the display. Metric (Centimeters): 1. 2. 3. F. Turn off the unit.
Section 5: Label Path Diagram Label Path Diagram Liner Idler Roller Liner Drive Roller Peel Edge Label Path Container Drive Roller Container Idler Roller AP360/362 Label Applicator 15
Section 6: Troubleshooting and Maintenance Troubleshooting Labels are applied to the container crooked. 1. Check for container taper. Some containers such as wine bottles may have a slight taper that will cause the label to be applied crooked. You may be able to apply your label straight if you angle the container idler roller to correspond with the angel of the taper.
Maintenance Label edges fold over or catch on the sensor as they are applied to the container. 1. Over time adhesive from the labels can build up on the sensor flag just above the container rollers. Periodically clean the top of the sensor with a Q-tip and alcohol. 2. Make sure the sensor is positioned in the middle of the the label. Unclamp Liner Idler Roller. When not in use, leave the Liner Idler Roller in the unclamped position.
Section 7: Specifications Container width: 1.0" to 9.4" (25.4mm to 238.8mm) Container diameter: 0.6" to 6.7" (15.2mm to 170.2mm) Container shape: Cylindrical and many tapered Supply roll diameter: Up to 8" (203mm) Media liner width: 1.00" to 8.38" (25.4mm to 213.0mm) Supply roll core: 2" to 3" ID (51.8mm to 76.2mm) Electrical rating: 12 VDC, 5.0A Power requirements: 100-240 VAC, 50/60 Hz, 60 watts Feed speed: 4.0 in/sec. in Default Mode. 2.
AP360/362 Label Applicator 19
P/N 511218 - 101609