Unpack and Assemble 2 Install Software 11 Load Label Stock 12 Create a Print File 17 Toner Monitoring & Supply Management 36 Media Recommendations 41 Maintenance and Troubleshooting 44 Specifications 55 Operator’s Guide © 2011 All rights reserved Introduction
Notices: The information in this document is subject to change without notice. NO WARRANTY OF ANY KIND IS MADE WITH REGARD TO THIS MATERIAL, INCLUDING, BUT NOT LIMITED TO, THE IMPLIED WARRANTIES OF MERCHANTABILITY AND FITNESS FOR A PARTICULAR PURPOSE. No liability is assumed for errors contained herein or for incidental or consequential damages in connection with the furnishing, performance, or use of this material. This document contains proprietary information that is protected by copyright.
Table of Contents Section 1. Section 2. Section 3. Section 4. Section 5. 5.1 5.2 5.3 Introduction . . . . . . . . . . . . . . . . . . . . . . . . . . . . . . . . . . . . . . . . . . . . . . . 1 Unpack and Assemble . . . . . . . . . . . . . . . . . . . . . . . . . . . . . . . . . . . . . . .2 Install Software . . . . . . . . . . . . . . . . . . . . . . . . . . . . . . . . . . . . . . . . . . . .11 Load Label Stock (Includes attaching stock to rewinder) . . . . . . . . . .12 Create a Print File . . . . . .
iv CX1200 Color Label Press
TOC INDEX Section 1: Introduction Thank you for purchasing the CX1200 Color Label Press. The CX1200 is a fast low cost solution for your label printing needs. Here after in the manual the CX1200 Color Label Press will be referred to as the "CX1200". The laser printer portion will be referred to as the "printer". The unwinder and rewinder unit will be referred to as the "base". Toner and label stock will be referred to as "media". This manual is one of many sources of information for this product.
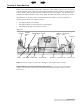
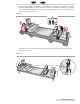
TOC INDEX Section 2: Unpack and Assemble 1. Remove the packaging material as shown below. The printer portion of the CX1200 will be packaged inside a separate box. Set aside the printer box for now. The base unit will be inside a wooden crate. You will need to remove the outer wooden crate using a 1/2” socket wrench or power driver with socket adapters. Remove 5 bolts each from the front and back and 2 bolts from each side. You may now lift off the top and sides as one piece. Figure 2-1.
TOC 2. INDEX In order to remove the base unit, you will need to detach the boards on the right and left side of the base using a Phillips screwdriver to remove the screws. Lift the base out of the crate using the nylon lifting handles on either side. Place the base on the Primera CX1200 cart or a similar cart or bench with adequate surface area and load specifications. Two people are required to lift the base on to a cart or counter. Figure 2-2. ! ! 65.5 Kg. 140 lbs.
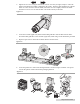
TOC INDEX Open all three boxes inside the crate. Ensure that the following parts are present: two chucks, 3 mm allen wrench and bottle of Loctite® taped to the base unit under the unwinder, empty label core, sample label stock, LCD monitor mount, two label guide discs, two power converters, 3 monitor mount screws, gray Ethernet cable, yellow Ethernet cross-over cable, a software disc, this manual and other documentation. Figure 2-4.
TOC 5. INDEX Tighten the set screws using the 3mm allen wrench. Once they are tight, attempt to rotate the chuck forward backward while watching the drive shaft. The drive shaft should move with the chuck. If it does not move with the chuck, loosen the set screws slightly and turn the chuck until the set screws are even with the flats. The Loctite will dry in 24 hours. Figure 2-6. 6. Locate the rewinder (right side) chuck and the label guide disc with the three interior holes.
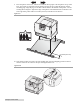
TOC 9. INDEX Place the printer on the base. Primera recommends three people to lift the printer on top of the base. Two people are required to lift the printer and one person to guide the printer onto the mounting pegs. Align the pegs on the base with the holes in the bottom of the printer. Use the locating label to align the right front edge of the printer with indicated mark on the label. The front edge of the printer will be 2.5 inches (63.5 mm) from the front of the base. Figure 2-9. ! 48 Kg.
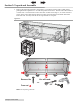
TOC INDEX 11. Open the front cover. Remove the red toner cartridge stabilization clips. Remove all the print cartridges. a. Pull up slightly on the cartridge handhold. b. Pull the cartridge straight out and use the handle to lift it off the guides. c. Place the cartridges on a clean, flat surface out of direct light. Figure 2-11. Note: The CX1200 comes with 4 starter cartridges. These cartridges can only be used with this printer! 12. Remove the Image Transfer Unit (ITU) protection sheet.
TOC INDEX 13. Before replacing the toner cartridges remove the red plastic protection plate from the bottom of each toner cartridge. Put cartridges back in to the printer. On each cartridge there are pegs that correspond to slide rails inside the printer. Note: Before replacing each cartridge, shake it side to side and front to back to redistribute the toner evenly. Figure 2-13. 14.
TOC INDEX 15. Pull down to open the feeder door on the left side of the printer. When the door is ¼ open pull both latches toward the unwinder to release the latches on both side of the door to open it all the way. Figure 2-15. 16. Now connect the six pin mini din cable to the connector on the door. The cable will be taped to the back bar of the base. Remove the tape and connect it as shown. Figure 2-16.
TOC INDEX 17. Remove the packing tape from the rewinder dancer arm and move it into the up (starting) position. Figure 2-17. 4X ! Warning: To prevent serious injury you must bolt the CX1200 to a table or bench. Use the included lag bolts and predrilled holes in the base. 18. Locate the power converters and the printer power cord. Connect power to the printer and switch on the power. Connect the power to the back of the rewinder and unwinder. Switch on the power. Figure 2-18.
TOC INDEX Section 3: Install Software Three pieces of software will need to be installed in order to print to the CX1200: • • • 1. The CX1200 Printer Driver. This software allows a networked or local computer to communicate with the CX1200 via the included Ethernet cable or Ethernet crossover cable. PTPrint. This software allows you to import an existing file and arrange it across a page (step and repeat).
TOC INDEX Section 4: Load Label Stock This section details the general process for installing label stock on the unwinder, and attaching the label stock to the rewinder. 1. Switch on the unwinder, printer and rewinder. Figure 4-1. I O 2. Place the label stock roll (max 12" OD) on the unwinder chuck. Push the stock all the way back until it touches the stop disc. Figure 4-2. Stop Disc Note: You must use only 8.5 inch wide label stock in the CX1200.
TOC INDEX 3. The loose stock should fall on the right side of the roll. Turn the tension knob clockwise to secure the roll to the chuck. Turn the knob as as tight as you can! Feed the stock under the dancer arm and through the cutter. Figure 4-3. Dancer Arm Cutter Note: To track supply roll usage, remember to enter the length of the roll using the instructions in Section 6.5. Tension Knob 4. Continue feeding the stock into the printer feeder tray.
TOC INDEX 5. Place an empty label core on the rewinder chuck. Push the core all the way back until it touches the back label guide disc. Figure 4-5. 6. Place the outer label guide disc on to the rewinder chuck. Push the guide until it touches the rewinder core. Turn the tension know clockwise to secure the core and the label guide to the chuck. Figure 4-6. Note: Some cores may be shorter than the the stock width.
TOC INDEX 7. Print your label according to Section 5 of the manual. Note: Depending on when the printer was last used, the fuser will need to heat up or cool down before the printer will print. This can take from 2 seconds to 2 minutes. 8. Attach the label stock to the rewinder core. A. As the printer is preparing to print, get a piece of tape ready. It is best to stand to the right side of printer with your arms above the rewinder roll.
TOC INDEX C. Immediately after the label stock is attached, engage the Rewinder by flipping the Rewinder Dancer Arm toward the printer until it touches the paper. Figure 4-9. ! Warning! Keep loose fitting clothing such as ties and shirt sleeves away from the rewinder once it has been engaged. Important! To minimize the slack loop that will be created under the rewinder, it is very important that you engage this lever immediately after the label stock is taped to the core.
TOC INDEX Section 5: Create a Print File PTPrint is the label lay-out software included with the CX1200 that will allow you to properly format images for the CX1200. With this software and the layout wizard you can easily import a variety of file formats, step and repeat them across a page and print them to the CX1200. 5.1 Array images with PTPrint Wizard 1. To open PTPrint go to Start - All Programs - PTPrint folder - PTPrint or click the PTPrint icon on your desktop. 2.
TOC 4. INDEX Step and Repeat per page are automatically calculated based on the size set in step 3. Alternately you may increase or decrease the size of the labels to affect the numbers of Rows or Columns per page. Tip: If you are using XY cutter you may be able to fit more images on the page by rotating the image. Select Landscape to rotate the image. 5. Adjust the spacing between labels to affect the number of rows and columns or match a specific die size.
TOC INDEX 6. You may adjust the position of the target/eye mark to be in one or more areas depending on the requirements of your cutter. 7. If you are using a fixed die or a rotary die you can set the length here. Rows and columns per page will be automatically adjusted. Important Note: Check Using Fixed Die only if you are using a full rotary drum die cutter with minimal (1mm) reregistering capability.
TOC 8. INDEX Once you have chosen the imported graphic and the Step & Repeat columns are set click OK to view the lay out. 9. You will notice that the eyemark is automatically placed in the one or more of four locations to correspond with the top or bottom of a label. By default it is .25 x .25 inches square. You may change the size or position by clicking on the eyemark and dragging it to a new location. Change the size by clicking on one corer and dragging your mouse.
TOC INDEX 11. Print a Proof Print. Click File - Print. Set the number of copies to 1. Important Note! Immediately before you print any job you must print 1 page of that job (Proof Print) to properly track toner usage. See Section 6.4 for more information. 12. Print your job. Click File - Print. Set the number of copies to correspond with the number of labels you wish to print. Click OK. Note: Depending on the status of your supplies you may see Low supplies warning.
TOC INDEX 5.2 Manually array images using PTPrint In some cases it may be necessary to manually import images without using the label setup wizard. For example if you wish to arrange multiple different labels on the same page you will need to follow this procedure. Follow the steps below: 1. Open PTPrint. Click the Cancel button to cancel out of the wizard. 2. Go to the File Menu - Choose Link. Browse to the location of the image. Click OK.
TOC 6. INDEX Repeat steps 2-4 to position each different label that you would like to on the page. To align labels with one another or create consistent gaps between labels you can use the X and Y values along with the size of the object to calculate the next position of the the image. For example if the first image is at X = 0.253 and Y = 0.0 and you wanted another image placed to the right of it, aligned to the top with 1/8 gap, you would first follow steps 2-3 to rough position the image.
TOC 9. INDEX Print your job. Click File - Print. Set the number of copies to correspond with the number of labels you wish to print. Click OK. Note: The labels shown in parenthesis on the print screen will not be accurate when manually arraying images. You will need to multiply the number of pages by the number of images on the page. 5.3 Creating Cut Files in PTPrint (PLT) If you also have an FX1200, there are three methods that can be used to create a cut file. Import Die Line (Recommended).
TOC INDEX Adobe Illustrator instructions: 1. Open the graphic in the source application. In this example Adobe Illustrator is used. 2. If you have not already done so, create the die line. Place the die line on the bottom layer in exact the position you would like the FX1200 to cut. 3. Select the die line. 4. Open the swatches windows, click the new swatch icon. 5. A New Color Swatch will be created. 6. Double click on it to open the swatch options.
TOC INDEX 7. Rename the swatch FXCUT. 8. Set the Color Type to "Spot Color." 9. Set the color to white. This necessary because any part of the imported die line which is not covered by another Fill = FXCUT object will be printed unless you set the color to white. 10. Make sure the fill of the object is set to the FXCUT Swatch and the outline is transparent. Outline = Transparent 11. Click OK. 12. Save the file as an EPS (Encapsulated Post Script).
TOC INDEX 5.3.2 Die Cut This method allows you to create standard shape cut lines such as circles, squares and rectangles within PTPrint. Use this method when no cut line has been created in the design software or when the source file EPS is not available and you must use flat files such as JPG, BMP or TIFF. Use these instructions to create a die line: 1. Follow the steps in the CX1200 manual to import and array the graphic. 2. Select any object by clicking on one of the labels on the page. 3.
TOC INDEX 4. Now you can set the various settings that determine where the cut will be. • • • • Set the color of the cut. This is just for viewing purposes. Set the shape. Set the size to correspond to the size of the label that you input in the layout wizard. You can make the size slightly smaller if your label includes a bleed like the example below. Set the corner radius if you want round edges. 5. Click Apply to apply it to the object. 6.
TOC INDEX 5.3.3 Contour Cut This method senses the edge of the printed label and attempts to draw the cut line based on this information. Use this as a last resort when no EPS source file is available and the cut file necessary is a non standard shape. If you have no EPS source file but you do have access to Adobe Illustrator you should not use this method. Instead, import the graphic into Illustrator and create a die line. Use the instructions in section 4.
TOC INDEX 5. Below is an example of edge sensitivity set too low. Notice how the contour line invades the image on the left side. This is because the image is very light in that area. 6. To retry the edge detection simply click Apply again. Note: The object must stay selected for the contour toolbar and the apply button to be visible. If it is not visible, repeat steps 1-2. 7. This time, enter a higher value in the threshold window. You may have to repeat this procedure a few times.
TOC INDEX 8. In this case, 252 was the correct number to choose. Now the contour line follows the outer border of the image correctly. 9. To add a bleed to the image adjust the border value on the counter cut tool bar. Click Apply again. Note: Any time you adjust a value on the toolbar you will need to click Apply to make the change. The threshold window will appear again with your last entered value remembered. Click OK to carry out the change. Note: Bleed amount is NOT the correct value to adjust.
TOC INDEX 10. In rare cases you may want to extend the contour lines inside the image. Check the Inside/Outside box to enable this feature. The threshold screen will appear. Enter the desired value. Click OK. Notice how the contour line traces the "Pinot Noir" letters inside the image. 11. Save the cut file as a .plt file on a thumb drive or any location that the FX1200 touch screen computer is setup to access. Go to the File menu then choose Cut. 5.3.
TOC INDEX Tool Options All settings should be set to the settings shown above with the following exceptions: Overcut. Increase this value if the cut is not completing. This will usually show itself as a tear at the cut starting point. Trailing blade. This affects the path the knife takes to go around corners. Increase the value to reduce tearing at sharp corners. 5.4 Label Layout Design Tips When importing labels through the PTPrint layout wizard there are two items to consider that affect FX1200.
TOC INDEX Columns. The number of columns affects the number of knives that can be used. In order to use multiple knifes the number of columns must be divisible by the number of knives. For example a 4 column cut will allow you to use 1 knife, 2 knives or 4 knives. A 5 column cut will only allow 1 knife to be used. A 6 column cut will allow you to use 1 knife, 2 knives or 3 knives. Manually adjust the columns, change the orientation or reduce the label width to fit more or less columns on the page. Rows.
TOC INDEX 2. Add a barcode by clicking the shapes button on the left side tool bar. Click the Barcode button. 3. A barcode toolbar will appear at the top of the screen. Here you can enter your barcode type and the value. Click Apply when you are ready to insert the barcode. 4. A cursor will appear. Place the cursor where you would like to insert your barcode and click once. You can make any adjustments to the position once the barcode is in place. 5. Repeat the procedure for each image on the page.
TOC INDEX Section 6: Toner Monitoring and Supplies Management The status monitor will start automatically when you print a label for the first time. You may also start it manually by going to Start - All Programs - PTPrint - Status Monitor. The status monitor can be used for the following tasks.
TOC 4. INDEX Click the Quote Tool Tab (fourth tab down with the coin icon). Your Total cost per label including stock will be displayed based on default toner cartridge and stock costs. Adjust these values to reflect the actual cost of your toner and label stock. Once you set the stock and toner cost values you will not have to change them again unless you make another buy of stock or toner at a different cost. Important Note: This tool provides a Cost ESTIMATE. Actual costs may vary.
TOC INDEX How do I Print a Proof Print? A proof print is simply a one page print job using the same PTPrint file that you created using the instructions in Section 5. Go to File - Print. Set your number of copies to 1. Click OK. It is not necessary to tape the proof print to the rewinder. The proof print will print approximately 4 feet of label stock. The stock will be automatically cut.
TOC INDEX How to use a toner Library 1. 2. Based on the proof print, before your job is sent to the printer the software estimates the amount of toner required from each cartridge to finish the job. It then checks this amount against the cartridges in the printer. If any of the levels are too low to complete the job, a warning message will be displayed.
TOC INDEX Print Reduced Amount. If you choose to print a reduced amount the CX1200 will print only the amount that it is able to based on the current supply levels. For example, if the job calls for 1500 labels but the Cyan Toner cartridge only had enough toner for 1200 labels and the supply roll only had enough paper for 900 prints, the software would give you the option to print only 900 labels. The software will always calculate the reduced amount based on the lowest label value. Print Original Amount.
TOC INDEX Section 7: Media Recommendations Primera recommends using Primera brand label stock available from our sales department or our online store. • • http://www.primerastore.com/cx1200-label-stock Sales Phone: 1-800-797-2772 Please search for article 366122 on the Primera Knowledgebase for an updated list of compatible stocks. http://www.primera.com/kb All stock must be converted to 8.5 width roll with 12" outer diameter on a 3" ID core.
TOC INDEX 6. Fuser Heat tolerance - wrinkling, bubbling, burning, Breaking, Curling 7. Water Tolerance 8. Scratch Tolerance 9. Cut quality 10. Lamination Quality Note 1: Test at least 100 feet of continuous material before determining compatibility. Some Plastic stocks will initially appear to be compatible. However over time, the material absorbs too much heat so that not enough is left over to fuse the toner to the surface of the material.
TOC INDEX Section 8: Replace Toner Cartridges Remove the print cartridge(s). a. Pull up slightly on the cartridge handhold. b. Pull the cartridge straight out and use the handle to lift it off the guides. c. Place the cartridges on a clean, flat surface out of direct light. Figure 8-1. Before replacing the toner cartridges, shake the cartridges side to side and back to front to redistribute toner. Next, remove the protective sheet from the bottom of each toner cartridge.
TOC INDEX Section 9: Troubleshooting and Maintenance 9.1 Matching Pantone Colors Important Note: PANTONE® to CMYK Bridge documents/files are available on the installation disc in the Pantone Folder. These documents/files allow you to look up a Pantone Color number and find the corresponding CMYK value to use in the file that will be printed on the CX1200. See below for more explantation. The CX1200 is a CMYK printer. This means any PANTONE® colors must be approximated using CMYK color values.
TOC INDEX Recommended Design Procedures Before beginning design work on a particular label the designer should have specific printing process in mind. This means that the designer will need to create a separate image file for each print process. For example, you can not use the same image file for the CX1200 that you use on a flexo press and expect the colors to print correctly. The designer will need to design a label specifically for the CX1200.
TOC INDEX 5. Type the printers IP address in the address bar. To find the printers IP address navigate the printer's control panel - Network/Ports - TCP/IP - Address. 6. A printer settings page will appear. Go to the Configuration Menu. 7. Click on "Color Samples" 8. Choose "Off CMYK" or "US CMYK". These choices correspond to color matching settings available in the printer driver. 9. Click Print. Not all colors will be printed on this job.
TOC INDEX 2. Open the Toner door to disengage the feeder path switch so the paper feeds out the top of the printer. 3. Turn off the printer. 4. Access the the diagnostic menu by holding the Right and Bottom arrow buttons on the control panel while switching on the unit. 5. Select the Alignment Menu - Select the Color you want to Align - Select "Quick Test" 6. A two page test pattern/worksheet will print. 7.
TOC INDEX 10. Turn the wheel the number of clicks specified in the worksheet in the direction specified in the worksheet. 11. Reprint the Quick Test to verify the values entered have affected the printer alignment. 12. When you are finished, restart the printer and set the default source back to MP Feeder. Press Menu - Select Paper Menu - Select Default Source - Select MP Feeder. 9.
TOC 4. INDEX The following calibration print will print to the Printer. Stretch Factor Calibration Print Measure the lines to the left. Tip: Use a clear acrylic ruler to measure the lines. Circle the letter below the line which measures closest to 10.00 inches. (Each line differs in length by .01 inch) A B C D E F G H I J K L M N O 5. Measure the lines on the calibration print. Enter the letter below the line which measures closest to 10.00 inches. (Each line differs in length by .01 inch) 6.
TOC INDEX 9.5 Stop/Cut button Press the Stop/Cut button located on top of the cutter if you need to quickly stop a job. Do not use this method for non-emergencies since it will deposit a large amount of toner on the ITU that will be cleaned and placed in the waste toner bin. Repeated use will cause toner build up on the cleaning mechanism and wear on the ITU belt. For non-emergencies, cancel the job using the control panel on the printer. Figure 9-1.
TOC INDEX The printed colors do not match the screen. The colors of the label shown in PTPrint may not match the original design program, other print programs or the printed output of the CX1200. There are no ICC profiles available to make colors shown in PTPrint match the printed output or other programs. The colors shown on screen will have no effect on the printers ability to print specific CMYK values or Pantone Matched CMYK values. Default Settings NOT set.
TOC INDEX 9.8 Replacing the Image Transfer Unit 1. Turn the printer off. Open the front cover. Figure 9-4. 2. Remove all the print cartridges. a. Pull up slightly on the cartridge handhold. b. Pull the cartridge straight out and use the handle to lift it off the guides. c. Place the cartridges on a clean, flat surface out of direct light. Figure 9-5.
TOC INDEX 3. Remove the image transfer unit. a. Raise the lever to unlock the image transfer unit. Figure 9-6. b. Pull down on the handle. Figure 9-7. c. Slide the image transfer unit out and place it on a clean, flat surface. Caution: Do not touch the transfer belt. Touching the belt will damage the image transfer unit. Figure 9-8.
TOC INDEX 4. Insert a new image transfer unit back into the printer. a. Align the guides with the insertion grooves and gently slide the unit in. Figure 9-9. b. Rotate the handle up, and push gently to lock the unit in place. Figure 9-10. c. Lower the lever to lock the image transfer unit into place. 5. Close the printer door. 6. Turn the printer on. The printer returns to a Ready state. 9.9 Technical Support.
TOC INDEX Section 10: Specifications Print Speed: 3.25"/second (83mm/second); 16.25 feet/minute (5 meters/minute) Print Method: Color laser Display: 4-line, 160 x 64 pixel, backlit gray-scale display Print Processor: 800 / 133 MHz Media Width: 8.5" (216mm) Print Width: Up to 8.17" (207mm) Print Length: stock Up to 1250 feet (381 meters) per 12" (305mm) roll of self-adhesive label Substrate Types: Self-adhesive label stock and approved films. See Section 7.
TOC INDEX Dimensions: Without bench: 76"W x 22"H x 22"D (193cmW x 56cmH x 56cmD) With bench: 76"W x 50”-56”H x 30"D (193cmW x 127-142cmH x 76cmD) Weight: Without bench: Approximately 256 lbs. (116 kg) With bench: Approximately 456 lbs.
TOC Index Barcodes . . . . . . . . . . . . . . . . . . . . . . . . . . . . . . . . . . . . . . . . . . . . . . . . . . . . . . . . . . . . . . . . . . . . . . . . . .34 Bleed . . . . . . . . . . . . . . . . . . . . . . . . . . . . . . . . . . . . . . . . . . . . . . . . . . . . . . . . . . . . . . . . . . . . . . . . . .28, 31 Color Calibration . . . . . . . . . . . . . . . . . . . . . . . . . . . . . . . . . . . . . . . . . . . . . . . . . . . . . . . . . . . . . . . . . . .46 Color Matching . . . . . . .
P/N 511222 - 093011