510910.
510910.qxd 9/26/2005 2:32 PM Page ii Notices: The information in this document is subject to change without notice. NO WARRANTY OF ANY KIND IS MADE WITH REGARD TO THIS MATERIAL, INCLUDING, BUT NOT LIMITED TO, THE IMPLIED WARRANTIES OF MERCHANTABILITY AND FITNESS FOR A PARTICULAR PURPOSE. No liability is assumed for errors contained herein or for incidental or consequential damages in connection with the furnishing, performance, or use of this material.
510910.qxd 9/26/2005 2:32 PM Page iii INDEX Table of Contents Section 1: Getting Started ...............................................................................1 A. Choosing a Good Location ................................................................1 B. Unpacking and Inspection.................................................................2 C. Identifying the Parts ...........................................................................3 D. Minimum PC Specifications...................
510119pdf.qxd 5/29/2002 11:14 AM Page iv Interactive Feature in this PDF Document There are interactive features that will allow you to jump to different locations within the document. Each listing in the Table of Contents is interactive. Place the cursor on either the words or the page number. A small hand with a pointing finger icon appears. Click on the line with the icon and the document will jump to that page.
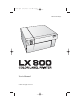
10910.qxd 9/26/2005 2:32 PM Page 1 TOC INDEX Section 1: Getting Started THANK YOU… ...for choosing an LX800 Color Label Printer. This printer is the perfect way for you to create customized, full color labels quickly, easily, and with a touch of class. The LX800 Printer will print razor-sharp text and barcodes, vibrant colors, and even stunning photo-realistic photographs directly onto rolls of labels and card stocks.
510910.qxd 9/26/2005 2:32 PM Page 2 TOC INDEX B. UNPACKING AND INSPECTION While unpacking your printer, inspect the carton to ensure that no damage has occurred during shipping. Make sure that all supplied accessories are included with your unit.
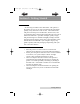
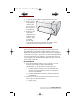
510910.qxd 9/26/2005 2:32 PM Page 3 TOC INDEX C. IDENTIFYING THE PARTS This illustration shows the front of the printer with its control buttons and LED indicator lights. Top Cover Pause Button Pause LED Power LED Load/Feed Button Ink Low LED Unload Button Label Tear Bar The Pause Button pauses the printer AFTER the printing of the current label has finished to allow for loading of label stock and ink cartridges. The Pause LED is lit when the printer is paused.
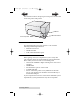
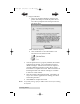
510910.qxd 9/27/2005 9:01 AM Page 4 TOC INDEX This illustration shows the input ports and power switch found on the rear panel of the printer. USB Port Power Input Port Power Switch D. MINIMUM PC SPECIFICATIONS For optimal printing speed you must have a PC with the following minimum specifications: • • • Pentium IV Processor 512 MB of RAM 5 GB of Free Hard Drive Space E.
510910.qxd 9/26/2005 2:32 PM Page 5 INDEX TOC F. APPLYING POWER 1. Locate the power adapter supplied with your printer. 2. Place one end of the adapter cord into the power port on the rear panel of the printer. 3. Plug the power cord of the adapter into an available wall outlet or surge protecting power strip. Once the power cord is connected, the printer can be switched on and off using the power switch. G.
510910.qxd 9/26/2005 2:32 PM Page 6 INDEX TOC b. Plug in USB Cable i. After a few moments Windows will detect the printer and attempt to install the printer driver. You will be prompted with a dialog box like the one shown here: Click “Continue Anyway”. ii. Once installed the "Color Label Printer" icon will appear in the printers folder. 3. Once the printer driver is properly installed, the installer application will prompt you to install label stock and the ink cartridges.
510910.qxd 9/26/2005 2:32 PM Page 7 INDEX TOC Mac Installation 1. Insert the Installation CD into your computer. In a few moments the Color Label Printer Icon should appear on your desktop. 2. Double click on the Color Label Printer Icon. 3. To run the installation, click on the ColorLabelSeries.pkg file. 4. Follow the on screen instructions to install the software. 5. Apply power and plug in the USB cable.
510910.qxd 9/26/2005 2:32 PM Page 8 TOC INDEX Section 2: Supplies and Driver Settings A. ABOUT INK CARTRIDGES AND LABEL MATERIAL (PIGMENT-BASED VS. DYE-BASED INKS, GLOSS VS. PLAIN PAPER) For full-color printing, a 3-color ink cartridge is available. This cartridge contains the three process-color inks of yellow, magenta, and cyan, which combine to produce up to 16.7 million printable colors and works very well on all label stocks. Two different Monochrome ink cartridges are available for the printer.
510910.qxd 9/26/2005 2:32 PM Page 9 INDEX TOC NOTE: All the stock listed on Primera's supply order sheet is semi-gloss or gloss and is meant for use with the Dye-Based Black Ink. You can use other stock if you like. If using plain paper stock, you will most likely have success with the Pigment-Based Black Ink. It is recommended that you test your stock and ink combinations before committing to a large supply purchase. Other paper label stock may also work properly as long as it is in specification.
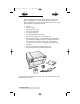
510910.qxd 9/26/2005 2:32 PM Page 10 INDEX TOC Installing Label Stock The following steps will guide you through loading label stock in your printer: Make sure power is connected and printer is on. 1. Open the Top Cover. 2. Lower the Roll Guide and pull it outward to make room for your label stock. 3. Pull the Movable Throat Guide outward to make room for the label stock. 1. Open Cover. 3. Pull Throat Guide Out. 2. Lower the Roll Guide and Pull it Outward. 4.
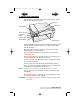
510910.qxd 9/26/2005 2:32 PM Page 11 TOC INDEX 7. Place the leading edge of label stock under the Label Stock "label stock" symbols on the Throat Guides. The label stock should be placed far enough into the throat of the printer to correctly position the Movable Throat Guide but not yet into the printer itself. The label stock should be biased against the Fixed Throat Guide. 8. Slide the Movable Throat Guide inward until it almost touches the label stock.
510910.qxd 9/26/2005 2:32 PM Page 12 INDEX TOC over the identifying mark. The Sensor Position Adjust tab has a guide in inches and milimeters that will help you identify where to set the tab to align the sensor over any identifying mark. To do this, simply measure from the center of the hole or mark to the edge of the label stock.
510910.qxd 9/26/2005 2:32 PM Page 13 INDEX TOC C. INSTALLING INK CARTRIDGES Your printer has a built-in ink tracking system. This system is designed to warn you if your ink cartridges are low on ink. This ensures your labels will print properly and that the printer can create large batches of labels unattended and worry-free. In order to make this system work properly, the cartridges must be changed using the procedure listed below.
510910.qxd 9/26/2005 2:32 PM Page 14 INDEX TOC 2 1 3 11. Click OK on your screen to indicate the new cartridge is now installed. Once you click OK you will be prompted to align the cartridge. The printer will automatically align the cartridge for you as follows: a. For Alignment you will need to have installed label stock that is equal to or larger than 4" x 4" (101.6 mm x 101.6 mm). If your stock meets this requirement, skip to step d. b.
510910.qxd 9/26/2005 2:32 PM Page 15 INDEX TOC e. The printer will print the alignment test and scan it into memory. Once the alignment is complete you will see a confirmation dialogue box on your monitor. Click OK. You have successfully installed the ink cartridges. D. PRINTER DRIVER SETTINGS Once the printer driver has been successfully installed, you will need to set the driver up with the appropriate print options.
510910.qxd 9/26/2005 2:32 PM Page 16 TOC INDEX NOTE on PC Settings: Most applications allow you to change these same printer driver options from their "Print" and/or "Printer Setup" screens. This means that you don't have to go back to the main printer setup window each time you want to change a setting or option in the printer driver. These applications will usually give you the same choices and options, but in a slightly altered format.
510910.qxd 9/26/2005 2:32 PM Page 17 INDEX TOC The following options are present in both the PC and Mac drivers: Label Size This option is set to Custom as a default. Even though you can click Properties and key in the dimensions of your label, this is best done from your labeling software. It is recommended that the Label Size setting is left to "Custom". Orientation There are two settings for orientation, Portrait and Landscape.
510910.qxd 9/26/2005 2:32 PM Page 18 TOC INDEX Best for Photos mode is best used for photographic images where accurate color reproduction is very essential. Images printed in this mode will look lighter than those printed in Photo mode. Skin tones especially will look more natural in this mode. NOTE: Exact color matching of the printed labels to the screen may never be possible since there are factors that affect this out of the drivers control.
510910.qxd 9/26/2005 2:32 PM Page 19 INDEX TOC sheet of paper (no wider than 8.25 inches or 209mm) into the print area then click OK to continue. The printer will print an alignment pattern then scan that pattern into memory automatically. Once it has finished you will see a dialog box stating that alignment values have been saved. Clean/Change Cartridges & Check Ink Levels Click this setting and you will see a Properties button.
510910.qxd 9/26/2005 2:32 PM Page 20 INDEX TOC c. Once the sensor "sees" the paper it will automatically feed it into position and will begin to print. The printer will print a purge pattern where swaths of each color are printed to clean the jets of the cartridge. A series of diagonal lines are printed in each color of both cartridges. By examining this pattern you can tell if the cartridge is firing all jets or if the cartridge is dirty and requires further cleaning.
510910.qxd 9/26/2005 2:32 PM TOC Page 21 INDEX TOF Offset TOF stands for Top of Form and this setting allows you to fine tune the alignment of your printing on your label stock. This will be factory calibrated. If fine tuning is needed, increase this setting to move the image down on the label. The unit of measure is 0.1mm. Tear Off Offset If Rewinder Mode (described earlier in this section) is set to No, the printer will present your labels over the Tear Bar for easy removal.
510910.qxd 9/26/2005 2:32 PM Page 22 INDEX TOC Section 3: Using the Printer A. USING NICELABEL Your printer ships with a basic version of Niceware's NiceLabel software. This easy-to-use software is designed to allow you to create full color labels with text and barcodes quickly and simply. The following is a tutorial to guide you through creating and printing a sample label. Launch NiceLabel from your computer's Start Menu.
510910.qxd 9/26/2005 TOC a. 2:32 PM Page 23 INDEX Set the dimensions of your label and unit of measure and click Next. b. Select your printer. This should be the Color Label Printer. Click Finish.
510910.qxd 9/26/2005 2:32 PM Page 24 INDEX TOC 3. Now you will see your label in the Document Window. You can start to design your label using Tools from the Tool Box. First, we will use the Text Tool. Text Tool Icon a. Text Cursor Click the Text Tool Icon in your Toolbox, then move the text cursor over the Document Window and click in the location where you want to enter text. There is no need to be exact, once you enter your text it can easily be resized and/or moved about the label.
510910.qxd 9/26/2005 2:32 PM Page 25 INDEX TOC 4. Now, insert a barcode. BarcodeTool Icon Barcode Cursor a. Click the Barcode Tool Icon from the Toolbox. You will now have a Barcode Cursor that can be positioned anywhere within the Document Window. Position your cursor in the general area where you wish your barcode to print and click to start entering your barcode information. There is no need to be exact, once you create your barcode it can easily be moved and/or resized.
510910.qxd 9/26/2005 2:32 PM INDEX TOC c. Page 26 Click Define to change the type of Barcode or to make changes to the options associated with your particular type of barcode. You will also want to set the Symbol Height and X Expansion Factor d.
510910.qxd 9/26/2005 2:32 PM Page 27 INDEX TOC e. Click OK, then click Finish and your Barcode will be placed on your label with "Edit Handles" to allow you to move and resize your barcode. Graphics Tool Icon 5. Graphics Cursor Now insert a graphic. Click on the Graphics Tool Icon in the toolbox. You will now see a Graphics Cursor. Drag the cursor to the general area where you wish to place the graphic and click to get an Open dialog box. You will be prompted to browse for graphic files.
510910.qxd 9/26/2005 2:32 PM INDEX TOC a. Page 28 Click Open and the graphic will be imported with edit handles so you can easily move and resize your graphic. b. There are other tools at your disposal to align the object or add shapes. On the right side of the screen you will see alignment tools so you can align the objects on your label in relation to each other.
510910.qxd 9/26/2005 2:33 PM Page 29 INDEX TOC You are now ready to print your label. Click File then Print from the main menu. Choose your number of copies and click OK. Congratulations! You have successfully created and printed your first label. The rest of this section will explain in more detail how to use barcode labels. Also, you can find more tips and hints by simply clicking Help then Contents in the main menu. c. B. CREATING BARCODES IN NICELABEL Barcode Tool Icon a.
510910.qxd 9/26/2005 2:33 PM Page 30 INDEX TOC ii. Click Define to change the type of Barcode. iii. This contains four tabs, General, Check Digit, Human Readable and Details. iv. The General Tab (shown on page 27) allows you to choose the appropriate barcode type from the Available barcodes: menu. You can choose one- or two-dimensional barcodes. Note that different barcode types have different requirements - some of them only allow numbers to be encoded, while others only allow upper case characters.
510910.qxd 9/26/2005 2:33 PM Page 31 INDEX TOC Available barcode types are listed here: EAN and UPC EAN-8, EAN-8 + 2-digit supplement, EAN-8 + 5-digit supplement, EAN-13, EAN-13 + 2-digit supplement, EAN-13 + 5-digit supplement, EAN-14, DUN-14, UPC Case Code, UPC-A, UPC-A + 2-digit supplement, UPC-A + 5-digit supplement, UPC-E, UPC-E + 2-digit supplement, UPC-E + 5-digit supplement, EAN.
510910.qxd 9/26/2005 2:33 PM TOC Page 32 INDEX vi. The Human Readable Tab allows you to manipulate the human readable text printed with your barcode. Here you can disable Human Readable, select position (above or below the barcode), include a check digit, and choose your font type and scaling. vii. The Details Tab allows you to set some further details of the barcode presentations on the printer.
510910.qxd 9/26/2005 TOC 2:33 PM Page 33 INDEX C. PRINTING ON A MAC FROM ADOBE ILLUSTRATOR 1. Create your document using the File - New command. Set your Width and Height to correspond with the label stock installed in the Printer. 2. Once your document is created and ready to print go to File - Print. The following screen will appear. Before doing anything else, click the Printer button to change the print quality settings for this print. Click here for more information on Print Settings.
510910.qxd 9/26/2005 2:33 PM TOC Page 34 INDEX 3. The printer settings screen defaults to Copies and Pages. Click the drop down arrow to change the screen to Label Printer Settings. 4. Change your printer settings to the desired quality.
510910.qxd 9/26/2005 TOC 2:33 PM Page 35 INDEX 5. Click Print to return to the print preview screen. Now click Page Setup to change the label size set in the printer driver. 6. The paper/label size defaults to 4x6 or whatever was last used.
510910.qxd 9/26/2005 2:33 PM Page 36 INDEX TOC 7. Click on the drop down arrow to select a predefined label size or create a custom size by clicking Manage Custom Sizes. For this example there is no 5.5 x 4 label predefined so the following step will explain how to create a custom size. 8. To create a custom size click the + below the list of custom sizes already created. Change the page size to correspond with the stock installed in the printer.
510910.qxd 9/26/2005 TOC 9. 2:33 PM Page 37 INDEX If you have created a custom size you will need to choose it again here by clicking the drop down arrow and choosing the custom size. Click OK. 10. You are now ready to print your label. Make sure the number of copies is set. Also, check the orientation. The label shown on the preview screen is how your label will print. Make sure there is no white space around the label. If there is white space you may have to change the orientation.
510910.qxd 9/26/2005 2:33 PM Page 38 TOC INDEX NOTE: You must set the Printer and Page Setup by clicking on these buttons each time you print. You must perform these steps each time you print even if what you see on the preview screen appears correct. D. CREATING BARCODES ON A MAC You can integrate barcode printing into any application that can print to the printer by using Mac Barcode Maker. Mac Barcode Maker can be purchased from their website at www.barcodeformac.
510910.qxd 9/26/2005 2:33 PM Page 39 INDEX TOC Section 4: Troubleshooting and Maintenance A. CLEANING THE PRINTER It may be necessary to clean the ink cartridge nozzles if the your labels are printing with horizontal banding or if you suspect an ink cartridge nozzle has become slightly dried out or clogged. Refer to the cleaning procedure explained within the Clean/ Purge description of Section 2-D to clean the cartridge nozzles.
510910.
510910.qxd 9/26/2005 2:33 PM Page 41 INDEX TOC Section 5 : Label Specifications Stripe Length Stripe Width Black Stripe Label Height Label Width Media Width Distance from edge of Media Throughhole (Optional) Width of Opening Gap Between Labels Max Min Label width 8.25" (210mm) 0.75" (19mm) Media width 8.5" (215mm) 1.5" (38mm) Label height/length 24" (609.6mm) 0.75" (19mm) Gap between labels 10" (253mm) 0.10 (2.5mm) Width of through-hole opening 0.5" (12.65mm) 0.25" (6.
510910.qxd 9/26/2005 2:33 PM Page 42 INDEX TOC Section 6 : Technical Specifications Print Method: Print Resolutions: Inkjet 4800 x 1200 dpi, 1200 x 1200 dpi, 600 x 600 dpi Print Speeds: Approximately 2" (51mm) per second for black Approximately 1.5" (38mm) per second for color + black Approximately 10" per second feed rate Ink Cartridges: #53335 Color (CMY) #53336 Black Dye-Based (Kd) #53020 Black Pigment-Based (Kp) Colors: 16.
510910.qxd 9/26/2005 2:33 PM Page 43 INDEX TOC Label Design Software: NiceLabel™ ME Primera Edition included. Can also be used with most other popular Windows-based label design software programs Electrical Rating: 12VDC, 3.0A Power Requirements: 100-240VAC, 50/60 Hz, 60 watts Certifications: UL, UL-C, CE, FCC Class B Weight: 29 lbs. (13.2 Kg) Dimensions: 17"W x 9.1'H x 15.
510910.qxd 9/26/2005 2:33 PM Page 44 TOC Index Alignment Tool...............................................................................28 Applying Power................................................................................5 Available Barcode Types in NiceLabel ......................................31 Barcode Wizard ........................................................................25, 29 Cartridge Alignment .....................................................................
510910.qxd 9/26/2005 2:33 PM Page 45 INDEX Sensor Position Adjustment ........................................................11 Sensor Type .....................................................................................20 Rewinder Mode..............................................................................20 Tear Off Offset................................................................................21 TOF Offset.............................................................................
510910.