© 2010 All rights reserved 3 Setup 4 Attach Label Stock 5 Operation 6 Specifications 7 Quick Start Guide Unpack and Inspect 511279-120110
Notices: The information in this document is subject to change without notice. NO WARRANTY OF ANY KIND IS MADE WITH REGARD TO THIS MATERIAL, INCLUDING, BUT NOT LIMITED TO, THE IMPLIED WARRANTIES OF MERCHANTABILITY AND FITNESS FOR A PARTICULAR PURPOSE. No liability is assumed for errors contained herein or for incidental or consequential damages in connection with the furnishing, performance, or use of this material. This document contains proprietary information that is protected by copyright.
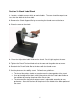
Section 1: Unpack and Inspect Thank you for purchasing the RW-12. The RW-12 Label Rewinder makes it easy to rewind large quantities of labels. Its perfect for use with Primera’s entire line of LXSeries Label Printers and many other label printers.
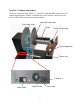
Section 2: Setup The RW-12 Rewinder is fully assembled inside the box. However, to get started you will need to plug in the power cable, switch the unit on and install the stability stand. Please follow the instructions below to install the stability stand. 1. Remove two thumb screws on the base of the unit. 2. Attach the stand to the base. 3. Reattach the Thumb Screws.
Section 3: Attach Label Stock 1. Locate a suitable core on which to rewind labels. The core should be equal to or less than the width of the liner width. 2. Remove the Chuck Support Bar by unscrewing the thumb screw at the base. 3. Place the core on the chuck. 4. Place the Adjustable Label Guide on the chuck. Push it tight against the core. 5. Tighten the Chuck Tension Knob so that the core and the guides do not move. 6. Reattach the Chuck Guide Bar to the base with the thumb screw. 7.
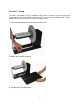
8. Before you attach the label stock print a header of approximately 2 feet (61 cm) of label stock. 9. Feed the header under the dancer arm. 10. Attach the stock to the core using tape. 11. Turn on the rewinder. 12. Start your print job. Section 4: Operation During normal operation the following will occur. 1. When the dancer arm is in a central position, the unit is idle; 2. When the dancer arm is down, the unit rewinds the labels onto the core; 3.
Section 5: Specifications Maximum Roll Diameter: 10” (254 mm) Core Size: 3” Maximum Roll Width: 8.5” (216 mm) Minimum Roll Width: 1” (25.4 mm) Electrical Rating: 29V, 2.5 A Power Input: 100-240 VAC, 50/60 Hz Weight: 17 lbs (7.7 kg) Dimensions: 17.5”W x 6.5”D x 13.5”H (444.5mm x 165.1mm x 342.