
Instructions / Assembly
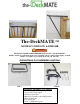
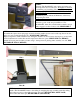
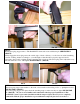
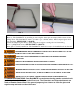

FIG. 4 FIG. 4A
STEP 5-
FIG. 5 FIG. 5A
Attach telescoping support arm to “The-DeckMATE” frame and secure with detent pin. SEE FIGURE 5
(ABOVE)
Solidly engage the telescoping arm to the outside edge of deck or balcony or to the lower crossbar if attaching
to inside of railing. Adjust accordingly to your rail height so that the table is properly supported and is
horizontal to the ground or slightly angled toward the deck or balcony. The telescoping arm is adjustable every
inch and will fit 36” to 42” rail heights. SEE FIGURE 5A (ABOVE)
STEP 6-
FIG. 6 FIG. 6A
The telescoping support arm attaches to the deck or bottom rail crossbar using 1- #8 x ½” phillipshead screw.
SEE FIGURE 6 (ABOVE)
Once telescoping support is in place check the attaching straps to make sure they are tight. SEE FIGURE
6A (ABOVE). **If you are now familiar and comfortable with the proper installation of “The-
DeckMATE” please repeat entire installation with the tempered glass sheet. If you are completely
comfortable with the proper installation, repeat without the tempered glass sheet as needed. **