
Installation Instructions

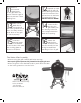

Primo Kamado Grill Assembly Instructions
Two Adults are Needed to Assemble the Grill.
Tools Needed: Box Cutter, Phillips Screwdriver, 7/16” Wrench.
IMPORTANT: DO NOT LIFT GRILL BY THE HINGE WHEN INSERTING INTO CRADLE
3
Remove the two
side tables and
set them aside.
Remove the two “Z”
shaped cardboard
inserts and discard.
4
Use a box cutter
and cut vertically
down one of the
corners. Firmly pull away
the four cardboard sides
and discard.
1
When the Primo
Kamado Grill
arrives, select a
level area with plenty of
working space such as a
driveway or parking lot.
2
Open the top of
the box, remove
the two main
cradle parts and set
them aside. Note: one
has a notched top bar.
5
Open the grill and
remove the ash
tool, grate lifter,
owners manual and
the cradle hardware
package.
6
Insert the cradle
part with the
notched top bar
horizontally then turn
upright to form an “X”
shape and align holes.
7
Insert the Phillips
head screw
through the two
bottom bars. Use a
locking washer, then nut.
Tighten with wrench.
8
Insert a flat head
screw into the two
top bars. Use a
locking washer and one
of the nuts. Tighten with
wrench.
9
Align the metal
crossmember bar
with the holes and
use the remaining flat
head screws and nuts.
Tighten with wrench.
10
Align the
cradle with the
grill. Make sure
the locking casters are
locked and the furthest
from the grill.