
Primus Air 40 & Breeze Circuit Replacement Kit Instructions


ECO 101-2720 05/17/2012 Page 7 of 12 3-CMLT-1016 REV G
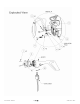
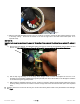
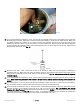
18. Place the new AIR X or AIR BREEZE circuit next to the front of the body. Holding the ribbon cable, carefully separate
the two LED wires, as a pair, from the potentiometer wires. Leave about 7” of ribbon cable intact (in the five wide form)
from the circuit. See Fig. 6
Fig. 6
19. Straighten out the wires that lead to the LED by running it between your thumb and index finger. Gently squeeze the
wires near the LED together to allow it to properly fit into the LED clip. Do not attach the clip yet.
20. Hold the empty body with the yaw shaft on top, and gently run the LED wire down the body. Push the LED through the
LED hole.
21. Push the new black LED clip onto the LED until you feel it snap lightly into place. The tip of the LED should stand
approximately 1/8” above the clip. Place 1 drop of super glue on the LED and clip.
22. Gently pull the wire from the inside of the unit while guiding the LED with clip towards the hole.
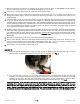
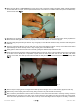
23. Gently press the LED clip down until the assembly slides into the hole. None of the four tabs should catch on the edge
of the hole. Use a dental pick or equivalent to press down the LED CLIP flush into the unit. DO NOT push down
directly on the LED. The LED clip should be flush with the body and the LED should stick out 1/8” above the clip. See
Fig. 7
Fig. 7
24. Place 2 drops of super glue on the edges of the LED clip so that the glue can run down into the gap around the clip.
25. Remove any excess super glue from the body, being careful not to push the LED into the body.
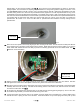
26. Next, install the potentiometer. Place a bead of silicone on the surface that will mate to the body casting. Insert the
potentiometer into the hole on the side of the unit and place the star washer and the nut loosely over the threads.
Orient the entire potentiometer so that the slot on the top of the shaft aligns with the dimple on the body, to mark the