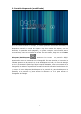
Encender/Apagar .............................................................................. 2 Usar la pantalla digital ...................................................................... 2 Interfaces ......................................................................................... 3 1. Escritorio .................................................................................... 3 2. Pantalla bloqueada (modificada) ................................................ 4 Programas operativos ......
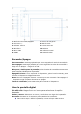
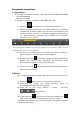
1: Botón de Encendido/Apagado 7: Puerto de Carga DC 2: Volumen +/- 8: Botón Reset 3: Cámara Trasera 9: Lector Micro SD 4: Micrófono 10: Altavoz 5: Micro USB 11: Cámara Frontal 6: HDMI 12: Pantalla Táctil Encender/Apagar Para encender: mantenga pulsada por cinco segundos la tecla de encendido Para apagar: mantenga pulsada por cinco segundos la techa de encendido→ haga clic en Apagar → haga clic en OK Bloquear/ desbloquear la pantalla: pulse la tecla de encendido suavemente para bloquear/desbloque
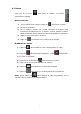
Interfaces 1. Escritorio 1 23 7 4 1: 3: 5: 7: 9: 5 6 Búsqueda Google Hora Volver Ver todas las aplicaciones Volumen + 8 2: 4: 6: 8: Estado de la batería Volumen Volver al Escritorio Aplicaciones Abiertas En el escritorio, pulse en el reloj hacia abajo para mostrar la lista de funciones desde las que puede operar. Puede establecer programas de uso frecuente arriba en el escritorio haciendo clic y manteniendo pulsado el programa para moverlo a la ubicación deseada en el escritorio.
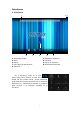
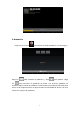
2. Pantalla bloqueada (modificada) Si no se utiliza durante un tiempo, o cuando presione la tecla de encendido, el dispositivo estará en modo de espera. Hay dos modos de espera, uno es dormido, la pantalla está apagada y si pulsa cualquier tecla estará activo nuevamente, como se muestra en la foto. En este modo, haga clic en el icono bloquear/desbloquear , entonces los iconos en posición A\B\C aparecerán como se muestran en la fotografía.
Programas operativos 1. Reproductor ☆ AVI, WMV, RM, RMVB, 3GP, MKV, MP4, ASF, VOB, MPG, MOV hasta 1080P HD-Alta Definición Reproducir un vídeo ☆ Formatos de imagen permitidos: JPEG, BMP, GIF, PNG. 1. Haga clic para entrar en el interfaz del reproductor. 2. Seleccione un archivo de vídeo y el sistema pasará a la interfaz de reproducción de vídeos.
3.Grabación Haga clic en el icono Haga clic clic para entrar en modo grabación (vea la imagen). para empezar la grabación, y aquí para pararla. Haga para escuchar la grabación de audio. Los archivos grabados se nombran según la hora de grabación. Puede seleccionar cualquiera de ellos para oírlos. En la imagen anterior, la aguja muestra la intensidad de sonido y la hora muestra el tiempo de grabación.
4. Cámara Haga clic en el icono para abrir la cámara, el interfaz aparecerá en pantalla. Hacer una foto 1. En la interfaz de la cámara, haga clic para hacer una foto. 2. La foto se guardará. 3. En el sistema versión 4.2, puede arrastrar la imagen para introducirla directamente en un álbum. Cuando accede al álbum desde la cámara, puede visualizar hasta 3 fotografías en miniatura. 4. Haga clic en Volver para ir al álbum. 5. Haga clic para entrar en el interfaz de la cámara. Grabando un vídeo. 1.
5. Navegador Haga clic en el icono para entrar en el navegador. 6. Tienda Google Play Abra para ver y bajarse aplicaciones. Cuando use la tienda por primera vez, se le pedirá su registro con su cuenta google, (si no tiene una cuenta gmail, ábrase una en http://gmail.google.com). 7. Calendario Haga clic en el icono del calendario. Cuando use el calendario por primera vez, se le pedirá su registro. Introduzca su email y contraseña, haga clic en siguiente y complete los ajustes según la guía.
8. Reloj Haga clic en el icono del reloj. Puede ver el día y la hora actual. Alarma Puede establecer más de una alarma a la vez. ☆ Cuando el icono aparece en pantalla, significa que al menos una alarma está activada. Añadir una alarma 1. Haga clic en el icono del reloj. 2. Haga clic en el menú →Añadir alarma. 3. Establezca la hora de la alarma. →Si no selecciona repetir, la alarma se borrará tras sonar. 4. Haga clic en Activar reloj. 5. Haga clic en Finalizar.
9. Calculadora 1. Haga clic en el icono de la calculadora. 2. Haga clic en los números y operaciones para calcular. 3. .Haga clic en Borrar, para borrar el resultado uno por uno, o haga clic y manténgalo presionado para borrar todos los resultados. 10. Descargar 1. Haga clic en el icono de descargar. 2. Puede ver el software descargado y seleccionar uno para instalarlo. 11. Mapa → Para usar esta función, asegúrese de tener acceso a internet.
. Email ☆Admite POP3 and SMTP. Añadir una cuenta de email: Puede introducir una o más direcciones de email que quiera usar en el dispositivo. 1. Haga clic en el icono de Email. 2. En el interfaz de Su cuenta, haga clic en Siguiente. 3. Haga clic en la opción de dirección de email → Introduzca su dirección de email. 4. En la apartado contraseña → Introduzca su contraseña. 5. Haga clic en Finalizar. 6. Ajuste manual (opcional): el servidor seleccionará un proveedor (gmail.com, etc.
Escribir un nuevo email 1. Una vez en la bandeja de entrada, haga clic en Menu →Escribir 2. Haga clic en Enviar a e introduzca la dirección del destinatario. 3. Si quiere incluir más destinatarios en cc o bcc, haga clic en Menú → Añada cc y bcc, e introduzca las direcciones de los destinatarios. 4. Introduzca el asunto en la barra del título. 5. Haga clic en Escribir un email para introducir su información. 6. Si es necesario, haga clic en Menu → Añadir un adjunto para añadir ficheros. 7.
13. Gestión de archivos Haga clic en el icono Gestión de archivos para ver todos los archivos guardados en el dispositivo (memoria interna, tarjeta SD, memoria USB), y puede instalar aplicaciones de Android en su dispositivo de forma rápida y cómoda. 1 2 1. Inicio 5. Nueva Carpeta 3 4 2. Nivel Atrás 6. Atrás 5 6 3. Multi Selección 7. Siguiente 7 4.
Configuración Red inalámbrica Wi-Fi Establezca el punto de acceso Wi-Fi (véase ajustes WiFi para más detalle). Tráfico Establecer y gestionar el tráfico de datos. Más… Modo vuelo: Permitir/impedir el Modo vuelo Ethernet Configure la red por cable. VPN Configure la red VPN. Red móvil Establezca la red más detalle). 3G (véase ajustes 3G para Dispositivo. Ajuste el volumen de los medios, alarma y notificaciones. Haga clic y deslice Volumen para ajustar el volumen, luego haga clic en OK.
sincroniza ción Servicio de ubicación Establece el servicio de ubicación de Google y las aplicaciones de búsqueda de Google. Protector pantalla Seguridad de Establecer protector de pantalla Contraseña Establecer contraseña. Gestión dispositivo 1.Añadir o borrar gestores del dispositivo 2. Ajustes de instalación de APK de una fuente desconocida. del Almacenamient o de credenciales. Gestiona la seguridad de las credenciales. Establece el idioma principal.
Ajustes Wi-Fi Muchas funciones exigen conexión Wi-Fi, por lo que le sugerimos que use la red Wi-Fi preestablecida. 1. Clic → Ajustes → Red inalámbrica 2. Permitir la conexión Wi-Fi. El dispositivo buscará todas las junto automáticamente. El icono redes Wi-Fi Wi-Fi disponibles significa que necesita una contraseña para acceder. 3. Haga clic en la red Wi-Fi elegida → si tiene contraseña, debe introducirla → Haga clic en conexión. Tras conectarse a la red Wi-Fi, verá el icono en el escritorio. 4.
establecer/ MMSC: Sin establecer / MMS proxy: Sin establecer / MMS Port: Sin establecer / MCC:460/ MNC:01/ Tipo autentificación: Sin establecer/ APN type: Sin establecer/ APN protocolo: Sin establecer Tras establecerlo, podrá conectarse a la red 3G, cuando vea el icono en la pantalla. Si el icono está gris, significa que el sistema busca la red y cuando está azul, significa que está conectado a la red. El icono significa que se está produciendo una transmisión de datos.
Descargar, instalar/desinstalar aplicaciones ☆Puede encontrar muchas aplicaciones gratuitas para Android en internet. Simplemente abra su explorador y busque «aplicaciones Android». Las aplicaciones Android que compre o descargue pueden instalarse vía Gestión de archivos de forma rápida y fácil. 1. Copie el archivo .apk que quiere instalar en la tarjeta SD o en el disco USB →Inserte la tarjeta o conecte el USB. 2. Haga clic en el icono Gestión de Archivos. 3. Busque la carpeta en la que el archivo .
Conectar al PC 1. Conecte el dispositivo al PC, así este dispositivo puede usarse como dispositivo de almacenamiento móvil. Cuando use un cable USB para conectarse al PC, conecte un extremo del cable al puerto USB OTG del dispositivo, y el otro extremo al puerto USB del ordenador. 2.
Precauciones Por favor, siga las indicaciones de seguridad cuando use el dispositivo.当 No exponga el producto a la lluvia o la humedad. Mantenga el dispositivo lejos de la luz directa del sol o una fuente de calor. Proteja el cable de conexión. Cuando use el cable de conexión, no lo pise ni ponga nada encima ni lo presione con fuerza. Tenga especial cuidado con los conectores del cable. Por favor, use adaptadores autorizados para la carga, para no dañar el dispositivo.
DECLARACIÓN DE CONFORMIDAD Primux Trading S.L., Tecnópole, Edificio CEI, 32900 Ourense. Declara que este producto: TABLET PRIMUX CICLON 2 Cumple con las disposiciones de la Directiva 1999/5/CE sobre Equipos de Terminales de Radio y Telecomunicaciones (R&TTE), de la Directiva 95/2006/CE de Seguridad Eléctrica de Equipos de Baja Tensión y de la Directiva 2004/108/CEE de Compatibilidad Electromagnética, de acuerdo con: - EN 300 328 V1.7.1 (2006-10) - EN 301 489-1 V1.9.2 (2011-09) - EN 301 489-17 V2.1.
22
ENGLISH USER'S MANUAL 23
24
Appearance ..................................................................................... 26 Power on/off................................................................................... 26 Using touch screen .......................................................................... 26 Interfaces ....................................................................................... 27 1. Desktop .................................................................................... 27 2.
1: Power 7: DC charger socket 2: Volume +/- 8: Reset button 3: Rear camera 9: Micro SD CARD 4: Microphone 10: Speaker 5: Micro USB socket 11: Front camera 6: HDMI socket 12: Touch panel Power on/off Power on: press and hold the power key for 5 seconds Power off: press and hold the power key for 5 seconds→ click Power off → click OK Lock/unlock screen: press the power key swiftly to lock/unlock the screen Forced shutdown: in case of no response of the device, press the Reset key to reset the devi
Interfaces 1. Desktop 1 23 7 4 1: 3: 5: 7: 9: Google search Time Return to desktop See all App Volume + 5 6 8 2: 4: 6: 8: Battery status Volume Return to desktop Select Multitask On the desktop, touch the clock down to display function list where you can operate accordingly. You can set frequently used programs on the top of the desktop by clicking and holding the program you want and dragging it to the desktop.
2. Locked screen (modified) If there is no operation for a long time, or when you press the power key, the device will enter standby mode. There are two standby modes, one is sleep mode, the screen is off in this mode, and if you press the button key, it will wake up and enter nap mode, as shown in the picture. In this mode, click and hold Lock/unlock icon , there identifiers at A\B\C positions will appear as shown in the picture.
Operating programs 1. Player ☆ AVI, WMV, RM, RMVB, 3GP, MKV, MP4, ASF, VOB, MPG, MOV up to 1080P HD-Definition Playing video ☆ Supported image formats: JPEG, BMP, GIF, PNG. 1. Click to enter player interface. 2. Select a video file to play and the system will enter video playing interface. Click icons on the screen to adjust the video accordingly (volume +/-, playing process bar, storage play, brightness +/-, pause/play, next video, screen size, desktop play, return, menu). Note: System ver. 4.
3. Recorder Click icon Click to enter recorder mode (see the picture). to start recording, and click to stop. Click to play the recorded audio. The recorded files are named according to the recording time. You can select any one to play. In the above picture, the finger shows the sound wave intensity and the time shows the recording time.
4. Camera Click icon to enable the camera, the interface will appear. Taking a photo 1. In camera interface, click to take a photo. 2. The photo will be saved. 3. For system ver. 4.2, you can drag the taken photo to enter the album directly. When entering album from camera mode, you can view the pictures in thumbnails and up to three pictures. 4. Click Return to go back to album 5. Click to enter camera settings. Recording a video 1. Click to switch to video. You can record video. 2.
5. Browser Click icon to enter browser interface 6. Play store Open to view and download applications. When running play store for the first time, you will be asked to login with your google account, (if you don’t have, apply one at http://gmail.google.com). 7. Calendar Click calendar icon. When running the calendar for the first time, you will be asked to login. Input your email address and password, click next, and complete the settings according to the guide. Then you can use the calendar.
8. Clock Click Clock icon. You can view the current date and time. Alarm clock You can set more than one alarm clocks at the same time. 6. When icon appears on the screen, it means at least one alarm clock is activated. Adding alarm clock 1. Click Clock icon. 2. Click menu→ Add alarm clock 3. Set the alarm clock you required. ☆ If Repeat is not selected; alarm clock will be deleted after alarming. 4. Click Activate clock. 5. Click Complete.
9. Calculator 1. Click Calculator icon. 2. Click numbers and operators to calculate. 3. Click Clear to clear the input one by one, or click and hold Clear to clear all inputs. 10. Downloading 1. Click Downloads icon. 2. You can view the downloaded software and select one to install. 11. Map ☆To use this function; make sure you have an Internet access. When there is an internet access, click icon to open the map where you locate. You can search for the information you want as shown in the picture.
12. Email ☆Support POP3 and SMTP. Adding email account You can input one or more email addresses you want to use on the device. 1. Click 2. 3. 4. 5. 6. 7. 8. 9. ☆ Email icon. In Your account interface, click Next. Click Email address option→ Input your email address. In Password option → Input your account password. Click Complete. Manual setting (optional): the server will select provider (gmail.com, etc.) automatically according to your email account.
5. Click Write an email option to enter your personal information. 6. If necessary, click Menu → Add attachment to add attachment files. 7. When you complete writing, click Menu→ Send. Editing email account 1. Click Email icon. 2. In Inbox interface, click Menu→ Account setting. 3. Set your email account according to your needs. 4. Click to return to Inbox interface.
13. File manager Click File manager icon to view all files saved in the device (internal store, SD card, USB disk), and you can install Android applications to your device in a fast and convenient way. 1 1. Start 5. New Folder 2 3 4 2. Level Back 6. Back 5 3. Multi Selection 7. Next 6 7 4. Options In order to perform actions (copy / delete / move / send) with the files on your device simply by pressing a few seconds in the file and a list of actions to choose from.
Settings Wireless network Wi-Fi Set and manage wireless access point (refer to WIFI setting for details). Traffic Set and manage data traffic. More.. Flight mode Enable/disable flight mode Ethernet Configure wired network. VPN Configure VPN network Mobile network Set 3G network (refer to 3G settings for details) Device Adjust volume of media, alarm clock and notification. Click and slide Volume to adjust volume Sound and then click OK.
management 2. Unknown source APK installation settings. Credential storage Manage application access surety credentials and other credentials. Set default language Keyboard and Language and input input method method Mouse/Touchpa d Backup and reset Set default keyboard and input method Adjust mouse speed. 1. Backup/restore device data. 2. Restore default settings. System Date time and Set or adjust time and date in the device.
Wi-Fi settings Many functions require Wi-Fi connect, so we suggest you use the preset Wi-Fi network. 1. Click → Settings → Wireless and network 2. Enable Wi-Fi. The device will search and list all available Wi-Fi networks automatically. The icon beside Wi-Fi means you need to enter a password to connect to it. 3. Click the Wi-Fi network you want to connect to → if there is password, you need to enter the password → Click Connect. After connecting to WIFI network, you will see icon 4.
Take Telecom 3G network for example, the settings are as following: Name: 3GWAP / APN:3gnet / Proxy: Not set/ Port: 80 / Username: Not set/ Password: Not set/ Server: Not set/ MMSC: Not set / MMS proxy: Not set/ MMS Port: Not set / MCC:460/ MNC:01/ Authentication type: Not set/ APN type: Not set/ APN protocol: Not set After setting, you will be able to connect to 3G network, when you will see the icon in the screen.
Downloading, installing/uninstalling applications ☆You can find many free interesting Android applications in the internet. Simply open the browser and search for “Android applications”. The Android applications you purchased or downloaded can be installed through File manager in a fast and easy way. 1. Copy the .apk file you want to install to SD card or USB disk →Insert the card or connect USB disk to the device. 2. Click File manager icon. 3. Find the folder in which .apk file is saved. 4. Select an .
Connecting to PC 1. Connect the device to a PC, and then this device can be used as a mobile storage device. When using a USB cable to connect to PC, connect one end of the cable to the USB OTG port of the device, and the other end to USB port of PC. 2.
Precautions Please follow the following safety precautions when using your device.当 Do not expose the product to direct rain or humidity. Keep the device away from direct sunlight or heat source. Protect the power cable. When connecting the power cable, do not step on it, put anything on it or press it by force. Give a special protection to the plugs of the power cable. Please use approved power adaptor for charging, otherwise it may cause damage.
DECLARATION OF CONFORMITY Primux Trading S.L., Tecnópole, Edificio CEI, 32900 Ourense. Warrants that this product: TABLET PRIMUX CICLON 2 Complies with the provisions of Directive 1999/5/CE on Radio and Telecommunications Terminal Equipment (R&TTE) of Directive 95/2006/CE on the Electrical Safety of Low Voltage Equipment and Directive 2004/108/CEE on Electromagnetic Compatibility with the standards: - EN 300 328 V1.7.1 (2006-10) - EN 301 489-1 V1.9.2 (2011-09) - EN 301 489-17 V2.1.
46