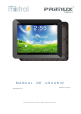
MANUAL DE USUARIO Español / English www.primux.es Para más información visite www.primux.
Contenidos ............................................................................................................................ 0 Consejos de uso .................................................................................................................. 30 1. Apariencia ......................................................................................................................... 3 2. Botón de encendido ................................................................................
Consejos de uso Cuando utilice el dispositivo, por favor tenga en cuenta los siguientes consejos básicos de seguridad. Estas advertencias reducirán los incendios, las descargas eléctricas y los riesgos de lesión: ● No deje que el producto se humedezca bajo la lluvia. ● Por favor mantenga el dispositivo alejado de la luz solar directa y los objetos de calor. ● Proteja el cable de alimentación. Cuando se conecte el cable de alimentación, no deje que se pise o se coloquen objetos encima.
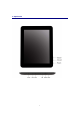
1.
2. Botón de encendido Encender:mantenga pulsado el botón de encendido durante 3 segundos. Apagado : mantenga pulsado el botón de encendido durante 3 segundos →seleccione apagar. Bloqueo/desbloqueo de pantalla :pulse el botón de encendido para bloquear o desbloquear la pantalla. Apagado forzoso: Si el dispositivo no responde, mantenga pulsado el botón de encendido durante 6 segundos para apagarlo.
Disco duro Conecte su disco duro con su cable OGT. ☆ No inserte su disco duro con frecuencia o se dañará. 5. Tarjeta TF ☆ El dispositivo es compatible con tarjetas de memoria de hasta 32 GB. Inserte la tarjeta en el lector; presione con los dedos para introducirla correctamente; la pantalla mostrará un cuadro que indica que se está leyendo la tarjeta SD; cuando esté lista para usarse, el cuadro desaparecerá. Retirar tarjeta TF Cierre todos los programas o documentos abiertos de la tarjeta.
Manejo de la batería La batería no está cargada totalmente cuando se abre por primera vez. Le recomendamos que cargue completamente la batería durante al menos 4 horas antes de utilizar su dispositivo. La duración de la batería depende del número de veces que se haya cargado y descargado. Sin embargo, puede seguir los siguientes consejos para una mayor duración: ● Usar el dispositivo al menos una vez por semana. ● Cargar totalmente y de forma regular. ● No dejar la batería sin carga durante mucho tiempo.
Herramientas 3G 1. El dispositivo solo es compatible con dispositivos USB 3G externos. La lista de redes 3G compatibles se puede consultar en → Conexiones inalámbricas y redes→ Más → 3G support. 2. Después de instalar la tarjeta SIM en la clavija 3G, instale el NIC 3G a través de un cable USB y conéctelo al dispositivo. 3. Después de conectarse a una red 3G NIC, pulse → Conexiones inalámbricas y redes→ Más → Red móvil para realizar los ajustes necesarios. 4.
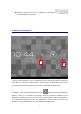
7. Escritorio ③ ④ ② ⑤ ① ⑥ ⑦ ⑧ A B C D 1. Aplicaciones 2. Visión rápida del navegador 3. Volver al ultimo interfaz 4. Volver al escritorio desde una aplicación 5. Seleccionar una clave para las páginas que elijas 6. Conexión USB 7. Hora local 8. Estado de la batería A: Estado conexión tarjeta TF B: Hora actual C: Símbolo conexión 3G/Wi-Fi D: Estado de la batería. ☆ Haga clic en cualquier programa o aplicación para abrirla.
☆ Mantenga presionado el icono y arrástrelo a la papelera para eliminarlo del escritorio. 8. Bloqueo del dispositivo A B Si lleva mucho tiempo sin usar su dispositivo o poco tiempo sin pulsar el botón de encendido, se activará el modo Reposo. Hay dos modos de hibernación: el primero es una hibernación prolongada, de forma que la pantalla del dispositivo se apaga, y será necesario presionar el botón para acceder a la pantalla en Reposo.
9.
Música Reproduzca y administre archivos de audio Vídeo Reproduzca y gestione sus vídeos Galería Reproduzca y gestione sus imágenes Mapas Compruebe su localización actual cuando esté conectado a internet Búsqueda Busque lugares de interés cercanos a su posición local actual Google Play Identifíquese para descargar aplicaciones, juegos,… Buscar Busque en el dispositivo lo que necesite Ajustes Configure los parámetros que considere necesarios ☆ Mantenga pulsado para mover el icono de la
10. Funciones del menú En el escritorio, pulse la tecla del Menú que le mostrará la lista de opciones y lleve a cabo la operación que desee. 11. Administrador de programas Instalación de programas ☆ Puede encontrar algunas aplicaciones Android muy interesantes. Sólo tiene que abrir el navegador y buscar “Aplicaciones Android” para saber cuáles están disponibles. Las aplicaciones Android que compra o descarga se pueden instalar en el dispositivo.
4. Haga clic en el icono para ejecutar o finalizar la aplicación Descargar programas directamente desde la red Puede descargar aplicaciones Android directamente e instalarlas en el dispositivo de forma rápida y conveniente. 1. Haga clic en para buscar las aplicaciones Android en internet. 2. Introducir la dirección web, seleccione el enlace para descargar la aplicación. 3. Al terminar la instalación, mantenga pulsada la aplicación (se guarda en el historial de descargas).
Desinstalar una aplicación Puede desinstalar aplicaciones Android rápidamente. 1. Pulse la tecla de Menú → Ajustes → Aplicaciones → Administrar aplicaciones. 2. Seleccione una aplicación → Desinstalar. 3. Pulse OK para desinstalar. 12. Grabadora Haga clic en el icono de grabadora. Aparecerá la siguiente pantalla: • Haga clic en grabación, o pulse • para empezar a grabar, seleccione para detener la para visualizar las notas de voz guardadas.
13. Reloj Haga clic en el icono del reloj . Puede ver la fecha y hora actuales. Despertador 1. Se pueden instalar diferentes alarmas en el dispositivo. 2. Cuando aparezca el icono en la parte superior de la pantalla, significa que al menos tiene configurada una alarma. Añadir una nueva alarma 。 1. Haga clic en el icono 2. Haga clic en el menú→ añadir alarma 3. Configure una nueva alarma 3. Si no has configurado la repetición, la alarma no se repetirá y se borrará la información.
Borrar alarma 1. Haga clic en el icono → seleccione 。 2. Seleccione la alarma que desee eliminar y, a continuación, confirme. 3. Seleccione la alarma eliminada. Seleccione para volver al escritorio. 14. Descargas 1. Haga clic en el icono . 2. Visualice las aplicaciones descargadas recientemente en el ordenador; seleccione e instale. 15. Navegador Puede conectarse a internet a través del navegador.
④: Tecla de menú 16. Calendario ☆ Haga clic en el icono de calendario . ☆ La primera vez que use el calendario, tendrá que agregar una cuenta de correo electrónico. Rellene los campos de cuenta y contraseña. Seleccione Siguiente, y tras configurar su correo electrónico ya podrá usar el calendario. Nuevo evento 1. En la interfaz del calendario, seleccione en el día que desee Nuevo evento para crear uno nuevo. 2.
7. Haga clic en el icono para realizar los ajustes de fotografía que desee. 8. Haga clic en el icono para retroceder y cerrar la cámara. Grabadora de vídeo 1. Haga clic en el icono 2. Haga clic en para abrir el vídeo. para comenzar a grabar. Seleccione para borrar el vídeo. 3. El vídeo se guardará. 4. Haga clic en para acceder a los vídeos. 5. Haga clic en el icono 6. Haga clic en 9. Haga clic en el icono Nota: para volver a la cámara. para realizar los ajustes de vídeo que desee.
19. Correo electrónico ☆ Admite cuentas POP3 y SMTP. Añadir una cuenta de correo electrónico Puede agregar una o varias cuentas de correo electrónico a su dispositivo. 1. Haga clic en el icono 2. En la interfaz de cuentas, haga clic en Siguiente. 3. Seleccione Opciones de correo electrónico→ introduzca su correo electrónico. 4. En las opciones de contraseña → introduzca su contraseña. 5. Haga clic en OK.
Redactar un nuevo correo electrónico 1. Seleccione Redactar. Haga clic en Para y escriba la dirección de correo electrónico. 3. Si fuera necesario, haga clic para añadir asunto. 2. Una vez que haya terminado de escribir el correo electrónico, seleccione Enviar. Editar una cuenta de correo electrónico 1. Seleccione el icono 2 Elija “Configuración de Cuentas” en el Menú.
20. Administrador de archivos • Seleccione el icono para visualizar sus archivos (Almacenamiento interno de su Tablet PC, tarjeta SD, dispositivo de almacenamiento externo USB).
continuación “copiar”. 3. Seleccione para volver al almacenamiento interno del PC → seleccione la carpeta de la tarjeta→ seleccione “Pegar”. Borrar archivos Haga clic y mantenga pulsado el archivo o carpeta. Pulse Borrar y después Aceptar. 21. Música ☆ Compatible con formatos de audio: MP3, WMA, OGG, FLAC, WAV, ACC Reproducir música 1. Haga clic en el icono 2. De todos los álbumes/artistas/directorios/favoritos/listas de reproducción, seleccione lo que desee reproducir. 3.
22. Vídeo ☆ Soporta: AVI, WMV, RM, RMVB, 3GP, MKV, MP4, ASF, VOB, MPG, MOV hasta 1080P HD. Reproducir vídeos 1. Seleccione el icono → haga clic en un grupo de vídeos. 2. Seleccione el vídeo que desea visualizar. 3. Haga clic en el vídeo. 4. Pulse la tecla de Volver para regresar a la interfaz de Vídeos 23. Galería de imágenes Soporta: JPEG、BMP、GIF、PNG 1. Seleccione el icono 4. Seleccione y entre en la galería. para reproducir todas sus imágenes.
24. Mapas ☆ Para utilizar esta aplicación debe estar conectado a internet. ☆ Después de conectarse a la red, seleccione el icono abrirán el mapa y su localización automáticamente. 25. Búsqueda local Similar a la función de Mapas. 24 .
. Google Play • Abra Google Play para descargar aplicaciones. • Cuando abra por primera vez Google Play, tendrá que registrarse introduciendo los datos de su cuenta GMAIL (si no dispone de una cuenta de correo electrónico de GMAIL, puede solicitarla en http://gmail.google.com). 27. Ajustes Wi-Fi Abrir Wi-Fi Configuración y gestión de puntos de acceso de Redes Ajustes de Wi-Fi conexión inalámbrica. inalámbricas Modo vuelo Inhabilitar toda conexión inalámbrica.
Haga clic y deslice hacia la izquierda o derecha para ajustar el brillo de la pantalla y confirme con Brillo Aceptar Cuando gire el dispositivo, la pantalla se ajustará a Pantalla giratoria la dirección en la que esté colocado, sea vertical u horizontal. Pantalla Reposo Ajustar el estado de reposo del dispositivo. Tiempo de espera Ajustar el tiempo de retraso antes de que la de pantalla pantalla se apague automáticamente. Ajustes de bloqueo de pantalla el dispositivo.
~ Descargar aplicaciones Los siguientes datos no se borrarán: ~ El software del sistema y su aplicación. ~ Los documentos almacenados en la tarjeta SD, tales como música y fotos. Capacidad total, capacidad Almacenamient o Aparecerá cuando inserte su tarjeta TF. disponible Desinstalar Cuando introduzca la tarjeta TF, puede seleccionar tarjeta TF desinstalar la tarjeta TF o instalar.
Apéndice: accesorios opcionales y modelo Accesorio Modelo TD-SCDMA E230, E176G, E160E, E182G, E1782, E1750 WCDMA ZTE MF633BP-1, MF633, MF637U. Módem 3G EVDO E150, EC1231, EC156 EC1270, EC122, ZTE AC580, ZTE AC2736, AC2746.
ENGLISH Contents ............................................................................................................................. 29 Tips ..................................................................................................................................... 30 1. Appearance ..................................................................................................................... 31 2. Power switch usage ...................................................................
Tips When you use this device, please follow the safety notice below to prevent fire, electric shock and injury. ● Keep the device away from rain and moisture. ● Keep the device away from direct sunlight and heat source. ● Protect the power cord. When connect the power cord, do not step onto it or place any object on it, which may cause extrusion. Protect the connector of the power cord connected devices specially. ● Please use the original power adapter for charging.
1.
2. Power switch usage Turning on: Press and hold the power switch for five seconds Turning off: Press and hold the power switch for five seconds – Tap Turn Off – Tap OK Screen locking/unlocking: Press the power switch to lock/unlock the screen. Force shut-down: If the device doesn’t have response, press the Reset key to restart the device. Note: Do not force shut down the device unless necessary. Under normal condition, please follow the normal procedure to turn off the device.
damage the flash drive. 5. TF card usage ☆ The device supports memory card up to 32GB. Insert the memory card into the slot, press with fingers to clamp it; the screen will show Preparing SD card, and the TF card is ready for use when the characters disappear. You can operate when the card is ready. Removing TF card Close all programs or files opened from the memory card. Tap → TF card and device memory → Remove TF card. Press the card and it will eject.
● Always keep the device and battery away from heat source. Start-up Press and hold the power switch for five seconds. Wi-Fi network settings Since many functions require Wi-Fi connection, please configure the Wi-Fi network before operation. 1. Click → Wireless and network. 2. Select to turn on Wi-Fi. The device will automatically scan and list all available Wi-Fi networks. If the Wi-Fi connection has icon, you need to enter the valid password. 3.
2. After installing the SIM card into the 3G NIC, install the 3G NIC to the USB OTG cable and then connect to the device; 3. After connecting to the 3G NIC, tap → Wireless and network → More → Mobile network to perform 3G Internet access settings. 4. Turn on the mobile network and select Enabled data flow → Data roaming, then select APN, enter and select Menu key: create new APN for Internet access.
7. Desktop ③ ④ ② ⑤ ① ⑥ ⑦ ⑧ A B CD ①: Tap to view all applications ②: Voice search shortcut ③: Browser shortcut ④: Return to current operation ⑤: Return to desktop directly from the program interface ⑥: Multipage task selection key ⑦: Menu function shortcut ⑧: USB connection symbol A: TF card connection status B: Current time C: 3G/WIFI connection signal symbol D: Battery status ☆ Tap any application icon to run it. ☆ Tap and hold the icon to drag and drop to other position on the screen.
☆ Tap and hold the icon to drag and drop to to delete from the desktop. 8. Locking desktop A B If the PC won’t be used for a long time, or the power switch is tapped, the device enters standby state. The standby has two states. One is deep-sleep standby, in which the screen is turned off; the other is light standby after pressing the power switch. The picture shows the default light standby state.
9. Programs Recorder Record external sound Clock Display time and set the clock Downloads Install the downloaded applications quickly Browser Connect to Internet browser Calendar Set the calendar of the event Camera Take pictures Calculator Do simple arithmetic E-mail Send and receive e-mail with existing e-mail address File View and manage files and programs. Install Android Manager applications and back up files in SD card.
My Music Play and manage music files My Video Play and manage video files Gallery Browse and manage picture files Map Connect to the Internet and view current position in the map Local Connect to the Internet and view the information of Search the facilities near current position E-market Log in and download system application Search Enter the desired data directly Settings Perform personalized setting ☆ Tap and hold the icon to drag and drop to other position on the screen.
10. Desktop menu function On desktop, tap the Menu key to show the menu list and perform the operation. At the same time, set common programs on desktop by tapping and holding the program icon to move to the desktop; 11. Program Manager Installing programs ☆ It is possible to download interesting and free Android applications. You just need to start the browser and search for “Android applications”. You can install the purchased or downloaded Android applications quickly through . 1. Copy desired .
Connecting to PC to save files 1. Connect the tablet PC to PC and the tablet PC can be used as mobile storage device; to connect to PC, connect one end of the USB cable to the USB OTG interface of the tablet PC and the other end to the USB interface of PC; 2. After connected, the tablet PC will prompt , click the icon and then select Turn on USB storage to transmit data between PC and tablet PC, as shown below: Uninstalling the application You can uninstall the Android application quickly. 4.
12. Sound recorder Click the sound recorder icon . The following interface appears Tap to start recording, tap to stop the recording, tap to view the recording files, which will be named by time; select a recording file to play; tap to perform sound recording setting according to the prompt. 13. Clock Tap the clock icon to view current date and time. Alarm clock You can set several alarm clocks at the same time.
1. Tap the clock icon . 2. Press the Menu key → Add alarm clock. 3. Set the alarm clock accordingly. ☆ If you don’t select Repeat, the alarm clock will be deleted automatically after the alarm time. 4. Tap Enable alarm clock. 5. Tap OK. Turning off alarm prompt When the alarm time is out, a window with the name of alarm clock will pop up. If you want to repeat the alarm clock in 10 minutes, tap Snooze. Tap Cancel to stop the prompt.
4. View currently downloaded applications in PC, select and install. 15. Browser You can connect to the Internet through the browser.
16. Calendar Tap the calendar icon . When the calendar is used for the first time, you need to add an Exchange account. Enter the e-mail address and password of the account, tap Next and follow the prompt the finish the account setting, and then the calendar is available. New event 1. In the Calendar interface, tap the date you want to create an event. 2. Select the time → enter the details in each field. 3. Tap OK. 4. Tap the Menu key to select desired calendar interface.
Recording video 1. Tap to switch to the video mode, in which you can record video. 2. Tap to start recording, and tap to stop recording. 3. The video files will be saved automatically. 4. Tap the video thumbnail to play the video. 5. Press the Back key to return to the camera. 6. Tap to switch to camera interface. 7. Press the key to perform settings for video recording. Note: You can tap to switch between front camera and rear camera to take pictures and record video. 18. Calculator 4.
3. In e-mail address option, enter your e-mail address. 4. In password option, → enter your e-mail password. 5. Tap OK. 6. Manual setting (optional): The server fills the supplier (i.e. gmail.com) automatically according to your e-mail account. However, if you need to change the server setting, click Manual setting to make necessary change. 7. Tap Next. 8. Optional: Enter the account name. 9. Enter the name of the message → Tap OK.
2. In the Inbox interface, press the Menu key → tap Account setting. 3. Set your e-mail account accordingly. 4. Tap to return to the Inbox interface. Deleting e-mail account ☆ If you have several accounts and have deleted the default account, the next e-mail account in the list will be set to default automatically. 1. Tap the e-mail icon 2. In the Inbox interface, press the Menu key → tap Account. 3. Tap and hold the account you want to delete. 4. In the popup Account option window, tap Delete account.
USB flash drive (needs adapter cable) Back to previous folder Create new folder Set file content Picture files Copying files between PC and the device You can copy files between external storage device, internal memory and the PC through File Manager. To copy files to the device, it is required to copy to SD card or USB storage device first. ☆ The folder of the internal memory is “LocalDisk”, the memory card is “sdcard”, and the USB storage device is “udisk”.
21. My music ☆ The compatible audio formats are: MP3, WMA, OGG, FLAC, WAV, ACC Playing music 1. Tap My Music icon 2. Select desired music to play from the music/album/artist/playing list. 3. Tap Previous→ Pause → Next icon for operation. 4. To return to previous interface while playing music, tap or to return to the desktop. Press the Menu key for music operation, as in the interface below: 22. My video ☆ AVI, WMV, RM, RMVB, 3GP, MKV, MP4, ASF, VOB, MPG, MOV up to 1080P HD-Definition Playing video 1.
3. Tap on the screen to adjust the video (including volume, pause/play, brightness, etc.) 4. Press the Back key or tap the icon to return to My Video interface. 23. Gallery ☆ The compatible picture formats are: JPEG, BMP, GIF, PNG 1. Tap the gallery icon 2. Tap a picture to browse. and then tap a picture group. 3. Press the Back key to return to the picture group interface. 4. Tap the icon to play the lantern slides. The lantern slide modes include common, classic, dynamic, sweet, warm and party. 5.
25. Local search ☆ Similar to the map function, it can save a large number of environmental information 26. E-market Turn on E-market to query and download applications. When E-market is run for the first time, the system will ask to log in with GMAIL account (if you don’t have a GMAIL http://gmail.google.com). After downloading, install the applications.
27. Settings Wi-Fi Turn on Wi-Fi Wireless Wi-Fi settings Set and manage wireless access point and Flight mode Turn off wireless connection network 3G network settings Set 3G network Wired network Configure wired network Dial-up Access the Internet through ADSL dial-up.
Install from USB storage Install encrypted certificates from USB storage Set password Set or change the credential storage password Clear storage Clear credential storage of all contents and reset its password. Unknown sources Application Allow installation of non-Market applications Manage Manage and remove installed applications applications Running services View and control currently running service Development Set options for application development Tap to clear all data in your device.
Appendix: Optional accessory and model Accessory Model TD-SCDMA huawei E230, E176G, E160E, E182G, E1782, E1750 WCDMA ZTE MF633BP-1, MF633, MF637U. 3G Wireless Modem huawei E150, EC122, EC156 EVDO EC1231, EC1270, ZTE AC580, ZTE AC2736, AC2746.