Mt3-II Series Operator’s Manual Printek, Inc. 1517 Townline Road Benton Harbor, MI 49022 269-925-3200 www.printek.
FCC Part 15 Class B This equipment has been tested and found to comply with the limits for a Class B digital device, pursuant to Part 15 of the FCC rules. These limits are designed to provide reasonable protection against harmful interference in a residential installation. This equipment generates, uses and can radiate radio frequency energy and, if not installed and used in accordance with the instructions, may cause harmful interference to radio communications.
Read all setup and operating instructions before proceeding with operation. Do not operate in an enclosure unless properly ventilated. Make sure no ventilation openings are blocked or obstructed, which may result in the printer overheating. Do not operate near a heat source. Lesen Sie vor der Inbetriebnahme die Aufbau- und Bedienungsanleitung. Betreiben Sie den Drucker nicht in einem kleinen, geschlossenen Raum, es sei denn dieser wird ordnungsgemäß belüftet.
TABLE OF CONTENTS Introduction ..........................................................................................................................................................1 Getting Started .....................................................................................................................................................3 Battery and Safety Information.........................................................................................................................
Introduction Thank you for purchasing a Printek Mt3-II Series mobile printer. The Mt3-II series has been designed to provide you years of service handling your most demanding printing requirements in the mobile arena. If you have any questions, or would like more information on the various supplies and accessories that are available for the Mt3-II Series, please visit us on the internet at www.printek.com, or call our Sales Department at (800) 368-4636.
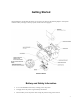
Getting Started Please familiarize yourself with the features of your printer as shown in the following diagram. Each printer includes a battery cartridge, a belt loop system, and one roll of receipt paper. Printer Features Battery and Safety Information • A 7.4 Volt 2200mAH Li-Ion battery cartridge powers the printer. • Charging time in the printer is approximately 180 minutes. • Take the battery out of the printer when storing the printer for long periods of time.
Getting Started • The recommended room temperature for charging is between 68°F (20°C) to 77°F (25°C). • The battery storage temperature is 40°-104°F (4°-40°C). Do not store a fully charged battery at temperatures greater than 104°F (40°C) for long periods of time – the battery may permanently lose charge capacity. • Be sure to use a fully charged battery before long or battery intensive printing sessions.
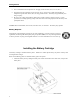
Getting Started 2. Orient the battery so that the two contacts on the battery will be face down, and will correspond with the two contacts inside the printer’s battery compartment, and set the battery into the compartment. A label showing this orientation is also located inside the battery compartment. 3. Close the battery door and slide the Battery Door Releases back to the locked position. Charging the Battery Insert the AC adaptor plug into the printer.
Operation Media Loading The printer can print text, bar codes and some limited graphics on thermal receipt paper. See “Media Specifications” for the width, thickness requirements and approved vendors. Follow these steps to load printer paper: 1. Open the paper supply door by placing your fingers under the “T” pull lever and pulling up firmly on the supply cover until the lever stops moving. Note: Do not pull too hard. Use enough force to allow the cover to unlock and lift freely 2.
Operation Initial Power Up And Self-Test Once the Battery is charged and the paper is loaded, perform an initial power up self-test. 1. To start the self-test, press and hold the FEED button, then press ON . The printer will start printing the self-test messages. 2. Press the OFF or FEED to stop or cancel the self-test print. The first few lines of self-test show the printer firmware version, the current printer settings and a list of any optional or special features installed.
Operation Reading the Indicator Status MCR Error Battery Power Indicator State Status Power: Green Printer is on and ready to receive data via the RS-232C port or the IrDA interface. When using RS-232C, pressing the On/Off button will turn the printer on. After approximately 20 seconds, if no instructions are sent, the printer will automatically turn off to conserve battery life. When using IrDA, the printer will stay on all the time. Pressing the On/Off button again will turn the printer off.
Operation Using the Magnetic Card Reader (MCR) The Magnetic Card Reader is a factory-installed option. This option requires special application software to read and process cards with a magnetic stripe, such as credit cards or driver’s licenses. Refer to the following figure if your printer is equipped with the optional magnetic stripe reader and the application software asks for the card to be read. Quickly swipe the card through the reader either left to right or right to left.
Configuration and Data Connectivity The standard Mt3-II Series printer supports both Serial RS232 and IrDA compatible infrared communication interfaces. Serial and IrDA communication settings can be changed via configuration switches located in the paper supply area (see figure below). The functions assigned to these switches are shown on the next page. If the Serial interface is selected, the communication parameters Baud Rate, Data Bit and Parity must be set.
Configuration and Data Connectivity Switch Position(s) SW1 OFF ON SW2 OFF ON SW3 OFF ON SW4 SW5 OFF OFF OFF ON ON OFF ON ON SW6 SW7 OFF X ON OFF ON ON SW8 Function IrDA Interface Disabled Enabled RS-232C Interface Enabled Disabled Bluetooth/Wi-Fi Interface Disabled Enabled Baud Rate 38,400 19,200 9,600 2,400 Parity No Parity Even Parity Odd Parity Reserved Mt3-II Configuration Switch Assignments Note: Be careful when changing switch settings.
Configuration and Data Connectivity PIN # FUNCTIONAL DESCRIPTION SIGNAL NAME 1, 5 2 3 4 6 Logic common RS232 from Printer (OUTPUT) RS232 from Host (INPUT) Clear to send from Printer (OUTPUT) Request to send from Host (INPUT) COM TXD RXD CTS RTS RS-232C Serial Connector & Pin Assignments IrDA Communication All Mt3-II Series printers are equipped with an IrDA interface.
Configuration and Data Connectivity Wi-Fi Communication Mt3-II printers equipped with the optional Wi-Fi Interface can communicate with either a host or a network that is compatible with the 802.11b wireless communication standard. The following tables show the required settings for the configuration switches and the default network and wireless settings when the printer is shipped from the factory.
Configuration and Data Connectivity Programming Information This section lists the printer control command strings. Refer to the Mt Series Programmer’s Manual for complete details. Further information for developers is available on the Mt Series Developers CD-ROM.
Configuration and Data Connectivity Printer Graphic Commands Printer Command String Printer Action ESC a n ESC J n ESC P # ESC P $ ESC V n1 n2 data ESC v n1 n2 data Select dot line spacing between printed lines.
Configuration and Data Connectivity Resident Character Sets Characters 32 through 255 ESC 6 for International & ESC 7 for PC Line Draw 17
Printer Maintenance and Troubleshooting Cleaning You may need to clean the print head and platen roller after printing a number of rolls of paper, whenever you load new supplies or when you see voids in the printout. Caution: Do not use sharp objects to clean the print head. This may damage the printer and require service. • Open the paper supply door by placing your fingers under the “T” pull-handle and pulling up firmly. • Remove the paper supply roll.
Printer Maintenance and Troubleshooting Important Notes On Charging The Battery • The battery fast-charge is initiated each time the power adapter is connected to the printer. • The fast-charge controller checks the battery’s voltage and temperature, before the start of the fast recharge process. If the battery voltage or the temperature is outside of the fast-charge limits, the charger defaults to trickle charge at C/10 or 70mA rate. • An optional external charger is also available.
Printer Maintenance and Troubleshooting Troubleshooting Printek Mt3-II Troubleshooting Guide Problem Printer will not turn on “Battery Charging” indicator not lighting when AC Adaptor is plugged in Battery not charging, or indicator turns off after a few seconds Poor print quality Paper not feeding Error/MCR indicator lit RED Prints illegible characters Printer will not print Possible Cause Discharged battery No AC power or bad AC adaptor Solution Recharge battery overnight Check AC outlet and Adaptor
Printer Specifications Height: Width: Length: Weight: w/battery & supply Shipping weight: Power: Operating Temp. Limits: Storage Temp. Limits: Operating Humidity Limits: Storage Humidity Limits: Print head: Printing Method: Print Speed: Supported Bitmap Fonts: Supported Bar Codes: Memory: Charging Time: Communications: Print Ratio: 2.25 inches (57mm) 4.25 inches (108mm) 6 inches (152mm) 1.3 lbs. (0.61 kg) 3 lbs. (1.4 kg) 7.
Printer Specifications Printer Supplies & Accessories Part Number 91254 91304 91308 91309 91393 91394 91247 91334 91260 91264 91311 91250 91305 91261 91251 91252 – – – – – – – Description Paper 35-Pack Battery (Li-Ion, 2200mAH) Battery (Li-Ion, 2200mAH) – 5-Pack Battery (Li-Ion, 2200mAH) – 20-Pack Print Head Cleaning Pen (Box of 12) MCR Cleaning Card (Box of 50) 120VAC Power Adapter 240VAC Power Adapter 12VDC Power Adapter 24VDC Power Adapter Two-Bay Trickle Charger Belt Loop System Environmental Case Sho
Glossary of Terms 802.11 Wireless networking communication standards created by IEEE. access point An interface between a wireless network and a wired network. Ad-Hoc A Wi-Fi network consisting of only stations (no access point). Same as Peerto-Peer. ASCII American Standard Code for Information Interchange. authentication The process a Wi-Fi station uses to identify itself to another station. bandwidth The amount of data that be transferred in a given period of time.
Glossary of Terms IP Internet Protocol. A specification for packets, or datagrams, of data and an addressing method to allow the exchange of data with another system. Must be combined with another protocol such as TCP to create a complete connection with the other system. LAN Local Area Network. LED Light emitting diode. line pitch The vertical spacing of rows of characters. Measured in lpi. lpi Lines per inch. margin An area along any edge of a form where data may not be printed.