
Manual


Determining Printhead Wear
307
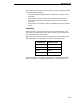
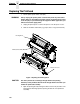
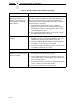
Figure 8. Replacing the Printhead Assembly
CAUTION
To prevent electrostatic damage to electronic components, ground
yourself by touching an unpainted part of the printer frame before
handling and installing the printhead.
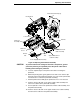
5. Touch an unpainted part of the printer frame before touching the
printhead.
6. Behind the pivoting deck, gently pull the lower tabs of the retainer clips
upward to release the printhead assembly. (You only need to pull the tabs
a small amount to release the printhead assembly.)
7. Hold the printhead assembly by the printhead cover as it is released.
8. Push the release tab down on the power supply cable assembly and
remove the cable from the printhead assembly.
9. Use the pull-tab to remove the printhead controller cable assembly from
the printhead assembly.
10. Push the release tab down on the upper media sensor cable assembly
and remove the cable from the printhead assembly.
Printhead Retainer Clip (2)
Printhead Controller
Cable Assembly
Pull-Tab
Pivoting Deck
Printhead
Assembly
Printhead
Cover
Power Supply Cable Assembly
Release
Tab
Lower Tab (2)
Upper Media Sensor
Cable Assembly
Release
Tab
Replacing The Printhead