
Use and Care Manual
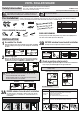

VINYL ROLLER SHADE
Safety Information
WARNING: Over-winding the spring mechanism of the Shade may
cause permanent damage.
CAUTION: Product failure due to using incorrect fittings is
responsibility of the installer. In case of doubt on whether to use
wall anchors (not provided), please consult with a professional.
You may clean your Shade using a mild soap solution. Brush lightly with a
soft cloth. Let the Shade dry before rolling it up.
CARE AND CLEANING
TOOLS REQUIRED (Not included)
Tape Measure Level
Philips-head
screwdriver
Drill and Bit SetPencil
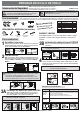
1
Remove temporary end cap from flat-tip end of Shade and lightly
tap in pin end plug on the opposite end. Slide plastic slat through
the hem.
Assemble the Shade
3B
Use tape measure and pencil to mark screw holes.
OUTSIDE window frame bracket installation
4
Insert round-tipped speed reducer (B) into round hole of desired brack-
et (see step 2). Insert flat tip (F) into the opposite bracket.
Shade mounting onto brackets
2
Measure your blind from tip to tip to determine distance between
brackets (A). Decide between INSIDE or OUTSIDE window frame
installation, and between STANDARD or REVERSE mount.
Mounting type
HOMEDEPOT.COM
Pre-Installation
INSTALLATION
Familiarize yourself with the package contents and have at hand the tools required.
NOTICE: Determine the space needed with a tape measure in order to ask a store associate cut the Shade accordingly, if
necessary. For the difference between inside and outside mount refer to installation step 2.
Retain this manual for future use.
D
E
A B
F
B
C
F
H
F
3A
Use tape measure and pencil to mark screw holes. Please
ensure that there is a clearance of at least 0.5 inches, as
noted below.
INSIDE window frame bracket installation
Clearance:
(a) Must be 0.5 inches or greater.
NOTE: The brackets are identical, so they can be installed left or right freely.
NOTE: The brackets are identical, so they can be installed left or right freely.
CAUTION:
Before placing the Shade into the brackets make sure the fabric is
rolled up evenly.
Troubleshooting
Problem Solution
The Shade rolls
up to slowly
The vinyl roll has
creases
1. Pull down one foot so that the Shade is locked in place.
2. Remove Shade from brackets.
3. Roll Shade up all the way.
4. Re-install on brackets, and repeat if necessary.
Creases fade away naturally after hanging for a few days.
G
H
F
A
B
C
D
Part Description Quantity
Universal brackets 2
Square-tipped speed reducer
Temporary endcap
1
Screws
1
4
E
Anchors 4
F
Flat tip
1
G
Vinyl roll
1
H
Hem slat
1
Inside Mount or Ceiling Mount Outside mount
CAUTION: Bracket installation on DRYWALL OR PLASTER: Pre-drill
pilot holes with 7/32 in. bit. Insert the anchors into the holes and
secure the brackets with screws provided.
Bracket installation on WOOD: Pre-drill pilot holes with 3/32 in. bit.
Secure the brackets with screws provided.
C
NOTICE: This Shade can be resized in store. Determine the
space to be occupied by the Shade with brackets, and ask a
store associate to cut it if necessary.
homedepot@mail.lumihomefurnishings.com
Standard
Reverse
Outside Mount
Inside Mount
7/32”
DRYWALL
3/32”
WOOD OR STUDS
A
D
A
DE
a
WOODDRYWALL
WOODDRYWALL
= X
X
A
A
B
A
B
A
F
F