
Installation instructions


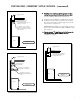


CONNECTING DUCT WORK
INSTALLATION PLANNING
CHIMNEY STYLE HOODS INCLUDE AN INSTALLATION PACKAGE
WITH THE FOLLOWING COMPONENT PARTS:
4
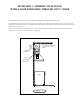
CHECK THE INSTALLATION LOCATION
CHOOSE THE INSTALLATION METHOD
If your installation has been roughed-in (including duct
work and wiring), be certain there is nothing in the way
of the mounting, pipes, other wiring, etc.
If the installation has not been roughed-in, check what is
needed to create the framing and mounting hardware
(allthreads, nuts, etc.). Be sure the location will not
interfere with wiring, other utilities, or structural
considerations.
•
•
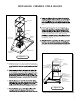
ere are several dierent methods available to mount
the hood: the Unistrut, Angle Iron, Frame In, Wall
Mounts, Island Mount and Rough-In Plate Mount,
which can be used for both indoor and outdoor. Please
check the model options for the suggested methods of
your installation. Each hood type and site requirements
are presented as follows.
Please read the instructions in their entirety prior to
installing the hood.
•
•
• Ten 10-24 Nuts
• Ten #10 Self-Tapping Screws - 2” long
• One Fan Control Knob
• One Light Control Knob
• One 10” Square-to-Round Transition w/damper for hoods 36” - 66” wide
• One 8” Square-to-Round Transition w/damper for hoods 30” wide
• Transitions are mounted upside-down within interior of hood
Chimney Hoods include a standard duct cover (standard heights). Duct covers are included when
ordered with the hood. Duct covers are shipped separately. Standard increment heights include:
12” tall, 18” tall, 24” tall, 30“ tall, 36” tall, 42“ tall and 48” tall. Included with the duct cover is
the following hardware:
Eight 12-24 Self-Tapping Screws - 7/8” long
Four 5/16” by 1” Bolts
Ducting should be as short and straight as possible for best fan performance.
SEAL ALL JOINTS WITH DUCT TAPE.