
Installation instructions


is not hindered from opening if using mechanical fasteners.
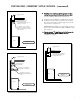
(see Figure 5. - Page 7)
into the hood cavity to the electrical box. (see Figure 2.)
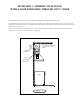
Option #1
Electrical Supply From
Ceiling.
Route to Hood J-Box.
Optional
Duct Cover
Option #2
Remove Knockout &
Install Customer
Supplied Bushing Typ.
Option #2
Electrical Supply
From Rear.
Route to Hood J-box.
Option #1
Remove Knockout &
Install Customer
Supplied Bushing Typ.
bolts.
(see Figure 2.)
the hood to the wall structure. (see Figure 6. - Page 7)
Install the Duct Cover to the top of the hood using the
12-24 self tapping 7/8” length screws. Also bolt the hood
use), separate the transition from the hood base and duct
cover.
Install the transition to the duct work ensuring the
transition. Verify that the transition is ush, and centered
to the bottom of the Duct Cover. When transition
hood, if necessary, to line up with the structural studs
transition. (see Figure 6. - Page 7)
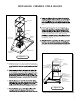
Duct Cover
Transition
Plate
Chimney
Hood
Top Electrical
Knockout
CFM1200 Blower
Drill & Screw
Into Structure
Rear Electrical
Knockout
5
INSTALLING CHIMNEY STYLE HOODS
Figure 1.
Figure 2.