
Owners manual


52612
Revised
8.21.07
FRONT INSTALLATION INSTRUCTIONS:
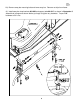
1) Park vehicle on a flat hard surface (I.e. asphalt or concrete). Set parking brake and block both
rear wheels in front and behind tires.
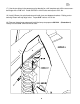
4
⇒ Front end and head light realignment is necessary!
⇒ Slight modification of the exhaust is required.
⇒ Speedometer and ABS recalibration will be necessary if larger tires (10% more than stock diameter) are in-
stalled.
⇒ Due to differences in manufacturing, dimensions and inflated measurements, tire and wheel combinations
should be test fit prior to installation. Tire and wheel choice is crucial in assuring proper fit, performance, and
the safety of your Pro Comp equipped vehicle. For this application, we recommend a wheel not to exceed 8”
in width with a minimum backspacing of 3.5” must be used, additionally, a quality tire of radial design, not ex-
ceeding 35” tall X 12.5” wide is also recommended. Please note that the use of a 35” X 12.5” tire may require
fender modification. Violation of these recommendations will not be endorsed as acceptable by Pro Comp
Suspension and will void any and all warranties either written or implied.
⇒ IT IS ADVISABLE THAT YOU HAVE HELP AVAILABLE WHEN INSTALLING THIS KIT. SOME COMPO-
NENTS ARE HEAVY AND AWKWARD. AN ADDITIONAL SET OF HANDS IS GOOD INSURANCE
AGAINST INJURY!
♦ This installation requires a professional mechanic!
♦ We recommend that you have access to a Ford service manual for your vehicle to assist in the disassembly and reassembly of your
vehicle. It contains a wealth of detailed information.
♦ Prior to installation, carefully inspect the vehicle’s steering and driveline systems paying close attention to the tie rod ends, ball joints
and wheel bearing preload. Additionally, check steering-to-frame and suspension-to-frame attaching points for stress cracks. The
overall vehicle must be in excellent working condition. Repair or replace all worn or damaged parts!
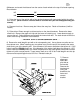
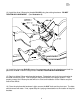
♦ Read the instructions carefully and study the illustrations before attempting installation! You may save yourself a lot of extra work.
♦ Check the parts and hardware against the parts list to assure that your kit is complete. Separating parts according to the areas
where they will be used and placing the hardware with the brackets before you begin will save installation time.
♦ Check the special equipment list and ensure the availability of these tools.
♦ Secure and properly block vehicle prior to beginning installation.
♦ ALWAYS wear safety glasses when using power tools or working under the vehicle!
♦ Use caution when cutting is required under the vehicle. The factory undercoating is flammable. Take appropriate precautions. Have
a fire extinguisher close at hand.
♦ Foot pound torque readings are listed on the Torque Specifications chart at the end of the instructions. These are to be used unless
specifically directed otherwise. Apply thread locking compound where specified.
♦ Please note that while every effort is made to ensure that the installation of your Pro Comp lift kit is a positive experience, variations
in construction and assembly in the vehicle manufacturing process will virtually ensure that some parts may seem difficult to install.
Additionally, the current trend in manufacturing of vehicles results in a frame that is highly flexible and may shift slightly on disas-
sembly prior to installation. The use of pry bars and tapered punches for alignment is considered normal and usually does not indi-
cate a faulty product. However, if you are uncertain about some aspect of the installation process, please feel free to call our tech
support department at the number listed on the cover page. We do not recommend that you modify the Pro Comp parts in any way
as this will void any warranty expressed or implied by the Pro Comp Suspension company.
Introduction:
Please Note: