
Owners manual


52612
Revised
8.21.07
3) Raise the front of the vehicle with a floor jack and support with jack stands behind the radius
arm mounts. (Never work on a vehicle while it is on the floor jack and unsupported by jack
stands).
* * REPEAT STEP 5 ON PASSENGER SIDE * *
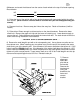
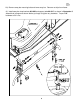
6) Remove the small draglink end with a tie rod separating tool. Use a pitman arm puller and re-
move pitman arm. When installing your new pitman arm you will need to first measure the sector
shaft coming out of the steering box. If the diameter of the sector shaft above the splines is 1.3125
inches install the FD 400 pitman arm. If the diameter of the sector shaft above the splines is 1.375
inches install the FD 600 pitman arm. Install the pitman arm and hand tighten sector shaft nut then
tighten only with a torque wrench. Torque sector shaft nut to 185 ft. lbs. install draglink end into pit-
man arm and torque draglink nut to 60 ft. lbs. Reinstall cotter pin.
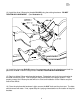
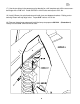
7) Remove
passenger
radius arm
pivot bolt at
the bracket.
Remove the
hardware se-
curing the
bracket to the
frame and
remove
bracket.
4) Remove front tires. Remove sway bar links at the sway bar. Retain all hardware (It will be
reused).
5) Raise driver I-Beam enough to relieve tension on the shock hardware. Remove the lower
shock bolt. Remove the upper coil clip and the lower coil retaining nut. Lower beam enough to
remove the coil. Raise the beam and reinstall the lower shock bolt. The stock shock will limit the
down travel during installation of the brackets.
5
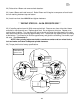
LR: RR:
RF
LF:
2)Measure and record the distance from the center of each wheel to the top of its fender opening.
Record below.