
Owners manual
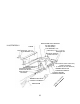


3) Remove the axle u-bolts. Remove the spring eye bolts and/or shackles and remove the springs
from the vehicle.
4) Hold the spring assembly securely together with “C” clamps. Remove any spring leaf alignment
clamps. Remove the spring center bolt. A hammer and drift punch may be used to drive it out if nec-
essary.
5) Carefully remove “C” clamps and lay the unassembled spring aside.
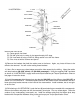
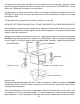
NOTE: The add-a-leaf will be placed in the spring assembly progressively according to length. For
example, if the existing leaves are 32” long and 25” long and the add-a-leaf is 28” long, place the add-
a-leaf between the existing leaves. If the existing leaf is the same length as the add-a-leaf, remove
factory leaf and replace with the add-a-leaf.
6) Apply a small amount of grease to the ends of the add-a-leaf, place it in the spring assembly as
described in the FORD note above and reassemble the leaf springs using the “C” clamps.
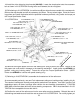
7) Insert the new center bolt and torque as follows:
3/8” Bolts...................................... 35-40 ft./lbs
7/16” Bolts.................................... 40-45 ft./lbs.
TEMPLATES- TO BE USED
PER INSTRUCTION 25, IF APPLICABLE.
If applicable, install new leaf alignment clamps. Cut off excess center bolt, leaving 2 to 3 threads
showing.
8) Loosely assemble the complete spring assemblies into their respective axle mounts. Reinstall the
u-bolts, nuts and washers and torque to 75-90 ft./lbs. Reinstall spring eye bolts and/or shackles and
torque to 75-80 ft./lbs.
9) Reconnect the axle vent hose and install the shock absorbers.
10) Lower the vehicle and test drive. PERIODICALLY INSPECT THE ASSEMBLY FOR TIGHTNESS.
TORQUE SPECIFICATION CHART:
11