
Owners manual


INSTALLATION:
1) Block the rear wheels of the vehicle in front and behind the tires. Raise the front of the vehicle with
a floor jack and support the frame with jackstands. Remove the front wheels and shock absorbers.
2) Separate the relay rod from the pitman arm. If your vehicle is equipped with a front anti-sway bar,
remove the brackets that hold it to the frame.
3) Mark the front driveshaft and the front differential yoke so that the driveshaft can be reconnected
in its original position. Failure to do so may result in a driveline imbalance and subsequent vibration.
Disconnect the front drive shaft at the u-joint and tape the caps to prevent them from falling off.
Be very careful not the pull the rear end of the driveshaft forward out of its splines or damage may
occur to the transfer case due to improper reinstallation. Secure the drive shaft end up and out of the
way.
4) Disconnect both front brake lines at the calipers. Hang the open ends of the brake lines as high
as possible to keep the fluid from draining out. Cover the open ends of the brake lines and calipers
to prevent loose dirt from entering the braking system. Disconnect the vent hose from the front dif-
ferential housing.
PERFORM STEPS 5 THROUGH 7 ON THE PASSENGER SIDE FIRST, THEN REPEAT THEM ON
THE DRIVER SIDE.
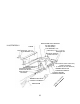
5) Support the beam near the spindle with the floor jack. Support the beam at several points to pre-
vent it from tipping or falling over. The beam assemblies are very heavy. Exercise extreme caution
when removing them to avoid any possibility of injury.
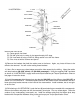
6) Remove the spring’s lower retaining nut and washer, then remove the J-clip that holds the spring
to the coil tower (see ILLUSTRATION 1). Lower the jack enough to remove the spring.
7) Remove the pivot bolts from the beam. Remove the nut from the end of the radius arm towards
the rear of the vehicle and carefully lower the end of the beam to the floor.
NOTE: Support the front differential with a floor jack. In order to keep the beam from tipping to
one side or another, you must either chain the beam to the floor jack, or use a second jack to support
the beam near the spindle.
(Repeat steps 5 through 7 on the driver side).
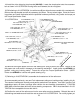
8) If the vehicle is equipped with a power steering cooler, remove the two bolts that hold it to the front
of the forward crossmember. Gently move the cooler out of the way.
9) Some of the brackets that held the pivot end of the front beams to the front beams crossmember
are bolted to the frame, some are riveted. These brackets must be removed from the crossmember
by unbolting and drilling the rivet heads. A right angle drill may be necessary to drill some of the riv-
ets.
4