
Owners manual

51315
Created
12.1.05
5
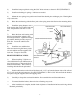
2) Install the bump stop blocks using the 5/16” bolts and nuts as shown in ILLUSTRATION 2.
3) Install new bushings in springs. Lubricate as needed.
4) Mount the new springs into position and install the shackle pins and hanger pins. Hand tighten
only at this time.
5) Raise the axle housing with the floor jack so the spring center bolt fits into the mounting holes.
6) Install the spring bumper, new u-
bolts, spring plate, new washers and new
nuts. Torque the u-bolt nuts to 75 ft./
lbs.
7) Raise the front axle housing with
the floor jack until the vehicle is free
from the jack stands. Tighten the hanger
pin and the shackle pin nuts; torque to
65 ft./lbs. Lower the vehicle to the
ground.
8) Install the new stabilizer bar
tubes and studs using the factory wash-
ers and cushions and the supplied 3/8”
lock nuts. Torque to 20 ft./lbs.
BRAKELINE RELOCATION:
1) When installing 3” lift kits on
some 1983/1984 Toyota 4WD trucks, it
may be necessary to relocate the front
brake frame brackets. This is done by
installing the brakeline drop brackets.
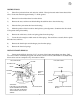
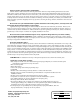
2) Position the bracket on the side of the frame rail, 1-1/2” up from the bottom side of the rail and
4-1/2” in front of the rear bump stop. See ILLUSTRATION 3. Drill a 3/16” hole and bolt the bracket
into place using the supplied 5/16” self tapping screw.
3) Carefully re-shape the stock steel brakeline. Re-assemble lines and bleed the brakes.
⇒ You must bleed the brakes, otherwise loss of braking may occur.
⇒ After installation is complete, double check all phases of installation before test driving vehicle.
Recheck periodically.
NEW BRAKELINE
MOUNT
4-1/2”
1-1/2”
NEW BRACKET
STOCK BRAKELINE MOUNT
WASHER
BOLT
ILLUSTRATION 3