
Hardware manual


4
GP4100 Series Quick Guide
How to Use GP-Pro EX
1. Start-up and default settings of GP-Pro EX
Double-click the icon on the desktop to start GP-Pro EX.
After a pop-up window appears, select [New] and specify
[Display Unit] and [Orientation] (“Landscape” or “Portrait”).
To create screen data for the GP4100 Series, select the
options for [Display Unit] as follows:
Series: GP4000 Series and then GP-41** Series
Model: GP4105 or GP-4106
2. Select a Device/PLC
Select a device or PLC connected.
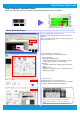
3. Start the main window
Click [New Screen]. The main window appears.
Any needed action can be carried out on the main window of GP-Pro EX.
GP-Pro EX allows you to create HMI screen data and to configure settings for the GP4100 Series.
Select an operation process. Create screen data using icons.
Icons are freely laid out.
Place drawings and parts on a base screen.
Click the tab to change the setting items.
Choose a part to place from [Parts Tool Box].
Click the [System Settings] tab to change settings for the display
unit and peripherals.
Click the [Address] tab to see the address map.
GP-Pro EX Main Window
Shortcut keys available.
For details on new and updated drivers, please go to our
support website, Otasuke Pro!
Æ http://www.pro-face.com/otasuke/
For details on new and updated drivers, please go to our
support website, Otasuke Pro!
Æ http://www.pro-face.com/otasuke/
Base Screen (Drawing Area)
Select switches and lamps from the
Parts Tool Box with drag & drop.