PRO FITNESS MAGNETIC CYCLE (4.2KG) OWNER’S MANUAL The specifications of this product may vary from this photo and are subject to change without notice.
IMPORTANT SAFETY NOTICE: NOTE THE FOLLOWING PRECAUTION BEFORE ASSEMBLING OR OPERATING THE MACHINE. 1、 Assemble the machine exactly as the descriptions in the instruction manual. 2、 Check all the screws, nuts and other connections before using the machine for the first time and ensure that the trainer is in the safe condition. 3、 Set up the machine in a dry level place and leave it away from moisture and water. 4、 Place a suitable base (e.g. rubber mat, wooden board etc.
WARNING: Before beginning this or and exercise program, consult your doctor. This is especially important for people over the age of 35 or those with health problems. Read all instructions before using the exercise bike.
Parts List Parts No. Description QTTY Parts No.
All the hardware items of the page have been preinstalled in the identified assembly parts. In these instances, simply remove and reinstall the hardware as assembly is required. Please reference the individual assembly steps and make note of all preinstalled hardware.
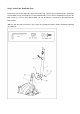
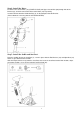
ASSEMBLY INSTRUCTION Step 1: A: Install the Front Stabilizer & Rear Main Frame Section. Attach the Front Stabilizer (2) onto the Main Frame (1), secure with the Carriage Bolts (11), Arc Washers (13) and Acorn Nuts (12) which are pre-attached to the stabilizer. Insert the Rear Main Frame Section (3) to the Base Beam, and then secure with the Allen Bolts (14) and Flat Washers (15). B: Install the Pedals. Secure the Pedals (9L/R) to the Crank (28) respectively, viewed from the rider’s seated position.
Step 2: Install the Handlebar Post. Connect the Sensor wire (20) to the Upper Sensor Wire (30), feed the Tension Control Cable (19) through the Handlebar Post (4) and out off the Tension Controller hole. Then, insert the Handlebar Post (4) over the Main section (1), secure in place with the Bolts (14) and Arc Washers (39) which are pre-attached to the Main Section. ★Ensure that ALL bolts and washers are in place and partially threaded in before completely tightening any ONE bolt.
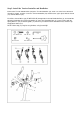
Step 3: Install the Tension Controller and Handlebar. Connect the Tension Control Cable (19) to the Tension Controller (34), make sure it has been connected correctly as shown, and then secure the Tension Controller (34) and the Cover (35) in place with the Screw (37) and Flat Washer (36). Feed Pulse Sensor Wires (32) (IF WITH PULSE) through hole in front of Handlebar Post (4), and out off the top of the Handlebar Post.
Step 4: Install the Meter. Feed the Pulse Sensor Wires (32) (IF WITH PULSE) and Upper Sensor Wire (30) through hole of the Bracket (33), and then connect the Wires to the Meter (10) respectively. Insert the Bracket onto the Handlebar Post (4), fix the Computer onto the Bracket. (Please follow the same way with the OPTIONAL METER) Step 5: Install the Saddle and Seat Post.
COMPUTER INSTRUCTION MANUAL FUNCTIONAL BUTTON: MODE/RESET -Push down to select functions. -Push down for 3 seconds to reset time, distance and calories . FUNCTION AND OPERATIONS: 1. SCAN: Press MODE button until “SCAN” appears, monitor will rotate through the following functions: time, speed, distance, total distance(IF HAVE) and calories. Each display will be hold 6 seconds. 2. TIME(TMR): Count the total time from exercise start to end. 3. SPEED(SPD): Display current speed. 4.
Control appetite Boost self-image Improve muscle tone and strength Improve flexibility Lower blood pressure Relieve insomnia TARGET HEART RATE AGE 20 25 30 35 40 45 50 55 60 65 70 75 80 85 TRAINING ZONE MIN-MAX (BPM) 133-167 132-166 130-164 129-162 127-161 125-159 124-156 122-155 121-153 119-151 118-150 117-147 115-146 114-144 Note: This is a guide only and performance will depend on the fitness and condition (health) of the person using the magnetic bike.
Increase the pace and resistance to slightly harder than comfortable and exercise for as long as you can. You may only be able to exercise for a few minutes at a time, but that will change quickly if you exercise regularly. End each work –out with a 5-minute cool down with the resistance set to a low level. You should then stretch the muscles you’ve just worked to prevent injury and cramp.
Inner Thigh Stretch Sit with the soles of your feet together with your knees pointing outward. Pull your feet as close into your groin as possible. Gently push your knees towards the floor. Hold for 15 counts. Hamstring Stretch Sit with your right leg extended. Rest the sole of your left foot against your right inner thigh.Stretch toward your toe as far as possible. Hold for 15 counts. Relax and then repeat with left leg extended.
Toe Touch Slowly bend forward from your waist, letting your back and shoulders relax as you stretch toward your toes. Reach down as far as you can and hold for 15 counts. Side Stretch Open your arms to the side and continue lifting them until they are over your head. Reach your right arm as far upward toward the ceiling as you can for one count. Feel the stretch up your right side. Repeat this action with your left arm.
SPECIFICATIONS Dimensions (L x W x H) 98.5X47.5X108CM Batteries 2 x “AA” size Class Rating HC Maximum User Weight 100kg Please note that the specifications are subject to change without notice.