T2000 Treadmill Assembly & User Instructions- Please Keep for future reference 769/7722 Important – Please read these instructions fully before assembly or use These instructions contain important information which will help you get the best from your equipment and ensure safe and correct assembly, use and maintenance. If you need help or have damaged or missing parts, call the Customer Helpline: 0345 6001714 or visit www.argos-support.co.
11 Contents Safety Information 1-2 Components-Parts 3 Components-Fixings 4 错误!未定义书签。-3 Assembly Instructions 5-9 Workout Area 10 11 11-24 112-26 Before starting 11 112 Muscle Chart 12 13 Warming up and Cooling down 13-14 14-15 Getting started 15-16 16-17 Console operation 17-23 Exercise Information Folding mechanism and incline adjustment Care and Maintenance Exploded Parts Diagram Parts List TABLE OF CONTENTS 24 25-29 30 31-32 33
Safety information Important – Please、read fully before assembly or use This exercise equipment is built for optimum safety. However, certain precautions apply whenever you operate a piece of exercise equipment. Be sure to read the entire manual before you assemble, operate or use this equipment. and dust. Do not put the equipment in a garage, outbuilding, covered patio, or near water. Assembly • Your product is intended for use in clean dry • The product must be installed on a stable and level conditions.
Safety information • The replacement parts could affect the safe use of the treadmill. • The max allowed lateral position of the running surface is around 5-8mm. • Noise emission under load is higher than without load. • When choosing a location for the equipment make sure that the location and position permit access to a plug. • Do not operate this equipment where aerosol products are used or where oxygen is being administered. • When connecting the power cord, plug the power cord into a grounded circuit.
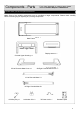
Components - Parts If you have damaged or missing parts, please call the Customer Helpline: 0345 6001714. Please check you have all parts listed below Note: Some of the smaller components may be pre-fitted to larger components. Please check carefully before contacting Argos regarding any missing components. Main Frame Display screen x 1 Console Upper Housing x 1 55 Left Console Mast Cover x 1 56 Right Console Mast Cover x 1 13.Left Console Mast X 1 14.Right Console Mast X 1 42.
Components - Fixings Please check you have all parts listed below Note: The quantities below are the correct amount to complete the assembly. In some cases more hardware may be supplied than are required. Some of the fixings are pre-fitted to the larger components. Please check carefully before contacting Argos regarding any missing fixings.
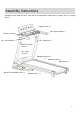
Assembly Instructions Total mass of the product is 64 kg. Total size of the equipment is (width) 82cm × (depth) 178 cm × (height) 128 cm.
Assembly Instructions Guide wire Handrail Hole 14 Right Console Mast 13 Left Console Mast Main wire 12 Base frame Step 1 a. Connect the guide wire from bottom of the Right Console Mast (14) with the main wire from the Base Frame (12), then pull the main wire out from the handrail hole as shown in the diagram. Notes: Once the main wire is threaded through the Console Mast, ensure it is secured before detaching the guide wire. Failure to do this could risk the main wire falling out. b.
Assembly Instructions Console 88 Right Handrail 87 Left Handrail Pulse Sensor Wire Main wire 42 Safety Key 13 Left Console Mast 4 14 Right Console Mast 12 Base frame Step 2 Connect the main wire with the Pulse Sensor Wire as shown in the diagram. Place the Console on the top of the Console Mast (13 & 14) and fix it using 6 x M8x15 SUNK BOLT (6).Then insert the safety key(42) into the notch of the console(43). Notes: Fully tighten all the bolts in above steps.
Assembly Instructions Display screen Console Check whether the snap fits into the groove! Console Wire 14 Right Console Mast Display Screen Wire 13 Left Console Mast 12 Base frame Step 3 Connect the console wire with the display screen wire as shown in the diagram. 1. Attach the Display screen to the Console , using 2 x M8x20mm Allen Bolt (1), 2 x φ8 Spring Washer (2), 2 x φ8 Washer (3).
Assembly Instructions Running Deck 13 Left Console Mast 56 Right Console Mast Cover 55 Left Console Mast Cover Protrusion 12 Base frame Step 4 Align and press the protrusion on the Console Mast Cover (55 & 56) to the holes on the Base frame (12) 2. then fix with 4 x M4*40 Flat hand screws (4),2 x M4*8 Flat hand screws (5). Notes: when installing, the Running Deck should be lifted up as shown in the diagram.
Workout Area The free area must be at least 0.6m greater than the training area. This is a space where you can safely dismount, without obstruction, in case of an emergency. Where two pieces of equipment are positioned adjacent to each other the free area may be shared. The free area behind the treadmill should be 2m in length and double the width of the product. 0.6m (Free area) 0.6m (Free area) 0.6m (Free area) Training area 1.7m 2.
Exercise Information Before starting Tailor your exercise program according to your physical condition. If you have been inactive for several years, or are overweight, you must start slowly and increase your time on the equipment; a few minutes per workout increase is advisable. Initially, you may be able to exercise only for a few minutes in your target zone, however, your aerobic fitness will improve over the next six to eight weeks. Don’t be discouraged if it takes longer.
Exercise Information Muscle Chart Aerobic Exercise Aerobic exercise improves the fitness of your lungs and heart - your body’s most important muscle. Aerobic exercise is promoted by any activity that uses your large muscles (arms, legs, or buttock, for example). Weight Training Along with aerobic exercising which helps get rid of and keep off the excess fat that our bodies can store, weight training is an essential part of an exercise routine. Weight training helps tone, build and strengthen muscle.
Exercise Information 12 Warming up and Cooling down Each workout should include the following three parts: 1. A warm-up, consisting of 5 to 10 minutes of stretching and light exercise. A proper warm-up increases your body temperature, heart rate, and circulation in preparation for exercise. 2. Training zone exercise, consisting of 20 to 30 minutes of exercising with your heart rate in your training zone.
Exercise Information Calf/Achilles stretch With one leg in front of the other, reach forward and place your hands against a wall. Keep your back leg straight and your back foot flat on the floor. Bend your front leg, lean forward and move your hips toward the wall. Hold for 15 counts, then relax. Repeat 3 times for each leg. To cause further stretching of the Achilles tendons, bend your back leg as well. Stretches: Calves, Achilles tendons and ankles.
Exercise Information Getting Started 1 2 Plug your fitness equipment into the mains power and turn on the switch (1). You will hear a beep and the computer screen will light up. OVER-CURRENT PROTECTOR: There is an over-current protector (2) located on the right side of the switch (1) (see above picture); in case of short circuit or over-current, the Button of the over current protector will pop up and the treadmill will power off; please unplug the power source and push down the button.
Exercise Information Getting Started 42 SAFETY KEY: The treadmill will only work if the safety key (42) is properly locked in the provided notch of the console. Insert the safety key (42) and attach the clip to your chest or the waist belt of your clothes. Then move backward to test the safety key. The safety key should be able to be pulled out from the console with the clip still on your clothes. If you need to turn the motor off immediately, just pull the safety key (42) out of the console.
Exercise Information Console Operation A:Incline B:Distance C:Time D:Display window E:Speed F:Calorie G:Pulse H:Bluetooth I:Quick Incline select(3%,6%,9%,12%) J:InclineK:Incline+ L:Start M:Program N:Mode O:Stop P:SpeedQ:Speed+ R:Quick speed select(3km/h,6km/h,9km/h,12km/h) S:Fan 17
Exercise Information Console Operation TECHNICAL SPECIFICATION Time---------------------------------00:00--99:59 min/sec Speed-------------------------------0.0--18.0 km/h Distance----------------------------0.00--99.9 km Calorie------------------------------0.0--999 Kcal Incline -------------------------------0-15% Pulse---------------------------------50-190 BPM START Press to start exercise at initial speed 0.8km/h.
Exercise Information Console Operation GENERAL OPERATION 1. Turn on the Power Switch at the front of your Treadmill. This switch is located next to the Mains Power Cord inlet. 2. Place the Safety Key into the magnetic recess on the middle front of the Computer Console. The console will beep and all console window displays will function with a start display value of 0.
Exercise Information Console Operation TRAINING TIME CONTROL WORKOUT MODE 1. Turn on the treadmill,press the “Mode” once, and the “Time” window flashes and displays “15:00”, which is the pre-set training time of the treadmill. Press “Speed +” / “Speed -” or “Incline+”/”Incline-” to select your desired training time, (the range is 5:00—99:00). 2.
Exercise Information Console Operation Program Workout Mode (P01—P30) In this mode, the user has a choice of Program P01 – Program P30. 1. 2. Press the “Prog.”, the “Calorie” window will display “P01” and the “Time” window will display “15:00”, which is the preset time of the treadmill for each program. Press the “Pro.” to select your desired training program “P01-P30”.
Exercise Information Console Operation PROG P17 P18 P19 P20 P21 P22 P23 P24 P25 P26 P27 P28 P29 P30 22 TIME SPEED INCLINE SPEED INCLINE SPEED INCLINE SPEED INCLINE SPEED INCLINE SPEED INCLINE SPEED INCLINE SPEED INCLINE SPEED INCLINE SPEED INCLINE SPEED INCLINE SPEED INCLINE SPEED INCLINE SPEED INCLINE Set Time/10 =Running time for each program 1 2 3 4 5 6 2.0 2.0 6.0 6.0 8.0 10.0 4 5 5 5 6 6 2.0 3.0 4.0 5.0 2.0 3.0 4 4 4 4 3 3 2.0 4.0 6.0 2.0 4.0 6.0 3 5 5 5 4 4 1.0 3.0 4.0 5.0 6.0 5.0 3 3 3 4 4 5 4.
Exercise Information Console Operation BODY FAT ANALYSIS Turn on the treadmill, press "Prog" until the big window displays "FAT".press “MODE”, the “Time”window is displaying “F1” and "Speed" window is displaying "1". Press“Speed +” or “Speed -” or “Incline +” / “Incline -” Key , the “Calories” Window will change to “ 1” or “2 ”, Please select “ 1” – Male, “2” – Female.
Exercise Information Folding Mechanism and Locking System 1. To fold the treadmill, lift the running deck and you can hear a click when the deck locks into position. 2. Hold the running deck, touch the cylinder joint with your tiptoes to unfold it as shown in the diagram. Warning! A folded treadmill should not be operated. Allow the running surface to come to a complete stop before folding.
Care and Maintenance 1. The safety level of the equipment can only be maintained if it is examined regularly for damage and wear e.g. ropes, pulleys and connection points. 2. Lubricate moving parts with light oil periodically to prevent premature wear. Never use abrasives or solvents to clean the treadmill. To prevent damage to the computer, keep liquids away and keep it out of direct sunlight. 3. Inspect and tighten all parts before using the equipment.
Care and Maintenance Belt Adjustment Improper maintenance can cause damage to the treadmill or shorten the life of the product and exceed the LIMITED WARRANTY coverage. Important: Never use abrasives or solvents to clean the treadmill. To prevent damage to the computer, keep liquids away and keep it out of direct sunlight. All parts of the treadmill must be checked and tightened regularly. Worn parts must be replaced immediately.
Care and Maintenance Belt Adjustment CENTRING THE RUNNING BELT When you run, you may push off harder with one foot than with the other. The severity of the deflection depends on the amount of force that one foot exerts in relation to the other. This deflection can cause the belt to move off-centre. This deflection is normal and the running belt will centre when nobody is on the running belt. If the running belt remains consistently off-centre, you will need to centre the running belt manually. 1.
Care and Maintenance Deck Lubrication The treadmill is pre-lubricated. However, it is recommended to check the lubrication of the treadmill regularly, to ensure optimal operation. CLEANING Regular cleaning of the belt ensures a long product life. After every 2 months of operation, lift the sides of the treadmill running belt and feel the surface of the deck, as far as possible. If traces of silicon spray are found, lubrication is not necessary. If the surface is dry, refer to the instructions below.
Care and Maintenance Trouble Shooting Error Code Check Solution E00 Safety Key not in the position Re-locate the safety key in the correct position E01 No signal to Controller from console E02 Motor communication error E04 Incline Motor communication error A: Check the Main Controller Wire B: Replace the PCB Board A: Check the wire from motor to controller B: IGBT breakdown, Replace the controller C: Check the power voltage if 50% lower than rate voltage D: replace the motor wire or motor A: Che
Exercise Information Exploded Parts Diagram 30
Parts List Key No. Description QTY Code Key No.
Parts List Key No. Description QT Y Code Key No. Description QTY Code 55 Left Console Mast Cover 1 3C51JBG00683 79 Power cord 1 3D22O00003 56 Right Console Mast Cover 1 3C51JBG00684 80 power outlet 1 3D23O00009 57 Console Rear Cover 1 3C51JBG00685 81 power switch 1 3D23O00010 58 Console Upper Housing 1 3C51JBG00686 82 Overcurrent protector 1 3D23O00014 59 Display screen Upper Housing 1 3C51JBG00687 83 ST4.
EU Declaration of Conformity Section 1 Product PRO FITNESS T2000 Treadmill Model/type TX-667SW Catalogue number 7697722 Product Image ☒Argos Limited. Manufacturer Name & Address 489-499 Avebury Boulevard, Saxon Gate West, Milton Keynes, Buckinghamshire, MK9 2NW Section 2 This declaration is issued under the sole responsibility of the manufacturer.
Section 3 Conformity is shown by compliance with the applicable requirements of the following harmonised standards: Applicable Harmonized Standards (Standard reference, date and amendments) Title e.g. Safety of Toy: Migration of certain elements e.g.
EN 50663: 2017 Generic standard for assessment of low power electronic and electrical equipment related to human exposure restrictions for electromagnetic fields (10MHz – 300GHz) EN 62479: 2010 Assessment of the compliance of low power electronic and electrical equipment with the basic restrictions related to human exposure to electromagnetic fields (10 MHz to 300 GHz) EN 957-6:2010+A1:2014 Stationary training equipment Part 6: Treadmills, additional specific safety requirements and test methods.
Guarantee Product Guarantee This product is guaranteed against manufacturing defects from a period of Year This product is guaranteed for twelve months from the date of original purchase. Any defect that arises due to faulty materials or workmanship will either be replaced, refunded or repaired free of charge where possible during this period by the dealer from whom you purchased the unit.