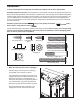
Model No. PFTL79506.0 Serial No. USER'S MANUAL Serial Number Decal QUESTIONS? As a manufacturer, we are committed to providing complete customer satisfaction. If you have questions, or if parts are damaged or missing, PLEASE CONTACT OUR CUSTOMER SERVICE DEPARTMENT DIRECTLY. CALL TOLL-FREE: 1-888-533-1333 Mon.–Fri., 6 a.m.–6 p.m. MST ON THE WEB: www.proformservice.com CAUTION Read all precautions and instructions in this manual before using this equipment. Save this manual for future reference.
TABLE OF CONTENTS IMPORTANT PRECAUTIONS . . . . . . . . . . . . . . . . . . . . . . . . . . . . . . . . . . . . . . . . . . . . . . . . . . . . . . . . . . . . . . . .3 BEFORE YOU BEGIN . . . . . . . . . . . . . . . . . . . . . . . . . . . . . . . . . . . . . . . . . . . . . . . . . . . . . . . . . . . . . . . . . . . . . .5 ASSEMBLY . . . . . . . . . . . . . . . . . . . . . . . . . . . . . . . . . . . . . . . . . . . . . . . . . . . . . . . . . . . . . . . . . . . . . . . . . . . . . . .
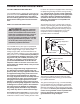
IMPORTANT PRECAUTIONS WARNING: To reduce the risk of burns, fire, electric shock, or injury to persons, read the following important precautions and information before operating the treadmill. 1. It is the responsibility of the owner to ensure that all users of this treadmill are adequately informed of all warnings and precautions. see your local PROFORM dealer or call the toll-free telephone number on the front cover of this manual and order part number 146148, or see your local electronics store. 2.
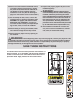
20. Never leave the treadmill unattended while it is running. Always remove the key, unplug the power cord, and switch the reset/off circuit breaker to the off position when the treadmill is not in use. (See the drawing on page 5 for the location of the circuit breaker.) 24. Inspect and properly tighten all parts of the treadmill regularly. 25.
BEFORE YOU BEGIN Thank you for selecting the revolutionary PROFORM® 755 CROSSTRAINER treadmill. The 755 CROSSTRAINER treadmill offers an impressive array of features designed to make your workouts at home more enjoyable and effective. And when you’re not exercising, the unique 755 CROSSTRAINER treadmill can be folded up, requiring less than half the floor space of other treadmills. ual. To help us assist you, note the product model number and serial number before contacting us.
ASSEMBLY To hire an authorized service technician to assemble the treadmill, call toll-free 1-800-445-2480. Assembly requires two persons. Set the treadmill in a cleared area and remove all packing materials. Do not dispose of the packing materials until assembly is completed. Note: The underside of the treadmill walking belt is coated with high-performance lubricant. During shipping, a small amount of lubricant may be transferred to the top of the walking belt or the shipping carton.
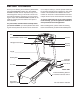
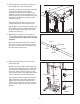
2. With the help of a second person, carefully tip the treadmill onto its right side as shown. 2 84 Insert the other Extension Leg (89) into the base of the Uprights (84) as shown. Hold two Extension Leg Nuts (67) in the bottom of the Extension Leg. Next, insert two Extension Leg Bolts (65) into the top of the Extension Leg, and firmly tighten the Extension Leg Bolts into the Extension Leg Nuts. 65 22 22 82 58 Attach two Base Pads (82) to the base of the Uprights (84) with two 3/4” Tek Screws (22).
5. Lower the treadmill frame (see HOW TO LOWER THE TREADMILL FOR USE on page 19). 5 64 Have a second person hold the Handrail (20) near the Uprights (84). Insert the Upright Wire Harness (77) into the hole in the bottom of the Handrail and out of the top as shown. 8 20 64 8 77 Next, set the Handrail (20) on the Uprights (84). Do not let the Upright Wire Harness (77) fall into the right Upright.
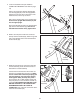
8. Set the console assembly on the Handrail (20). Be careful to avoid pinching any of the wires. Make sure that the ground wire (see step 6) and the wire harness from the console assembly (see step 7) are in the indicated channel. 8 Console Assembly Channel Hand tighten five Screws (3) into the Handrail (20) and the console assembly. Start all five Screws, but do not tighten them yet. Do not put Screws into the two indicated holes. 20 3 3 3 No Screws 9.
OPERATION AND ADJUSTMENT THE PRE-LUBRICATED WALKING BELT tric shock. This product is equipped with a cord having an equipment-grounding conductor and a grounding plug. Plug the power cord into a surge suppressor, and plug the surge suppressor into an appropriate outlet that is properly installed and grounded in accordance with all local codes and ordinances. Important: The treadmill is not compatible with GFCI-equipped outlets. Your treadmill features a walking belt coated with highperformance lubricant.
CONSOLE DIAGRAM Key Clip FEATURES OF THE CONSOLE programs to choose among. Note: The strength exercises require the use of dumbbells and an inflatable exercise ball (not included). To purchase dumbbells or an exercise ball, call the toll-free telephone number on the front cover of this manual. The revolutionary treadmill console offers a selection of features designed to make your workouts more effective and enjoyable.
HOW TO TURN ON THE POWER 1 Plug in the power cord (see page 10). 2 Locate the reset/off circuit breaker near the power cord. Make sure that the circuit breaker is in the reset position. 3 Speed increase and decrease buttons. Each time a button is pressed, the speed setting will change by 0.1 mph; if a button is held down, the speed setting will change in increments of 0.5 mph. Note: After the buttons are pressed, it may take a moment for the walking belt to reach the selected speed setting.
The left side of the display will show the elapsed time, the distance that you have walked or run, and the incline level of the treadmill. Note: When a cross trainer program is selected, the display will show the time remaining in the program instead of the elapsed time. Before using the handgrip pulse sensor, remove the sheets of clear plastic Contacts from the metal contacts. In addition, make sure that your hands are clean.
The speed setting for the first segment will be Current Segment shown in the flashing Current Segment column of the matrix. (The incline settings are not shown in the matrix.) The speed settings for the next several segments will be shown in the columns to the right. HOW TO USE A CROSS TRAINER PROGRAM 1 Insert the key into the console. See HOW TO TURN ON THE POWER on page 12. 2 Select one of the nine cross trainer programs.
4 Perform the first strength exercise when prompted. 5 Continue the cross trainer program. When you have performed the recommended number of repetitions, the words PRESS START will appear in the display. To continue the cross trainer program, step onto the treadmill, slide the clip back onto the waistband of your clothes, and press the Start button. The treadmill will automatically adjust to the speed and incline settings for the next segment.
be shown in the flashing Current Segment column of the matrix. (The incline settings are not shown in the matrix.) To program a speed setting and an incline setting for the first segment, simply adjust the speed and incline of the treadmill as desired by pressing the Speed and Incline buttons. Every few times a Speed button is pressed, an additional indicator will appear or disappear in the Current Segment column. HOW TO CREATE A CUSTOM PROGRAM 1 Insert the key into the console.
When the first segment is completed, all speed settings will move one column to the left. The speed setting for the second segment will then be shown in the flashing Current Segment column and the treadmill will automatically adjust to the speed and incline settings for the second segment. HOW TO USE A CUSTOM PROGRAM 1 Insert the key into the console. See HOW TO TURN ON THE POWER on page 12.
THE INFORMATION MODE/DEMO MODE IMPORTANT: If a “d” appears in the display, the console is in the “demo” mode. This mode is intended to be used only when a treadmill is displayed in a store. When the console is in the demo mode, the power cord can be plugged in, the key can be removed from the console, and the indicators in the display will automatically appear in a preset sequence; the buttons on the console will not operate.
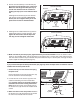
HOW TO FOLD AND MOVE THE TREADMILL HOW TO FOLD THE TREADMILL FOR STORAGE Before folding the treadmill, adjust the incline to the lowest position. If this is not done, the treadmill may become permanently damaged. Next, unplug the power cord. CAUTION: You must be able to safely lift 45 pounds (20 kg) to raise, lower, or move the treadmill. Frame 1. Hold the metal frame firmly in the location shown by the arrow at the right.
TROUBLESHOOTING Most treadmill problems can be solved by following the steps below. Find the symptom that applies, and follow the steps listed. If you need further assistance, please call the toll-free telephone number on the front cover of this manual. PROBLEM: The power does not turn on SOLUTION: a. Make sure that the power cord is plugged into a surge suppressor, and that the surge suppressor is plugged into a properly grounded outlet (see page 10).
Locate the Reed Switch (63) and the Magnet (46) on the left side of the Front Roller (47). Turn the Front Roller until the Magnet is aligned with the Reed Switch. Make sure that the gap between the Magnet and the Reed Switch is about 1/8". If necessary, move the Reed Switch slightly using a slotted screwdriver. Reattach the Hood (not shown), making sure that the Screws (not shown) are inserted into the same holes from which they were removed.
CONDITIONING GUIDELINES ergy. Only after the first few minutes does your body begin to use stored fat calories for energy. If your goal is to burn fat, adjust the speed and incline of the treadmill until your heart rate is near the lowest number in your training zone. WARNING: Before beginning this or any exercise program, consult your physician. This is especially important for individuals over the age of 35 or individuals with preexisting health problems.
PART LIST—Model No. PFTL79506.0 R1006A To locate the parts listed below, see the EXPLODED DRAWING on pages 24 to 27. Key No. Qty.
5 16 24 55 53 52 2 111 90 23 21 5 9 69 3 70 3 5 1 53 49 51 54 2 19 23 21 18 5 9 3 90 48 6 30 5 70 17 11 12 58 5 50 10 112 2 15 1 5 29 47 46 12 10 11 5 19 6 18 30 112 2 101 39 15 EXPLODED DRAWING—Model No. PFTL79506.
Part 2 of 4 41 7 114 7 7 66 66 2 2 66 2 66 2 33 73 2 38 2 73 103 73 2 26 59 2 27 4 2 92 2 40 99 36 103 104 109 105 108 24 13 106 33 107 43 28 25 32 61 42 45 63 32 25 28
Part 3 of 4 8 3 64 8 3 20 3 8 64 60 62 3 3 8 3 3 3 77 3 84 62 60 44 14 32 31 65 33 57 32 82 22 68 31 77 82 78 22 33 67 65 89 81 44 86 82 88 110 22 87 22 89 72 80 68 94 95 96 102 87 56 22 93 67 97 81 80 82 110 78 22 26 14
Part 4 of 4 37 35 35 34 79 33 85 3 3 91 76 100 3 3 98 71 75 33 74 27
ORDERING REPLACEMENT PARTS To order replacement parts, see the front cover of this manual. To help us assist you, please be prepared to give the following information: • the MODEL NUMBER of the product (PFTL79506.0) • the NAME of the product (PROFORM 755 CROSSTRAINER treadmill) • the SERIAL NUMBER of the product (see the front cover of this manual) • the KEY NUMBER and DESCRIPTION of the part(s) (see pages 23 to 27) LIMITED WARRANTY ICON Health & Fitness, Inc.