
User Manual


© Audio Trade GmbH · Pro-Ject Phono Box USB · Revision 2013.3.15
2
Dear music lover,
thank you for purchasing a PRO-JECT AUDIO phono amplifier.
In order to achieve maximum performance and reliability you should study these instructions for use carefully.
!
Warning of a hazard for the user, the unit or possible misuse.
Important notice.
Setting the cartridge mode
The phono amplifier can be used in either MM (for moving magnet and high-output MC cartridges) or MC (for
low-output MC cartridges) mode according to the construction principle of the pickup cartridge to be used.
Since most cartridges use the MM principle the phono amplifier is factory set to operate in this mode. To find
out which type your cartridge is please consult the literature accompanying your cartridge. If in doubt please
consult your dealer.
A switch at the back of the phono amplifier sets the correct level of amplification for the cartridge.
!
Before setting MM / MC mode the unit must be disconnected from the power supply and amplifier.
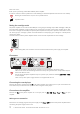
Connectors
Pro-Ject Audio Systems, Vienna, Austria
18V
!
Make all connections whilst the phono amplifier is disconnected from the power supply.
Take care to connect the left and right channels correctly. The right channel is usually marked red, the
left channel black or white.
Do not connect the phono amplifiers output to a phono input (sometimes labelled gram, disc or RIAA)
on the amplifier.
Never use any other power supply than the one supplied with the unit.
Connecting the record player
Connect the tonearm signal lead to the In of the phono amplifier. The earthing wire may be connected to the
screw terminal if you encounter hum problems when using the record player.
Connection to the amplifier
Connect the Out of the phono amplifier to a line input (such as AUX, CD, Tuner, Tape or Video) on your
amplifier.
Mains power connection
Connect the low voltage plug from the power supply to the Power 18V
"
socket of the phono amplifier before
connecting the power supply to the mains.