INSTRUCTIONS FOR USE The Classic Evo
© Pro-Ject Audio Systems · Pro-Ject The Classic Evo · Revision 2019.03.
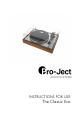
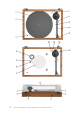
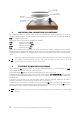
The Classic Evo Controls, features and connections (1) (2) (3) (4) (5) (6) (7) (8) (9) (10) (11) (12) (13) (14) (15) (16) (17) (18) (19) (20) (21) MAIN PLATTER CHASSIS SPEED CONTROL MOTOR WITH MOTOR PULLEY DRIVE BELT SUB-PLATTER TRANSPORT SCREWS TONEARM COUNTERWEIGHT TONEARM LIFT TONEARM REST AND REMOVABLE TRANSPORT LOCK CARBON / ALUMINIUM TONEARM TUBE HEADSHELL WITH FINGER LIFT TONEARM FLANGE ANTI-SKATING WEIGHT WITH THREAD ANTI-SKATING WEIGHT SUPPORT ANTI-SKATING STUB WITH ANTI-SKATING ADJUSTMENT SCALE L
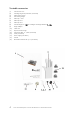
Turntable accessories (1) (2) (3) (4) (5) (6) (7) (8) (9) (10) (11) (12) (13) (14) (15) (16) 4 Instruction for use Cartridge alignment protractor (not shown) White cotton gloves Anti-skating weight Allen key 1.5mm Allen key 2mm Allen key 3mm Counterweight no. 183 for cartridges with weight between 7 - 14g Single adaptor Hook tool Stylus Pressure Gauge Connect IT RCA – E 1,23m (not shown) Cloth (not shown) Power supply (not shown) 3x Feet Round drive belt for 78 r.p.m.
CONTENTS TURNTABLE OVERVIEW 2-3 ACCESSORIES OVERVIEW 4 SETUP AND INSTALLATION 1. FEET ASSEMBLY 7 2. TRANSPORT SCREWS 7 3. MOUNTING AND CONNECTING THE CARTRIDGE 8 4. CARTRIDGE DOWNFORCE ADJUSTMENT 8 5. ANTI-SKATING FORCE ADJUSTMENT 9 6. CONNECTION TO THE AMPLIFIER 9 7. MAINS POWER CONNECTION 10 8. FITTING THE LID 10 9. SWITCHING ON AND OFF 10 10. CHANGING REPLAY SPEED 10 11. ADJUSTING THE VERTICAL TRACKING ANGLE (VTA) 11 12. ADJUSTING THE AZIMUTH 11 13. USEFUL TIPS 12 14.
Dear music lover, Thank you for purchasing a Pro-Ject Audio Systems record player. In order to achieve maximum performance and reliability, please study these instructions carefully. Warning of a hazard for the user, the unit or possible misuse Important notice The following instructions for adjusting the cartridge are provided in case the cartridge is replaced by a different model at a later date.
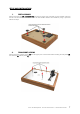
SETUP AND INSTALLATION 1. FEET ASSEMBLY Remove the three feet (15 –accessories list) from the grey foam insert. Carefully turn the turntable and screw the feet into the thread insert from the bottom of the turntable. Balance the turntable by using a spirit level before next steps. 2. TRANSPORT SCREWS Remove the three transport screws (7) from the upper part of the chassis before installing the sub-platter (6), the drive belt (5) and the platter (1).
3. MOUNTING AND CONNECTING THE CARTRIDGE All cartridges with half inch mounting holes can be mounted. Leave the needle's protection cover on, fit the cartridge to the headshell by using the supplied screws by passing one screw through each slot in the headshell (12). Do not tighten the nuts yet.
5. ANTI-SKATING FORCE ADJUSTMENT Put the anti-skating thread hook over the anti-skating adjustment scale. The anti-skating force must be adjusted corresponding to the downforce as follows: Downforce Groove in the stub (15) 10 - 14mN 1st from bearing rings 15 - 19mN 2nd " " " 20mN and bigger 3rd " " " 6.
For detailed product information regarding Pro-Ject Audio Systems interconnect cables and phono amplifiers please visit our website: www.project-audio.com 7. MAINS POWER CONNECTION The turntable is supplied with a power supply suitable for your country's mains supply. Check the label before connecting to ensure compliance with the mains rating in your house.
. ADJUSTING THE VERTICAL TRACKING ANGLE (VTA) Put a record on the platter. When the needle is lowered into the record groove and the tonearm is not resting on the lift arm, the tube of the tonearm should be parallel to the surface of the record. If it is not, loosen both hexagon screws in the tonearm base just enough to allow vertical movement of the arm pillar without force and slide the arm up or down until it is parallel.
13. USEFUL TIPS The lid is not only a dust cover but also a resonant structure likely to be excited by and to pass into the plinth the acoustic energy emanating from your loudspeakers during replay. Therefore it is recommended to remove the lid for achieving a better sound quality. The record player should be positioned on a low-resonance surface, like wood or multiple layer ply board to avoid structural vibrations disturbing replay. 14.
Internal impedance, DC resistance Recommended load impedance Cartridge body material Coil wire material Cartridge colour Cartridge weight 7 Ohm >20 Ohm/amplifier connection – MC-input ABS/Aluminium Copper Red 9g Potential incorrect use and fault conditions Pro-Ject turntables are manufactured to the highest standards and undergo strict quality controls before leaving the factory.
© Pro-Ject Audio Systems · Pro-Ject The Classic Evo · Revision 2019.03.