
User Manual


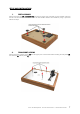
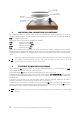

Table Of Contents

© Pro-Ject Audio Systems · Pro-Ject The Classic Evo · Revision 2019.03.26
8
3. MOUNTING AND CONNECTING THE CARTRIDGE
All cartridges with half inch mounting holes can be mounted. Leave the needle's protection cover on, fit the
cartridge to the headshell by using the supplied screws by passing one screw through each slot in the headshell
(12). Do not tighten the nuts yet.
Connect the tonearm wires with the cartridge pins as follows:
white left channel positive (L+)
red right channel positive (R+)
green right channel return (R-)
blue left channel return (L-)
The full sound quality of the record player can only be achieved if the cartridge is adjusted correctly. Particular
tools like the Pro-Ject Audio Systems alignment tool are required to accomplish this job properly. If you are not well
acquainted with the adjustment of cartridges, please call for the willing help of your Pro-Ject Audio Systems
dealer.
Please note: adjusting a cartridge and tonearm calls for the greatest care in order to avoid damaging
the cartridge or tonearm bearings. Ask your local dealer for help if you are unsure in any of the
necessary steps and precautions which must be taken.
4. CARTRIDGE DOWNFORCE ADJUSTMENT
The counterweight (8) supplied is suitable for cartridges weighing between 7 - 14g (counterweight no. 183).
Adjust the downforce prior to setting the anti-skating force.
Place counterweight (8) halfway along the counterweight support rod at rear of arm.
With the power off, and the platter static, place the stylus pressure gauge (11 –accessories list) onto the platter.
To set the recommended 23mN downforce (1mN = 0,1g / 0,1 Pond), place the tip of the stylus slightly after
the 20mN mark.
If the stylus gauge becomes level, then the correct pressure has been achieved. However if the there is
insufficient or excessive pressure the gauge will either not move or tilt down.
To adjust the amount of pressure, carefully move the counterweight (8) along the support rod, until the stylus
pressure is sufficient to raise the pressure gauge to the level position. Moving the counterweight
(8) away from
the cartridge will reduce pressure and towards will increase pressure.
Please note: It is advised to remove stylus tip from gauge whilst making adjustments to avoid damage
to stylus.