
Owners Manual


© Pro-Ject Audio Systems · Pro-Ject Primary E / Pro-Ject 8.6E · Revision 2018.04.03
5
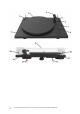
Cartridge downforce adjustment
The counterweight (8) supplied is suitable for cartridges weighing between 3 - 7g (weight no. 81). The
counterweight is pre-set perfectly from the factory.
In case you need to set the tracking force, please read following instructions:
Place the stylus pressure gauge onto the platter
.
To adjust the amount of pressure, carefully move the
counterweight along the support rod, until the stylus pressure is sufficient to raise the pressure gauge
to the level position. Moving the counterweight away from the cartridge will reduce pressure and
towards will increase pressure. Finally secure the counterweight using hexagonal key provided.
If the stylus gauge becomes level, then the correct pressure has been achieved. However if the there is
insufficient or excessive pressure the gauge will either not move or tilt down.
Connection to the amplifier
The record player has a captive tonearm signal lead (11) for connection to the amplifier. Use the Phono
input (sometimes labelled gram, disc or RIAA) on your amplifier. Make sure that the phono input offers
correct matching and amplification for the type of cartridge used. Line inputs (such as CD, Tuner, Tape or
Video) are not suitable.
Take care about connecting the left and right channel correctly. The right channel is usually marked
red, the left channel black or white. Check the manual of your amplifier for relevant information. An
earthing wire may be connected to the screw terminal between the sockets if you encounter humming
problems.
If your amplifier does not have an input suitable for phono cartridges you will require a separate
phono amplifier stage for MM or MC cartridges which is then connected between the record player and
a free line level input of the amplifier.
For detailed product information regarding Pro-Ject Audio Phono Amplifiers please refer to the Pro-
Ject web site www.project-audio.com.
Mains power connection
The turntable is supplied with a power cord suitable your country’s mains supply. Connect the power
cord to the mains.
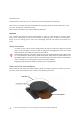
Fitting the lid
Fit the lid (dust cover) carefully over the hinge prongs and adjust the screws (9) until the lid stays open
where you want it to without being too stiff to open or close.
Switching on and off
Pressing the power switch (1) alternately starts or stops the motor.