
User Manual


© Pro-Ject Audio Systems · Pro-Ject X2 · Revision 2021.12.02
7
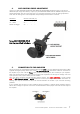
4. ANTI-SKATING FORCE ADJUSTMENT
Unpack (14) ANTI-SKATING STUB WITH ANTI-SKATING ADJUSTMENT SCALE and screw it into the pre-
drilled hole (see image down below). Unpack (13) ANTI-SKATING WEIGHT WITH THREAD and put the anti-
skating thread hook over the correct groove for your cartridge’s downforce on the anti-skating adjustment
scale. The anti-skating force must be adjusted corresponding to the downforce as follows:
Downforce Groove in the stub (15)
10 - 14mN 1
st
from bearing rings
15 - 19mN 2
nd
" " "
20mN and bigger 3
rd
" " "
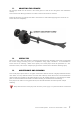
5. CONNECTION TO THE AMPLIFIER
The record player has gold plated female RCA phono sockets (19) so you can substitute the interconnect cables
supplied with higher quality cables such as the Pro-Ject Connect IT Si interconnect cables for connection to
the amplifier if you wish. Use the Phono input (sometimes labelled gram, disc or RIAA) on your amplifier.
Make sure that the phono input offers correct matching and amplification for the type of cartridge used. Line
inputs (like CD, Tuner, Tape or Video) are not suitable.
Take care about connecting the left and right channel correctly. The RIGHT CHANNEL is usually marked
RED, the LEFT CHANNEL BLACK or WHITE. Check the manual of your amplifier for relevant information. An
earthing wire may be connected to the screw terminal between the sockets if you encounter humming
problems.
If your amplifier does not have an input suitable for phono cartridges, a separate phono amplifier stage for
MM or MC cartridges is required. It has to be connected between record player and a free line level input of
the amplifier.
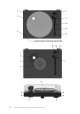
Screw ANTI-SKATING STUB
into the pre-drilled hole here: