INSTRUCTIONS FOR USE X2
© Pro-Ject Audio Systems · Pro-Ject X2 · Revision 2021.12.
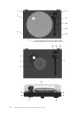
X2 Controls, features and connections (1) (2) (3) (4) (5) (6) (7) (8) (9) (10) (11) (12) (13) (14) (15) MAIN PLATTER CHASSIS SPEED CONTROL MOTOR WITH MOTOR PULLEY DRIVE BELT SUB-PLATTER TONEARM FLANGE TONEARM COUNTERWEIGHT TONEARM LIFT TONEARM REST AND REMOVABLE TRANSPORT LOCK CARBON / ALUMINIUM TONEARM TUBE HEADSHELL WITH FINGER LIFT ANTI-SKATING WEIGHT WITH THREAD ANTI-SKATING WEIGHT SUPPORT ANTI-SKATING STUB WITH ANTI-SKATING ADJUSTMENT SCALE (16) (17) (18) (19) (20) (21) LID HINGE HINGE FASTENERS LID
CONTENTS TURNTABLE OVERVIEW 2-3 ACCESSORIES OVERVIEW 3 SETUP AND INSTALLATION 4 1. PLATTER AND DRIVE BELT ASSEMBLY 6 2. MOUNTING AND CONNECTING THE CARTRIDGE 6 3. CARTRIDGE DOWNFORCE ADJUSTMENT 6-7 4. ANTI-SKATING FORCE ADJUSTMENT 7 5. CONNECTION TO THE AMPLIFIER 7-8 6. MAINS POWER CONNECTION 8 7. FITTING THE LID 8 8. SWITCHING ON AND OFF 8 9. CHANGING REPLAY SPEED 8 10. ADJUSTING THE VERTICAL TRACKING ANGLE (VTA) 8-9 11. ADJUSTING THE AZIMUTH 9 12. USEFUL TIPS 9 - 10 13.
Dear music lover, Thank you for purchasing a Pro-Ject Audio Systems record player. In order to achieve maximum performance and reliability, please study these instructions carefully. Warning of a hazard for the user, the unit or possible misuse Important notice The following instructions for adjusting the cartridge are provided in case the cartridge is replaced by a different model at a later date.
SETUP AND INSTALLATION 1. PLATTER AND DRIVE BELT ASSEMBLY Install the drive belt (5) and the main platter (1) as shown in following ilustration. 2. MOUNTING AND CONNECTING THE CARTRIDGE All cartridges with half inch mounting holes can be mounted. Leave the needle's protection cover on, fit the cartridge to the headshell by using the supplied screws by passing one screw through each slot in the headshell (12). Do not tighten the nuts yet.
4. ANTI-SKATING FORCE ADJUSTMENT Unpack (14) ANTI-SKATING STUB WITH ANTI-SKATING ADJUSTMENT SCALE and screw it into the predrilled hole (see image down below). Unpack (13) ANTI-SKATING WEIGHT WITH THREAD and put the antiskating thread hook over the correct groove for your cartridge’s downforce on the anti-skating adjustment scale.
For detailed product information regarding Pro-Ject Audio Systems interconnect cables and phono amplifiers please visit our website: www.project-audio.com 6. MAINS POWER CONNECTION The turntable is supplied with a power supply suitable for your country's mains supply. Check the label before connecting to ensure compliance with the mains rating in your house.
11. ADJUSTING THE AZIMUTH The cartridge needle must be vertical in the record groove in order to trace the groove wall modulations correctly. A small screw at the bearing end of the arm allows incorrect azimuth to be corrected. Slacken off the screw just enough to be able to revolve the arm tube without applying force. Note! Do not remove this screw completely! 12.
TECHNICAL SPECIFICATIONS X2 Pro-Ject 9’’ Carbon/Alu sandwich tonearm Nominal speeds Speed variance Wow and flutter Signal to noise Effective tonearm mass Effective tonearm length Overhang Power consumption Outboard power supply Dimensions (W x H x D) Weight 33/45/78 r.p.m. 33: ±0.25 % 45: ±0.20 % 33: ±0.12 % 45: ±0.10 % -70dB 13.5g 9 " (230mm) 18mm 5W/ 0.3W standby mode 15V/ 0.
Warranty The manufacturer accepts no responsibility for damage caused by not adhering to these instructions for use and/or by transportation without the original packaging. Modification or change to any part of the product by unauthorized persons, release the manufacturer from any liability over and above the lawful rights of the customer. Pro-Ject Audio Systems is a Registered Trademark of H. Lichtenegger. This guide was produced by: Pro-Ject Audio Systems Copyright © 2019. All rights reserved.
X2 Setup Guide Please read before unpacking.
Getting started: Make sure you have enough space to unpack your turntable. Always unpack and setup in a clean enviroment Important for warranty: Do not throw packaging away.
1 Unpack all items from accessory box. counterweight drive belt Remove dust cover carton from the box. 3 6 Carefully remove the protection covering. 7 Lift the wrapped turntable out of the box. 4 Unpack the acrylic platter and subplatter. 8 Put the platter on the turntable. single adapter & Allen key Antiskating Weight Connect it E RCA cable 5 2 Unpack the power supply. Put the drive belt on the pulley & sub-platter.
Technical Data Speed Principle Speed cariance :RZ ưXWWHU Platter Main bearing Tonearm 33, 45, 78 (electronic speed change) belt drive 33: +/-0,25%; 45: +/-0,20% 33: +/-0,12%; 45: +/-0,10% 30mm thick acryl, 2 kg heavy acryl Stainless steel 9” carbon/aluminium sandwich tonearm (ƬHFWLYH DUP OHQJWK Overhang (ƬHFWLYH WRQHDUP PDVV Tracking force range Power consumption Dimensions Weight 9“/230 mm 18 mm 13,5 g 0 - 30mN 4.5 W max / 0.
www.project-audio.