INSTRUCTIONS FOR USE Pro-Ject RPM 1 Carbon
© Pro-Ject Audio Systems · Pro-Ject RPM 1 Carbon / Ortofon 2M Red · Revision 2014.10.
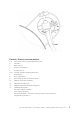
Controls, features and connections 1/11 Power switch, motor unit with stepped drive pulley 2 Drive belt * 3 Platter, felt mat 4 Tonearm counterweight 5 Tonearm lift lever 6/16 Tonearm rest and removable transport lock 7 Tonearm tube 8 Power supply socket 9 Phono output sockets and earth connection 10 Magnetic anti-skating mechanism 12 Magnetic anti-skating scale 13 Magnetic anti-skating adjustment mechanism 14 Headshell with finger lift Connection cable (not shown)* Power supply (no
Pro-Ject RPM 1 Carbon Dear music lover, thank you for purchasing a Pro-Ject Audio Systems record player. In order to achieve maximum performance and reliability with this record player you should study these instructions for use carefully. Warning of a hazard for the user, the unit or possible misuse. ! Important notice. The record player is supplied without cartridge or with a factory fitted and adjusted cartridge Ortofon 2M RED.
Adjusting the vertical tracking angle (vta) ** Put a record on the platter. When the needle is lowered into the record groove and the tonearm is not resting on the lift arm, the tube of the tonearm should be parallel to the surface of the record. If it is not loosen both screws in the tonearm base just enough to allow vertical movement of the arm pillar without force and slide the arm up or down until it is parallel.
Connection to the amplifier The record player has gold plated female RCA phono sockets (9) for connection to the amplifier using the supplied interconnect cables. Use the Phono input (sometimes labelled gram, disc or RIAA) on your amplifier. Make sure that the phono input offers correct matching and amplification for the type of cartridge used. Line inputs (such as CD, Tuner, Tape or Video) are not suitable. Take care to connect the left and right channels correctly.
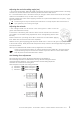
Fitting and connecting the cartridge ** All cartridges with half inch mounting holes can be fitted. Leaving the needle's protection cover on, fit the cartridge to the headshell using the screws supplied with the cartridge by passing one screw through each slot in the headshell (14). Do not tighten the nuts yet. Connect the tonearm wires to the cartridge pins as follows: white red green blue left channel positive (L+) right channel pos.
Potential incorrect use and fault conditions Pro-Ject turntables are manufactured to the highest standards and undergo strict quality controls before leaving the factory. Faults that may possibly occur are not necessarily due to material or production faults but can sometimes be caused by incorrect use or unfortunate circumstances. Therefore the following list of common fault symptoms is included.
© Pro-Ject Audio Systems · Pro-Ject RPM 1 Carbon / Ortofon 2M Red · Revision 2014.10.