Rev.
WELCOME... ...to the world of electronic moving message systems! We are pleased that you have chosen the Pro-Lite TruColorII electronic message sign. The Tru-ColorII utilizes state-of-the-art electronic technology along with a proven easy-to-learn programming sequence to seamlessly display both informative and fun messages to your viewing audience! We trust that you will enjoy the benefits from using the Pro-Lite sign.
KEY FEATURES TRIVIA QUESTIONS Your electronic sign is equipped with built-in TRIVIA to maximize the impact of your message. Whether it is a promotional message or just information for employees. TRIVIA questions entice people to read. The messages you program will automatically be inserted between the questions and answers. This will give the reader the opportunity to read your message while anticipating the answer to the question.
UNPACKING The complete package consists of the following items: 1. Electronic message sign 2. Wireless Infrared Remote Keyboard 3. Power adapter 4. User's manual 5. Warranty Registration Card 6. Two mounting brackets * Wall mounting screws not included 7. 30-day TRIAL Software and PC cable. 8. Accessories Brochure/Order Form If you notice a missing item(s), please contact Pro-Lite, Inc. within 7 days of purchase at 714-668-9988. INSTALLATION AND SET UP 1. 2. 3. 4.
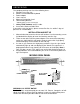
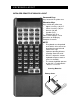
KEYBOARD LAYOUT INFRA-RED REMOTE KEYBOARD LAYOUT Command Keys Keys located in the yellow area Character Keys Keys outside the yellow area • Upper Case Keys (26) A-Z • Lower Case Keys (26) a-z • Numeric (10) 0-9 • Symbols (29) !; ... • European (64) Â æ Please refer to pages 3-4 for instructions on displaying European characters NOTE: • IR keyboard must be pointed • • • at the built-in infra-red sensor located on the top left hand corner of the sign. Optimum operating distance should be around 5' to 30'.
USER’S GUIDE SECTIONS PROGRAMMING Section .................................................. 1 - 11 Programming your new Pro-Lite sign using the included IR Remote Keyboard ! QUICK REFERENCE Section .......................................... 12 - 15 Corresponding Codes for IR Remote Keyboard ? HELP - PROGRAMMING Section .................................... 16 - 18 Most commonly asked questions, troubleshooting SOFTWARE Section .........................................................
TABLE OF CONTENTS Getting started . . . . . . . . . . . . . . . . . . . . . . . . . . . . . . . . . . . . . .1 - 2 Programming basics. Programming alternate characters . . . . . . . . . . . . . . . . . . . . . . . .3 - 4 Displaying letters, numbers, symbols, graphics, and alternate characters. Colors and Effects . . . . . . . . . . . . . . . . . . . . . . . . . . . . . . . . . . . .5 - 6 Text colors, font sizes, effects, displaying the DATE & TIME. Advanced features . . . . . . . . . . . . . . . . . . .
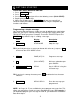
GETTING STARTED PROGRAM A QUICK MESSAGE AND GO! 1. Press RUN/STOP once. 2. Press PROG once. 3. Press the letter A and you will see the following screen: (PG:A START) 4. Begin typing your message. 5. When you are done, press RUN/STOP and your message will go! Continue reading the booklet to learn more about using the complete sign functions and features. Programming a simple message. Let's practice how to program a simple message by following the steps below.
Editing Your Message Now that you have programmed a simple message, let's change that message from "HELLO" to "HELLO MY NAME IS JOE". Press Display Description 1 RUN/STOP STOP MODE Stops the sign 2. PROG PAGE (A-Z)? A Program a message 3. A (PG: A START) Program PAGE A HELLO View previously programmed message from right to left until "O" "is the last character on the right 4. TIP: Use the right arrow key or the left arrow key to view and edit your programmed message. 5.
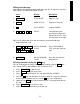
PROGRAMMING ALTERNATE CHARACTERS Display lower-case Letters, numbers, and symbols using the SHIFT key. Please take notice of the COLORED BLOCK, which appears on the left hand corner of the sign whenever the SHIFT key is pressed in the following steps. 1. 2. 3. 4. 5. 6. 7. 8. Press RUN/STOP to stop the sign. Press PROG to program a message. Press B to program PAGE B. The sign will read: (PG: B START) Press A to display the letter" A". Press the SHIFT key once.
Displaying European characters in lower-case using the SHIFT and ALT-CHAR key. 1. Press RUN/STOP to stop the sign. Press PROG to program a message. 2. Press D to program PAGE D. The sign will read: (PG: D START) 3. Press the SHIFT key once to go into the lower-case mode. Remember, the SHIFT key toggles you from 4 different modes. Upper case, lowercase, numerical, and symbols mode. 4. Now press C to display the letter" C "in lower-case. 5. Now press the ALT-CHAR key.
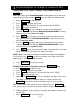
COLORS AND EFFECTS Using the COLOR key to select a text color. 1. 2. 3. 4. 5. 6. 7. Press RUN/STOP to stop the sign. Press PROG to program a message. Press F to program PAGE F. The sign will read: (PG: F START) Press the COLOR key. The sign will read: COLOR: A Now press the right or left arrow keys to view the different text colors. Once you see the color you wish to use, press the ENTER key. Your color has now been selected.
Adding special effects to your message using the FUNCTION key. Now the real fun begins! Let's program a message using the effect "CYCLING" and the animated graphic "COMIC 1". 1. 2. 3. 4. 5. Press RUN/STOP to stop the sign. Press PROG to program a message. Press H to program PAGE H. The sign will read: (PG: H START) Press the FUNCTION key. The sign will read: (AUTO): A Now press the right or left arrow key to scroll through the various effects. Once you locate the effect "CYCLING", press the ENTER key.
ADVANCED FEATURES Running combined Pages using the F1 key. This feature allows you to run up to 32 pages together as one long message. Remember to have your messages programmed before setting this feature. 1. Press RUN/STOP to stop the sign. 2. Press the F1 key. The sign will read: Page: 1)_ 3. The "1)" represents the sequence number in which the Pages will run. For example: let's say you have Pages "A", "B", and "C" programmed and you want to run them together as one long message. 4. Key-in the letter A .
Setting the Password, current DATE/TIME, turning the BEEP OFF. (cont.) 10. The sign will read: MINUTE: 01. Key-in the current MINUTE(s). Press ENTER . 11. The sign will read: 24 HOUR Y/N ?. Press Y to display the time as MILITARY TIME (i.e. 01:00 p.m. = 13:00). Press N to display the time as NORMAL TIME. 12. The sign will read: ID = 01. This setting is for software use only. Press ENTER . 13. The sign will read: 9600 BAUD. This setting is for software use only. Press ENTER . 14. The sign will read: BEEP ON.
Deleting a Page(s) or Graphic(s) you edited. (cont.) 5. At this time you can Key-in any "PAGE LETTER" to delete or you can press the DEL key to delete all the Pages. 6. Press A to delete PAGE "A". 7. The screen will read: Del: A (Y/N)?. Press Y for YES or N for NO. Your selection has now been accepted. To delete a Graphic(s), select "G" for Graphics in Step 3. NOTE: Deleting a graphic will restore the graphic to its original state. NEW AND IMPROVED FEATURES Turning OFF the TRIVIA using the FUNCTION key. 1.
The TARGET Function What you should know about the TARGET function. You should be familiar with Pages 1-9 before beginning. NOTE: Due to varying outlet frequencies, power outages and/or incorrect entry of information, Pro-Lite, Inc. will not be responsible for counter inaccuracies. There are 2 types of' TARGET options: 1) Count Up to TARGET. 2) Count Down to TARGET.
"Count Down" to TARGET setup 1. Begin by pressing RUN/STOP to stop the sign. Press the TARGET key. 2. The sign will read: Count Up/Dn. Press D to count DOWN to a TARGET. 3. The sign will read: DAY: 0000. Key-in the number of days to start counting down from. For example: If you wanted to count down from 125 days, press 1 2 5 . The sign will display: DAY: 0125 4. Press ENTER . The sign will read: HOUR 00. Key-in the current hour. For example: If the hour is currently 10, press 1 0 .
! QUICK REFERENCE SECTION Color Code Table To select a COLOR, press COLOR once, then press the Corresponding Letter.
European Character Table To display a EUROPEAN CHARACTER, press the Corresponding Letter, then press the ALT-CHAR key until the European letter of your choice is reached. Once you see the European letter you which to use, press any other letter to continue to type your message.
Graphic Images Table To select a GRAPHIC, press GRAPHIC once, then press the Corresponding Letter.
Special Effects Table To use an EFFECT, press FUNCTION once, then press the Corresponding Letter. Letter Type A B C D E F G H I J K L M N O P Q R S T U V W L L L L T T T L L L L L L T L L L L Effect Description AUTO OPEN COVER DATE CYCLING CLOSE CLOSE CLOSE SCROLL UP SCROLL DN OVERLAP STACKING COMIC 1 COMIC 2 BEEP PAUSE APPEAR RANDOM SHIFT TIME MAGIC THANK YOU WELCOME Shows text using all the effects randomly. Opens text from center to both ends.
? HELP SECTION - PROGRAMMING I programmed Pages A, B, and C. But when I press RUN/STOP only Page A will show. How do I get all of my Pages to run together? Please refer to page 7 for running combined pages. What does it mean when the sign says "MEMORY FULL"? This message means you have entered the maximum amount of characters onto the sign. To correct this you must down-size your messages in order to enter more information.
I program and run my message, but it shows characters I don't want. This is usually a programming error. Edit your message and use the arrow keys (left and right arrows) to locate the unwanted characters. When you locate them, press DEL to delete the unwanted characters. Please refer to page 1. Will I lose my messages if I remove the power to the sign? No, there is a built-in rechargeable battery in the sign.
? HELP SECTION - TROUBLESHOOTING I press RUN/STOP and the sign doesn't respond? • Try using a fresh new set of batteries. • Make sure the battery polarities are inserted in the correct direction. • Stand 10’ from the sign and point to the top left hand corner of the sign. My sign does not show the trivia questions. Make sure the TRIVIA is enabled by pressing the FUNCTION key while your message is running. • You can use the enclosed 30-Day TRIAL software to upload the TRIVIA to the sign.
The TruColorII Software for Windows® The TruColorII Software turns your computer into an Instant Messaging Update machine. Features such as scheduling, editing your own graphics, time synchronization, and more, are just a click away! Complete Package Consists of the following Items 1. Communication Cable with 9 pin female connector (communication cable not a phone cable) 2. 1 - PC Software CD System Requirements 1. 2. 3.
The TruColorII Software Screen TOOL BAR: MENU BAR Buttons that serve as shortcuts to execute commands. See pages 21 and 22 for descriptions. MESSAGE WINDOW: CHARACTER COUNT: Area where you can type and see the message that will be transmitted to the sign. Displays the number of characters typed by the user. Opens a new Message Window. Opens an existing File. Saves the current message in the Message Window. Cut the highlighted selection and put it on the clipboard.
The Menu Bar • File New Open Save Save as... Save As Text... Print Setup Print Set Comm Login Register Exit • Delete Select All Refresh : : : : Use this command to reverse the last pasting action. Cut the highlighted selection and put it on the clipboard. Copy the highlighted selection and put it on the clipboard. Paste the contents of the clipboard onto the active document. : Use this command to remove selected content from the Message Window.
• Functions Send Message Send Message Via Network : Send the current text in the Message Window to the sign. : Send the current text in the Message Window to the sign through the LAN. Run Page : Run a specified page on the sign. Set Speed : Set the scroll speed of the message on the sign. Delete Page : Delete a specified page on the sign. Set Date & Time : Sets the current Date & Time on the sign as a 12 hour or 24 hour clock (24 hour: 1 p.m.
Set-Up Connecting the Communication Cable 1. 2. 3. Connect the Phone Clip end of the Phone Type Cable to the sign. On the back of your computer, identify a COM PORT. If you have trouble locating a COM PORT on your computer, please reference your computer user manual or contact the manufacturer of your computer. Write the COM PORT number you will be using (for example: COM1, COM2): COM PORT Number = _____________ 4. Connect the 9-Pin connector end to the COM PORT you will be using.
Configure Software 1. Go to "File" and "Set Communication" Select the Com Port from PAGE 23. Data Bits = 8 Stop Bits = 1 Parity = None Do Not Change These Settings. Select the Baud Rate from PAGE 23. 2. Click on "OK" when your settings are complete. Sending a Message The Send Message icon is used to transmit the message to the sign. 1. 2. In the Message Window, type in a test message such as 'Welcome to my message". Click on the icon on the Toolbar or press "F5" to bring up the Send Message window.
Graphic Editor Use the Graphic Editor to edit existing graphics on the sign or to create graphics of your own. To open the Edit Graphic window, click on "Graphics" on the menu bar, then click on "Edit Graphics". • Select Graphic window Click on any one of the graphics from the Select Graphic list to view the graphic in the Graphic window. Solid: pre-stored graphics. Library: user saved graphics. Pre-stored graphics list.
• Color Window Select any one of four colors to edit an existing graphic or to create a graphic. Current selected color. • Colors to select from: black, red, green, yellow Edit Graphic Buttons Functions of buttons are described below. SAVE the current graphic displayed in the "Graphic" window. Graphic name can be up to 25 characters. Graphic will be saved in the "Library". DELETE a graphic from the "Library". "Solid" graphics cannot be deleted. Open a NEW "Graphic Window" for editing.
1. Count Up window • Day/Hour: select to "count up" in Days or Hours, • Start: specify a "start point”. For example: If you wanted to start the counter in 10 days, enter 0010. If you selected Day, your "start point” will automatically be in days. If you selected Hour, your "start point" will automatically be in hours. • Target: specify a "target" day or hour, For example: If you wanted the "target" to be reached in 125 days, enter 0125. • Page: select the Page you want to run when the "target" Is reached.
Send by Schedule The Send by Schedule icon is used to schedule a message to be sent from the computer to sign on the specified date and time. In order for this feature to work, the sign MUST always be connected to the computer. In addition, the Pro-Lite Software program must be running in the background mode. To run the software in the background mode, simply start the TruColorlI Software program and minimize the screen. 1. Click on the Send by Schedule icon on the toolbar.
LAN Communication HOW IT WORKS The display is first connected to the Serial Communication Port of a computer in the LAN environment which we refer to as the Receiving Slave Computer (RSC). The computer that will actually be transmitting messages to the display is referred to as the Transmitting Master Computer (TMC). The TMC will have the display control software installed. It is not necessary to install the software on the RSC.
6. Under "Printer name", type in the name you want for the Display Printer Driver. This name must be 12 characters in length. Write the "Printer name" below. Printer name: ______________________________ In the example below we used the initials "F.D." to represent "Front Desk". Select "No" to select the printer as the default printer and click on "Next". 7. Click on "Finish" to complete the set-up. If prompted for the Windows 95 CD or disk, insert CD or disk into the proper drive and click "OK". 8.
• 1. 2. 3. 4. 5. TMC Printer Driver Set -Up Click on "Start", "Settings", and "Printers". The "Printer" dialog window will appear. Double-click on the "Add Printer" icon. The "Add Printer Wizard" window will appear. Click on "Next". Select "Network printer" and click on "Next" again. Select "No" to print from "MS-DOS-based programs". Click on "Browse". Double-click on the name of the RSC on the network and select the Display Printer Driver created. 6. 7. Click on "OK". Now click on "Next".
? HELP SECTION - SOFTWARE Can I assign an IP address to the Pro-Lite sign? This can only be done with a partnering device such as a LAN serial server. You can purchase one directly from Pro-Lite. Ask for the Mini-Web! How do I display the current Count Variables in my message 1. Go to the part of your message where you want the Current Count Variable to be displayed. 2. Click on Commands on the menu bar, then click on Target. 3. Click on the Current Count Variable you wish to use.
How do I turn my sign OFF and ON automatically everyday. In order for this feature to work, the sign MUST always be connected to the computer and the TruColorII softtware minimized in the background. 1. Program an ON message. Save the message to the computer. 2. Use the "Set By Schedule" feature and set your ON message to come ON "daily" at a specified time. See Page 28. 3. Click on "OK" to confirm your entries. 4. Program an OFF message (edit a page with only a "space") 5. Save the message to the computer.
? ARE YOU STILL HAVING PROBLEMS? • • • Review this manual World Wide Web: http://www.pro-lite.com/support E-mail: support@pro-lite.com CONTACTING TECHNICAL SUPPORT Before contacting Technical Support, please have the following information ready: 1. MODEL NUMBER (found on the back panel of the display) 2. DATE OF PURCHASE 3. SIGN VERSION (Press RUN/STOP , then press the letter V ) Phone: (714) 668-9988 x106 Fax: (714) 668-9980 Email: support@pro-lite.com Online: http://www.pro-lite.
ONE YEAR LIMITED WARRANTY PRO-LITE, INC. warrants to the original consumer that each of its PRO-LITE products and all components therein contained will be free from defects in materials and/or workmanship for one year from the date of purchase. Any warranty hereunder is extended only to the original consumer purchaser and is not assignable.