Wireless LAN Adapter User’s Manual (For SOHO Users) June, 2006
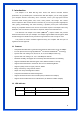
FCC Warning This equipment has been tested and found to comply with the limits for a Class B digital device, pursuant to part 15 of the FCC Rules. These limits are designed to provide reasonable protection against harmful interference in a residential installation. This equipment generates, uses, and can radiate radio frequency energy and, if not installed and used in accordance with the instructions, may cause harmful interference to radio communication.
Trademarks: All trade names and trademarks are the properties of their respective companies. Revision History Revision History V1.
Contents 1. 2. Introduction.............................................................................................4 1.1 Features.................................................................................................. 4 1.2 LED Indicator ......................................................................................... 4 1.3 Hardware Diagram................................................................................. 5 1.4 Package Contents .................................
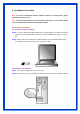
1. Introduction This adapter is an IEEE 802.11g client device that delivers unrivaled wireless performance for your desktop PC or notebook PC. With this adapter, you can easily upgrade your computer wireless connectivity. Once connected, access your high-speed Internet connection while sharing photos, files, music, video, printers, and storage. Get a better Internet experience with a faster wireless connection so you can enjoy smoother digital phone calls, gaming, downloading, and video streaming.
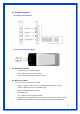
1.3 Hardware Diagram [For Wireless PCI Adapter] [For Wireless CardBus Adapter] 1.4 Package Contents ‧ One Wireless PCI or Cardbus adapter ‧ Three external antennas (for PCI adapter) ‧ One CD disk includes driver and user’s manual 1.
2. Installation Procedure Note: If you have installed the Wireless Adapter LAN driver & utility before, please uninstall the old version first. Note: The following installation was operated under Windows XP. (Procedures will be same for Windows 2000 / Windows ME / Windows 98SE) 2.
STEP3: Secure this card to the rear of the computer chassis and put back the cover. STEP4: Secure the antenna to antenna connector of the card. Please refer to the illustration below: STEP5: Turn on the computer.
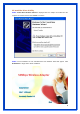
2.2 Install the Driver & Utility STEP1: Found New Hardware Wizard is displayed after the adapter is installed and the computer is restarted. Please click Cancel to continue. STEP2: Insert Installation CD into CD-ROM drive then windows below will appear. Click Install Driver to begin device driver installation.
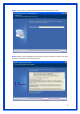
STEP3: Please wait for a while during the Setup Wizard is preparing the setup. STEP4: Please read the following license agreement. Use the scroll bar to view the rest of this agreement. Click Yes to accept the agreement.
STEP5: In Windows XP, there is a Windows Zero Configuration Tool for you to setup wireless adapter. You can choose to configure the adapter through the Microsoft Zero Configuration Tool or the Ralink Configuration Tool. It is recommended to choose the Ralink Configure Tool for the adapter. Click Next to continue. STEP6: If you need the adapter to operate with better performance, place choose Optimize for performance mode to enable the Tx Burst mode.
STEP7: Please wait for a while during the adapter is configuring your new software installation. STEP8: When the adapter is installed, the configuration utility will be displayed automatically.
STEP9: Please restart your computer after the installation has finished. Choose Yes, I want to restart my computer and click Finish button. To check if the adapter is properly installed, you can right-click My Computer Properties choose click Device Manager.
The Configuration Utility appears as an icon on the system tray of Windows while the adapter is running. You can open the utility by double-click on the icon. Right-click the icon, there are some items for you to operate the configuration utility, Launch Config Utilities Select this option to open the Configuration Utility tool. Use Zero Configuration as Configuration Utility Select this option to use Windows XP built-in wireless configuration utility (Windows Zero Configuration) to configure to card.
3. Wireless Network Configuration Utility The Configuration Utility is a powerful application that helps you to configure the Wireless LAN adapter and monitor the link status and statistics during the communication process. When the adapter is installed, the configuration utility will be displayed automatically. This adapter will auto connect to wireless device which has better signal strength and no wireless security setting.
STEP3: Uncheck “Use Windows to configure my wireless network settings” to enable the utility for the adapter and then click OK to continue. Note: If “Wireless Zero Configuration” is enabled, you can only configure the advance setting or check the link status and statistics from the configuration utility of the adapter. 3.1 Profile In the “Profile”, you can view and manage the current using Available Point(s). You can Add, Delete, Edit, or Activate the current Available Point(s).
3.2 Link Status In this section, you can immediately monitor the current connected link status, such as Link Speed, Throughput, Link Quality, Signal Strength, Noise Level …etc. Status: Display the SSID and MAC ID of the network that the adapter is connecting to. Extra Info: Display the link status.
Channel: Display the number of the radio channel and the frequency used for the networking. Link Speed (Mbps): Display the transmission and reception rate of the network. The maximum transmission rate is 54Mbps. Throughput (Kbits/sec): Display the speed of data transmitted and received. Link Quality: This bar indicates the quality of the link. The higher the percentage, the better the quality. dBm: If you want to know the signal strength in the unit of dBm, select the check box.
Strength, Channel, Encryption, Authentication, and Network Type. If you want to connect to any networks on the list, double-click the item on the list, and the card will automatically connect to the selected network. Rescan Button: Click this button to collect the SSID and Channel information of all the wireless devices nearby. Connect Button: Click “Connect” to connect to the selected network. Add to Profile Button: Add the selected network to Profile list. 3.3.
CAM (Constantly Awake Mode) – The adapter will always set in active mode. PSM (Power Saving Mode) – Enable the adapter in the power saving mode when it is idle. Network Type: Infrastructure – This operation mode requires the presence of an wireless Access Point. All communication is done via the Access Point or Router. Ad-Hoc – Select this mode if you want to connect to another wireless station in the Wireless LAN network without through an Access Point or Router.
3.3.2 Authentication and Security Authentication Type: This setting has to be consistent with the wireless networks that the adapter intends to connect. Open: No authentication is needed among the wireless devices.
connecting each other. Setup the same key as the wireless device that the adapter intends to connect. LEAP: LEAP is a pre-EAP, Cisco-proprietary protocol, with many of the features of EAP protocols. Cisco controls the ability of other vendors to implement this protocol, so it should be selected for server products are not a concern. When you have set up LEAP authentication, you have to enter the use name and password of your computer.
Encryption Mode: None – Disable the Encryption mode. WEP – Enabled the WEP Data Encryption. When the item is selected, you have to continue setting the WEP Key Length & the key Index. TKIP – TKIP (Temporal Key Integrity Protocol) changes the temporal key every 10000 packets (a packet is a kind of message transmitted over a network). This insures much greater security than the standard WEP security.
[An example for MD5 Authentication] Authentication Type: The EAP authentication protocols this adapter has supported are included as follows. This setting has to be consistent with the wireless APs or Routers that the adapter intends to connect.
PEAP and TTLS: PEAP and TTLS are similar and easier than TLS in that they specify a stand-alone authentication protocol be used within an encrypted tunnel. TTLS supports any protocol within its tunnel, including CHAP, MS-CHAP, MS-CHAPv2, PAP and EAP-MD5. PEAP specifies that an EAP-compliant authentication protocol must be used; this adapter supports EAP-MSCHAP v2, EAP-TLS/Smart card and Generic Token Card. This client certificate is optional required for the authentication.
3.3.4 802.1x Setting-CA Server Use Certificate Chain: When the EAP authentication types such as TLS, TTLS or PEAP is selected and required a certification to tell the client what server credentials to accept from the authentication server in order to verify the server, you have to enable this function. Certificate Issuer: Choose the server from the list to issue the certificate. If “Any Trusted CA” is selected, any CA included in the list (provided by the Microsoft Certificate Store) is permitted.
3.4 Statistics This option enables you to view the statistic information of the connection including transmit statistics and receive statistics. You may reset the counters by clicking “Reset Counter”. 3.5 Advanced In the “Advanced”, you can configure more advanced settings, for example: wireless Mode, B/G Protection, Tx Rate, Country Region Code…etc.
Wireless Mode: 802.11 B/G mix – If you have a mix of 802.11b & 802.11g wireless stations in your network, it is recommended to setting the card to this mode. This mode is also the default setting. 802.11 B only – This adapter can be compatible with both 802.11g and 802.11b wireless stations. If there are only 802.11b wireless stations in the network, you can set the adapter to this mode. 802.11 G only –This adapter can be compatible with both 802.11g and 802.11b wireless stations. If there are only 802.
the network nearby without intercepting the wireless connection, especially the adapter is applied to the multimedia application or a voice call. The adapter will fast roaming to the near network when the receive sensitivity (signal strength) is lower to the value you have set up. Turn Off RF Button: If you want to turn off the radio of the adapter temporarily, click this button. To turn on the radio, click this button again. CCX 2.0: CCX 2.
3.6 About In the “About”, you can click the hyperlink to connect the website for the information of the wireless chipset vendor and review basic information about the Utility such as the RaConfig Version, Driver Version, EEPROM Version, IP Address, Sub Mask, and Default Gateway.
4. Troubleshooting This chapter provides solutions to problems usually encountered during the installation and operation of the adapter. 1. Symptom: The LED is Off. Possible Remedy: Make sure the Wireless adapter is inserted properly. Otherwise, please contact your vendor. 2. Symptom: The LED is always on not blinking. Possible Remedy: Make sure that you have installed the driver from the attached CD. 3. Symptom: The LED is blinking but the Wireless adapter icon does not appear in your icon tray.
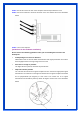
7. Symptom: No wireless signal. Possible Remedy: Move the antennas of the access point or wireless router into an L shape (one vertically, and one horizontally). Click on the Refresh button on the Site Survey screen. If the computer still does not see the Access Point. Then try moving your Access Point closer to the Computer. Then click on the Refresh button again. If the computer does not see the Access Point still, then try moving the computer so it is not flush with the wall.
B. A protection mechanism called RTS.CTS that governs how 802.11g devices and 802.11b devices interoperate. 10. What is the IEEE 802.11b standard? The IEEE 802.11b Wireless LAN standard subcommittee, which formulates the standard for the industry. The objective is to enable wireless LAN hardware from different manufactures to communicate. 11. What does IEEE 802.11 feature support? The product supports the following IEEE 802.
security standard, and the specification might be officially released by early 2003. 17. What is AES? AES (Advanced Encryption Standard), a chip-based security, has been developed to ensure the highest degree of security and authenticity for digital information, wherever and however communicated or stored, while making more efficient use if hardware and/or software than previous encryption standards. It is also included in IEEE 802.11i standard.