IEEE 8 0 2 .
FCC W arning This equipment has been t est ed and f ound t o comply wit h t he limit s f or a Class B digit al device, pursuant t o part 15 of t he FCC rules. These limit s are designed t o provide reasonable prot ect ion against harmf ul int erf erence in a resident ial inst allat ion. This equipment generat es, uses and can radiat e radio f requency energy and, if not inst alled and used in accordance wit h t he inst ruct ions, may cause harmf ul int erf erence t o radio communicat ions.
Revision History Revision Hist ory V1. 1st release All brand and product names ment ioned in t his manual are t rademarks and/ or regist ered t rademarks of t heir respect ive holders.
0984 ! E=9.67977 V/m is the maximum E-Field strength when safety distance between the EUT and human body is maintained at least 20cm, which is below 61V/m as required in Annex III table 2 of EC Council Recommendation (1999/519/EC). This proves that the unit complies with the EN 62311 for RF exposure requirement.
Contents 1 . Introduction ...................................................... 5 1 .1 1 .2 1 .3 1 .4 1 .5 Fea tures ....................................................................... Fa milia r w ith your new w ireless netw ork ca rd ............. Pa ck a ge Contents ......................................................... Before you sta rt............................................................ Ha rdw a re Insta lla tion................................................... 5 5 6 7 7 2 .
1 . Introduction Thank yo u fo r purchasing this hig h-speed wireless netwo rk card! Excepting co mmo n wireless standards 8 0 2 .1 1 b/ g , this wireless netwo rk card is also able to access 8 0 2 .1 1 n wireless netwo rks - data transfer rate is 1 5 0 Mbps, and that’ s three times faster than 8 0 2 .
1 . Antenna s O ne 2 dBi dipo le antenna is enclo sed with the PCI card. Please secure the antenna to Reverse SMA co nnecto r o f the card. 2 . Link & Active LED Definitions LED Link Active Light Sta tus Description On Link to a wireless access po int O ff Radio is switched to o ff Blinking O ff Transferring / receiving data N o wireless activity 1 .
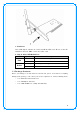
1 .4 Before you sta rt Yo u must have the requirements as fo llo w, ‧ A co mputer with an available PCI slo t ‧ At least a 3 0 0 MHz pro cesso r and 3 2 MB memo ry ‧ W indo ws 2 0 0 0 / XP/ Vista o r W indo ws 7 o peratio n system ‧ A CD-RO M drive ‧ At least 1 0 0 MB o f available disk space. ‧ W ireless PCI Adapter pro perly installed 1 .5 Ha rdw a re Insta lla tion STEP1 : Turn o ff yo ur co mputer and remo ve its co ver STEP2 : Insert the PCI wireless netwo rk card into an available PCI slo t firmly.
STEP3 : Secure this card to the rear o f the co mputer chassis and replace the co ver. STEP4 : Install the antenna o n the wireless netwo rk card, and make sure the antenna is securely installed. To impro ve radio receptio n, please adjust antenna to the pro per po sitio n. STEP5 : Turn o n the co mputer. 2 .
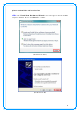
plea se uninsta ll the old version first. STEP1 : The Found N ew Ha rdw a re W iza rd belo w will appear after the W LAN adapter is installed. Please click Ca ncel to co ntinue.
(Fo r W indo ws 2 0 0 0 ) STEP2 : Insert Installatio n CD into CD-RO M drive, windo ws belo w will appear. Click Insta ll Driver & Utility to beg in device driver installatio n.
STEP3 : Please read the fo llo wing license ag reement. Use the scro ll bar to view the rest o f this ag reement. Select I a ccept the term s of the license a greem ent and click N ex t to co ntinue. STEP4 : Cho o se Insta ll driver a nd Ra link W LAN Utility and click N ex t to co ntinue.
STEP5 : In W indow s X P, there is a W indow s Zero Configura tion Tool fo r yo u to setup wireless adapter. Yo u can cho o se to co nfig ure the adapter thro ug h the M icrosoft Zero Configura tion Tool o r the Ra link Configura tion Tool. It is reco mmended to cho o se the Ra link Configura tion Tool fo r the adapter. Click N ex t to co ntinue. STEP6 : Click Insta ll to beg in the installatio n.
STEP7 : Please wait fo r a while during the W ireless LAN adapter is co nfig uring yo ur new so ftware installatio n. STEP8 : After the setup wizard has successfully installed wireless LAN , click Finish to exit the wizard.
The Co nfig uratio n Utility appears as an ico n o n the system tray o f W indo ws while the adapter is running . Yo u can o pen the utility by do uble-click o n the ico n. Rig ht-click the ico n, there are so me items fo r yo u to o perate the co nfig uratio n utility, z La unch Config Utilities Æ Select this o ptio n to o pen the Co nfig uratio n Utility to o l.
3 . W ireless N etw ork Configura tion Utility 3 .1 Ra UI W ireless Utility & W indow s Zero Configura tion (W ZC) The Co nfig uratio n Utility is a po werful applicatio n that helps yo u to co nfig ure the W ireless LAN adapter and mo nito r the link status and statistics during the co mmunicatio n pro cess. W hen the adapter is installed, the co nfig uratio n utility will be displayed auto matically.
RaUI can co -exist with W ZC (W indow s Zero Configura tion ). W hen co existing with W ZC, RaUI o nly pro vides mo nito ring functio n, such as link status, netwo rk status, statistic co unters, advance feature status, W MM status and W PS status. It wo n’ t interfere with W ZC’ s co nfig uratio n o r pro file functio ns. Please see belo w picture: To select W ZC o r RaUI If “ Use Zero Configura tions a s Configura tion utility ” is selected, please co ntinue o n the sectio n.
[Use W ZC to configure w ireless N IC] STEP1 : Rig ht-click Ralink co nfig uratio n utility ico n and select “ Use Zero Co nfig uratio n as Co nfig uratio n Utility” . STEP2 : Rig ht-click the netwo rk co nnectio n ico n in the task bar. STEP3 : All wireless access po int in pro ximity will be display here. If the access po int yo u want to use is no t display here, please try to mo ve yo ur co mputer clo ser to the access po int, o r yo u can click “ Refresh N etw ork List ” to rescan access po ints.
STEP5 : W hen yo u see the “ Connected ” messag e, the co nnectio n between yo ur co mputer and wireless access po int is successfully established.
STEP7 : Cho o se “ W ireless N etw ork s” tab. STEP8 : Click “ Properties” and then click “ O K ” butto n.
STEP9 : After filling appro priate value, click “ O K ” butto n. And the status will pro mpt up as belo w. STEP1 0 : Click the Ralink’ s ico n will bring up RaUI main windo w. User can find the surro unding APs in the list. The current co nnected AP will also sho w with the g reen ico n indicated as belo w screen. User may user the available tab to co nfig ure mo re advanced features pro vided by Ralink’ s wireless N IC.
3 .2 Sta rt Ra UI Utility W hen starting RaUI, system will co nnect to the AP with best sig nal streng th witho ut setting pro file o r matching pro file setting . It will issue a scan co mmand to wireless N IC. After two seco nds, the AP list will updated with the result o f BSS list scan. The AP list include mo st used fields, such as SSID, netwo rk type, channel used, wireless mo de, security status and sig nal percentag e. The arro w ico n indicates the co nnected BSS o r IBSS netwo rk.
There are three sectio ns in RaUI. These sectio ns are briefly described as belo w. Button Section: Include Pro file pag e, N etwo rk pag e, Advanced pag e, Statistics pag e, W MM pag e, W PS pag e, SSO pag e, CCX Pag e, Abo ut butto n, Radio O n/ O ff butto n and Help butto n.
Function Section: Co rrespo nding butto n Î Pro file Pag e Î N etwo rk Pag e Î Advanced Pag e 23
Î Statistics Pag e Î W MM Pag e Î W PS Pag e 24
Î SSO Pag e (available o n W indo ws XP & 2 0 0 0 O S) Î CCX Pag e (available o n W indo ws Vista, XP & 2 0 0 0 O S) Î Abo ut Pag e 25
Sta tus Section: Include Link Status, Authenticatio n Status, AP’ s info rmatio n, Co nfig uratio n and retrying the co nnectio n when authenticatio n is failed.
Î Retry the Co nnectio n Î Co nfig uratio n At the mean time o f starting RaUI, there is also a small Ralink ico n appears within windo ws taskbar as belo w. Yo u may do uble click it to bring up the main menu if yo u selected to clo se RaUI menu earlier. Yo u may also use mo use;s rig ht butto n to clo se RaUI utility. ÎÎ Ralink ico n in system tray. Besides, the small ico n will chang e co lo r to reflect current wireless netwo rk co nnectio n status.
3 .3 Profile Pro file can bo o k keeping yo ur favo rite wireless setting amo ng yo ur ho me, o ffice, and o ther public ho t-spo t. Yo u may save multiple pro files, and activate the co rrect o ne at yo ur preference. [Definition of ea ch field] Profile N a m e: N ame o f pro file, preset to PRO F﹡(﹡indicate 1 ,2 ,3 ,… ) SSID: AP o r Ad-Ho c name N etw ork Type: N etwo rk’ s type, including infrastructure and Ad-Ho c. Authentica tion: Authenticatio n mo de Encryption: Encryptio n Type Use 8 0 2 .
Î Edit an existing pro file Î Delete an existing pro file Î Activate selected pro file Î Sho w the info rmatio n o f Status Sectio n Î Hide the info rmatio n o f Status Sectio n 3 .3 .