
User's Manual


8
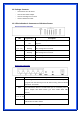
PWR Power connector, connect to the power adapter packaged with the AP
router.
1.4 System Requirements
‧ One or more PCs (desktop or notebook) with Ethernet interface.
‧ TCP/IP protocol must be installed on all PCs.
‧ Have valid Internet Access account and a DSL or cable modem.
‧ 10/100BaseT network cables with RJ-45 connectors.
‧ In case to use Wireless Access Point, all Wireless devices must be compliant with
IEEE 802.11b/g/n.
‧ System with MS Internet Explorer ver. 5.0 or later, or Netscape Navigator ver. 4.7 or
later.
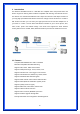
1.5 Installation Instruction
1) Power off Wireless Router and DSL/cable modem.
2) Connect systems to the LAN ports on the Wireless Router with straight LAN cables.
3) Connect the DSL or cable modem to the WAN port on the Wireless Router.
4) Power on DSL or cable modem first, then connect power adapter to the power jack
on the Wireless Router and plug the power cable into an outlet.
5) Check LEDs.
a) Once power on Wireless Router, Power LED should be on.
b) LAN LED should be on for each active LAN connection.
c) The WAN LED should be on when the DSL or cable modem is connected.
Warning: Only use the power adapter is provided from this package, use other power adapter
may cause hardware damage
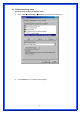
2. PC Configuration
User needs to configure TCP/IP network settings, Internet access configuration and
Wireless configuration for each system within Wireless Router’s LAN network.
By default, Wireless Router acts as a DHCP server for server version of Windows, it
automatically assigns IP address to each system when systems boot up. For all non-server
versions of Windows, the default TCP/IP setting acts as a DHCP client. If user chooses fixed
IP addresses for client systems, the Gateway of the client system must be set to the IP
address of the Wireless Router and DNS of the client system should be set to the address
provided by your ISP.