
User's Manual


50
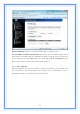
Request MPPE Encryption: Click the checkbox to enable request MPPE
encryption.
Attain DNS Automatically: Click to select getting DNS address for L2TP support.
Please select Set DNS Manually if the L2TP support is selected.
Set DNS Manually: Click to select getting DNS address for L2TP support.
DNS 1: Fill in the IP address of Domain Name Server 1.
DNS 2: Fill in the IP address of Domain Name Server 2.
DNS 3: Fill in the IP address of Domain Name Server 3.
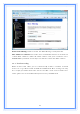
Clone MAC Address: Fill in the MAC address that is the MAC address to be
cloned.
Enable uPNP: Click the checkbox to enable uPNP function.
Enable IGMP Proxy: Click the checkbox to enable IGMP Proxy.
Enable Ping Access on WAN: Click the checkbox to enable WAN ICMP
response.
Enable Web Server Access on WAN: Click the checkbox to enable web
configuration from WAN side.
Enable IPsec pass through on VPN connection: Click the checkbox to enable
IPSec packet pass through.
Enable PPTP pass through on VPN connection: Click the checkbox to enable
PPTP packet pass through.
Enable L2TP pass through on VPN connection: Click the checkbox to enable
L2TP packet pass through.
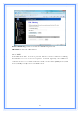
Apply Changes: Click the Apply Changes button to complete the new
configuration setting.
Reset: Click the Reset button to abort change and recover the previous
configuration setting.
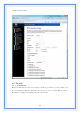
[USB3G]
USB3G : This page is used to configure the parameters for Internet network
which connects to the WAN port of your Access Point.
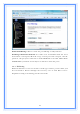
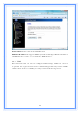
User Name: If you select the USB3G support on WAN interface, fill in the user
name and password to login the USB3G server.
Password: If you select the USB3G support on WAN interface, fill in the user
name and password to login the USB3G server.
Connection Type: Select the connection type from pull-down menu. There are
Continuous, Connect on Demand and Manual three types to select.
Continuous connection type means to setup the
connection through USB3G protocol whenever this WLAN