
Manual

Ass,
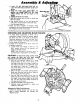
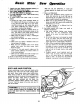
TRAVEL PIVOT ADJU : T
.OTE:These at the
factory _:_andn_rmlt_ild_ i_ot_i'_u|i'e r"djustment.
1. T_imiter_';a_ Shouidrise completely to the up
pos!_On by itself, If the _saw will not raise by
itself or if there is play in the pivot joints the
following adjustments are necessary.
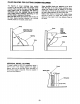
a. Loosen the hex lock nut with an adjustable or
24turn wrench.
b. Recheck the saw travel. Saw should rise
freely to its up travel stop. Check to see that
the saw will raise from all positions and
there is no looseness in the pivot. If saw still
won't fully rise, have service check and
repair it.
Adjustable
Wrench
Lock Nut
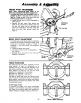
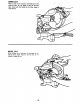
BEVEL PIVOT ADJUSTMENT
1. The miter saw should bevel easily by loosening
the bevel lock handle and tilting the power head
to the left. If movement is tight or if there is
looseness in the pivot follow the adjustment
procedure.
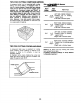
a. Loosen the bevel lock handle.
b. Turn the hex lock nut with an adjustable or
3/4" wrench.
c. Recheck bevel movement of the miter
Readjust if necessary.
Bevel Lock
Handle
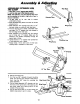
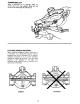
FENCE POSITIONS
The miter saw has two fence positions.The front
fence position is used for workpieces up to
standard 2 × 4 for cut off and bevel operation, floor
and ceiling moldings, and door casings. The rear
fence position is used for cut off and bevel
operation for a standard 2 × 6 workpiece.
Standard 2×4 measures 1 1/2 _ x3 1/2 _
Standard 2;<6 measures 1 I/2" x5 1/2"
The base on either side of the work table has two
sets of holes for locating the fence. To change the
fence position, remove the two fence lock screws.
Put the fence in the other fence position and install
the fence lock screws.
REAR FENCE POSITION
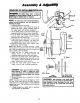
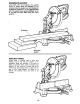
On/Off Trigger Switch
To prevent the trigger from being accidentally
engaged, a lock-off button is provided. To start the
tool, press in the lock-off button and squeeze the
trigger. Release the trigger to stop the miter saw.
Adjustable
Wrench
12 FRONT FENCE POSITION