
Manual

Assembly
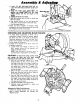
ASSEMBLINGEXTENSIONARM
AND CLAMP o :
2. Lock the m!_r_W_:i_ei_emd _tion.
NOTE: T_ :_te_ion arm Withl attached stop block
can be mounted on the left or right side of saw to
suit your operation.
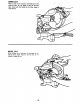
3. Tilt saw back on its rear legs to expose
underneath of base.
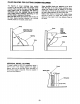
4. Slide adjustable stop block over back rail of side
extension arm,
5. Stide extension arm through first, pair of 1/2"
diameter holes on outside of miter saw base,
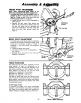
6, Find the second pair of holes underneath miter
saw base, Put _U_ bracket over hole nearest to
the front edge of the miter saw.
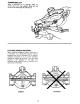
7. Slide extension arm through both the second
pair of holes and _U" bracket, Make sure the
extension arm passes completely through the
second pair of holes,
8. Tighten Screw on _U" bracket with screwdriver
to hold extension arm in place.
9. Repeat steps 1-8 for other side of miter saw
Omitting step 4-installation of stop block.
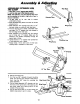
Stop Block
Extenslon Arm
Stop Block
\
Wing Screw
Wing _;crew
Extension Arm
Front Edge
Miter Saw
Pan Head
Screw
_U_ Bracket
t0.
11.
12.
13.
1/2_ Dia. Hole
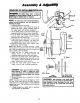
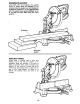
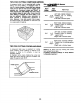
Set the saw back down,
Find the two 3/8" diameter forward mounting
holes. Find the two 5/8 _ diameter holes next to
them. Use the 5/8" holes for mounting the
clamp assembly.
Put the clamp assembly 5/8 _ diameter rod into
the hole on the same side of the blade as the
stop block. Make sure clamp guide is on the
outside of the saw base,
Put the stop fence plate on the stop block and
tighten wing screw to set it in place.
Stop
Fence
Stop Fence Plate
Wing Screw
Clamp Assembly
13