
Manual

&A
REMOVING
NUll:: To avoid Injury from unexpected starting,
unplug the saw whenever you are removing or
installing the blade.
1. Unplug the saw from the outlet.
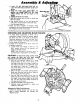
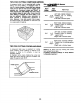
2. Loosen the screw A and 'remove the screw B
holding the lower guard mounting plate to
the upper guard with phillips screwdriver.
3. Lift the lower guard up and tilt the lower guard
assembly back so the arbor screw is exposed.
4. Find the arbor lock between the upper guard
and the miter saw handle. Place changing
blade wrench over arbor screw.
5. Press the arbor lock and hold it in firmly while
turning the wrench clockwise. The arbor lock
will engage after some turning of the wrench.
6. Remove the arbor screw, arbor washer, outer
blade collar, and the blade.
NOTE: Pay attention to pieces removed, noting
their position and direction they face (see illustra-
tion). Wipe the blade collars clean of any saw dust
before installing the new blades.
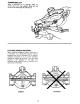
7. install the new 10" blade. Make sure the
rotation arrow on the btade matches the
clockwise rotation arrow on the upper guard.
8. Instal! the outer blade collar, arbor washer and
arbor screw. Press the arbor lock and turn the
1/2" wrench counter clockwise to secure the
blade. Tighten arbor screw securely.
9. Lower the lower blade guard. Tighten the
screw A and B with a phillips screwdriver.
DANGER: Never use saw without mounting
plate securely in place. It keeps the arbor
screw from falling out if it accidentally loosens,
and prevents the spinning blade from coming
off the machine.
10. Be sure the arbor lock is reteased so the blade
turns freely.
NOTE: The arbor lock can be damaged by impro-
per use. If the arbor lock will not hold, lower the
blade down on to a scrap piece of wood positioned
against the fence. This will serve as an alternate
locking means.
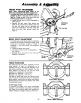
11. If blade contacts turn table, refer to assembly
and alignment, for adjustment.
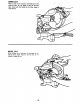
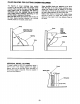
Screw A
Miter
Handle
U
Blade
Guard
Arbor Washer
10 _ Blade
/
Arbor Screw \
Ouler Inner Blade Collar
Blade Collar (Do Not Remove)
,, ,, ,,
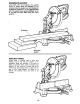
WARNING: Alter installing a new blade, make
sure the blade clears the table slot at the0°and45 _
bevel positions. Lower the blade into the lower
table and check Ior any contact with the base or
turn table stru_ure.
B
14