
Manual
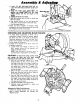

Miter
1. Inspect your saw. Replace dama_ missing or
failed paris before using th9 llw,:_ _::
2. Wear safety __IU_)that
comply
3. For: dusty operations, wear a face shield along
with safety goggles.
4. To avoid injury from jams, slips or thrown
pieces:
a. Choose the right lO-inch diameter blade for
the material and the type of cutting you plan
to do. Use this miter saw to cut only wood,
woodlike products or soft metals like alumi-
num. Other materials may shatter, grab at
the blade or create other dangers.
b. Make surethe direction of rotation arrow on
the blade matches the d_rection arrow on the
saw_ The teeth of the blade should always
point downward at the front of the saw.
c. Make sure the blade is sharp, undamaged
and properly aligned.
d. Make sure the blade and arbor collars are
clean.
e. Make sure the collars' recessed sides are
facing toward the blade.
f. Make sure the recessed side of the blade
washer (just under the arbor screw head)
faces the collar.
g Using a 1/2" box end wrench, make sure the
arbor screw retaining the blade collars is
firmly hand tightened.
h. Make sure alt clamps and locks are tight and
there is no excessive play in any parts.
5. Never cut more than one workpiece at a time.
6. Make sure the cut off piece can move sideways
Saw
after it's cut off. Otherwise, it could get
wedged against the blade and thrown violent-
ly.
7. Never cut FREEHAND:
a. Brace your workpiece solidly against the
fence and table top so it will not rock or
twist during the cut. Make sure there is no
debris caught beneath the workpiece.
b. Make sure no gaps between the workpiece,
fence and table will cause shifting after the
workpiece is cut in two.
e. Use jigs, fixtures or a different tool for
unstable workpieces.
8. Use extra caution with large, very small or
awkward workpieces:
a. Use extra supports (tables, saw horses,
blocks, etc.) for any workpieces large
enough to tip when not held down to the
table top.
b. Do not use this saw to cut pieces too small
to let you easily hold the work while you
keep the thumb side of your index (pointer)
finger against the cutside edge of the fence.
c, When cutting irregularly shaped workpieces,
plan your work so it will not slip and pinch
the blade. A piece of molding, for example,
must lie flat or be held by a fixture or jig
that will not let it twist, rock or slip while
being cut.
d. Properly support round material such as
dowel rods, or tubing. They have a tende-
ncy to roll while being cut, causing the
blade to _bite." To avoid this, use a fixture
designed to properly hold your workpiece,
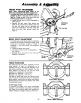
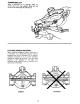
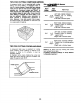
BODY AND HAND POSITION
Proper positioning of your body and hands when
operating the miter saw will make cutting easier
and safer. Never place hands near cutting area.
Place hand at least 4" from path of blade. Hold
workpiece firmly to the fence to prevent movement
toward the blade. Keep hands in position until
trigger has been released and the blade has
completely stopped. Before making a cut, make a
_dry run _with the power off so you can see the
path of the blade.
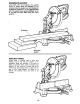
WARNING: Do not try to cut short pieces. You I
cannot properly support the workplace and keepl
your hold down hand the required distance from_
the blade.
I
, ....... I
15