
Manual


Maintaining Your
MAINTENANCE
Atways unplug the power cord before imymatnten,
ance check on this SaW.i_.... :_.... i::......
DANGEI=h Never put I_bricants on the blade while
.o""...,°,;; ,m
mrUng or electrical shock, unplug the
power, cord I
| bef_ wo,_ing on the saw.
iiiiii iiii i ii
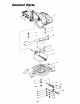
I WARNING: For your safety, this saw Is double
I Insulated. To avoid electrical shock, fire or injury,
I use only parts Identical to those Identified in the
I parts list. Reassemble exactly as original assembly
| to avoid electrical hazards.
i iiiiiiii i iiiiiiiiiiiii i iiiii iiii lllliHii
OUST
Periodically, sawdust will accumulate under the
work table and base. This could cause difficulty in
the movement of the work table when setting up a
miter cut. Frequently blow out or vacuum up the
sawdust
i iiiiiiiii ] i iiii
WARNING: If blowing sawdust, wear proper
eye protection to keep debris from blowing into /
eyes.
iiiiii iiii
BASIC BLADE REQUIREMENTS
10_ Diameter
Blades marked for 5,500 RPM or higher.
5/8 '1Arbor Hole
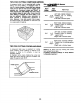
REPLACING CARBON BRUSHES
The carbon brushes furnished will fast approxi-
mately 50 hours of running time or 10,000 on/off
cycles, Replace both carbon brushes when either
has less than 1/4 _ length of carbon remaining. To
inspect or replace, first unplug the saw, then
remove the black plastic cap on the side of the
motor (caution, this cap is spring loaded by the
brush assembly). Then pull out the brush. Repeat
for the other side. To reassemble reverse the
procedure. The ears on the metal end of the brush
assembly go in the same hole the carbon part fits
into. Tighten the cap snugly but do not overtighten.
NOTE: To reinstall the same brushes, first make
sure the brushes go back in the way they came
out. This will avoid a break in period that reduced
performance and increases wear.
LOWER BLADE GUARD
Do not use the saw without the lower guard. The
lower blade guard is attached to the saw for
protection. Should the lower guard become dama-
ged, do not use the saw until damaged guard has
been replaced. Devetop a regular check to make
sure the lower guard is working properly. Clean
the lower guard of any dust or build up with a
damp cloth,
LUBRICATION
All the motor bearings in this tool are lubricated
with a sufficient amount of high grade lubricant for
the life of the unit under normal operating
conditions, therefore, no further lubrication is
required. (See below.)
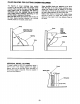
Infrequent Lubrication As Required:
t. Lubrication of arm pivot for free movement.
a. By loosening nut and applying oil to washer
and to contact face (minor).
b, Disassembly means required to grease pivot
bolt and contact faces (major).
NOTE: Disassembly should be done by an
authorized service technician. Removal of the
upper guard and the bolt stop is necessary
before pivot can be disassembled. Pay close
attention to the spring-end positions in the
castings. Mark with chalk to avoid later confu-
sion.
2. Lubrication of-mechanism which pivots lower
guard. Use light household oil (sewing machine
oi!) on metal-to-metal or metal-to-plastic guard
contact areas as required for smooth, quiet
operation. Avoid excess oil, to which sawdust
will cling,
CAUTION: Do not use solvents on the guard.
They could make the plastic 'cloudy" and brittle.
i ii ii ii i
WARNING: When cleaning lower guard unplug
the saw from the outlet to avoid unexpected start-
up.
i ===ll i = 11
(WHITE
Wiring Diagram
cl
(RED)
FIELD LEAD _ _ .. FIELD LEAD _'_
.... v, ,----_ , v , .........w "' _.UJ .J=
(GRAY) I I _v
BRAKE LEAD _ / m_
I SWITCH
I'= X N.C. ARMATURE
,, n -,_x---,I \. )
; _ _ BRUSH
2_ ' _-
N---_-_-! (WHITE) I -"
[ BRUSH LEAD J
21