
Manual


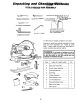

,q s e rn u Ey et
MOUNTING THE SAW
1: Before moving the saw, lock the miter, bevel and
Rear
power-head positions. Unplug electric cord.
Mounting
2. To avoid back injury, get help when you need to
Holes
lift the saw more than 10 inches. Hold the toot
close to your body. Bend your knees so you can
lift with your legs, not your back. Lilt by using the
hand-hold areas at the bottom of the base
3 Never carry the miter s3w by the power cord or
the plastic handle. Carrying the tool bv the powe;
cord could cause damage to the insWatior, or the
wire Connec-tions re-suiting in electric shock or
fire.
4. Place the saw so other people cannot stand
behind it Thrown debris coutcl miure people in its
path.
5_ Place the saw or_ a firm. level surface where there
is plenty of room for handling and properly
supporting the workpiece.
6 Support the saw so the table is levet and the saw
does not rock,
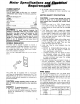
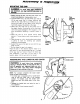
7. Bolt or clamp the saw to _ts support
Place the saw in the desired Iocat=on e_ther on a
work bench or the recommended leg set The base
of the saw has four holes to mount the miter saw
(see illustration) I! the saw is to be used _,n one
location, lasten tt to the work beqch or leg set.
Forward
Mounting
Holes
ASSEMBLING THE LOWER BLADE GUARD
WARNING: To avoid injury from unexpected
starting or electrical shock, do not plug the saw in
until all aGsembly and alignment steps are com-
plete. The power cord must remain unplugged
whenever you are working on the saw,
NOTE: For compact shipment the lower blade
guard has been disconnected.
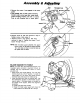
1 The miter saw is equipped with a handle latch
used to lock the miter saw in the lowered
position. To release, push the handle down
slightly and pull the handle latch to the other
side.
2. Release the handle latch and raise the saw to
its up position.
3. Loosen screw A and remove screw 8
Rear
Mounting
Holes
Forward
Mounting
Holes
Handle Latch
9