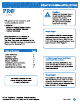
PR® TAQ. This portion of the manual is used to setup additional zones: * RZ251W (Requires Z955W Master Zoning Control and Z260W Wireless Damper Modules) Congratulations on purchasing a PRO Wireless Zoning System. This Zone Thermostat was designed to the highest reliability and ease of use standards. Thank you for choosing Prof.
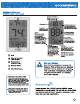
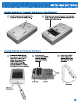
Getting to know your RZ251W Zone Thermostat @ Lop Glow in the Dark Light Button, ©) Temperature Set point Keys, O) Remote Name ® Operation Keys.» NOTE ABOUT THE LIGHT BUTTON: This button is used to light up the display. DO NOT hold the light button down for longer than 3 seconds or you will enter the technician setup screens. If you inadvertently enter the tech setup press and release the light button a second time to exit the tech screens.
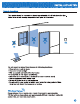
Remotes Locations The remote should be mounted or placed approximately 4 to 5 feet above the floor. Select an area with average temperature and good air circulation.
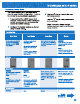
Wall Mount Permanent it is Beet for the remote to stay in the zone iris sensing; permanent wall mounting Is strongly recommend, Mount sub base (4) Remove the RZ251W from the sub base. to the wall LLL Inside View Sub base = of Remote —_ Sensor & Wall Mount ~ Removable Slide the Remote Sensor over {1} Mount T-bracket on the Wall. Slide the Remote Sens Wall mount Wall 10 slot holders. = Punt = “og T-bracket mounted on the wall HB T-bracket Desk or Counter Option Slide the T-bracket up into the slot holders.
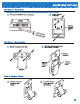
installing Batteries for Temporary Wall Mount or Table Placement Use the finger tab on the back of the Once you have removed the doer from the back remote to remove the battery door. of the remote, Insert 2 AA Alkaline batteries and replace the battery door. Inserting Batteries for Permanent Wall Mount Remove the RZ251W from Once you have Attach the RZ251W the sub base.
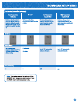
Remember The PRO Wireless Zoning System contains delectable wireless communication. Each component has a jumper switch label FSK and ASK. Default setting: FSK. All components must be set to the same position for wireless communication. Connecting to Z958W Master Zone Thermostat Back of RZ251W FSK/ ASK Switch STEP 1. Next Step Change Setting to “ZONING” Set Zone Number RZ251wW Wireless icon Light button Set Zone Number STEP 4. RZ251W Easy communication link set up: 1.
Technician Setup Menu This remote sensor has a technician setup menu for easy installer configuration. To set up 3. Use the A key to move to the next the remote for your particular application: tech setup screen. 1. Press and hold the LIGHT button for 3 Use the WV key to make adjustments seconds. This 3 second delay is designed to the settings. so that homeowners do not accidentally access the installer settings. Note: Press and release the light button when you want to exit the tech 2.
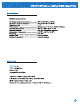
Specifications RZ251W Remote Sensor The display range of temperature . 2°F to 89°F (5°C to 35°C) The control range of temperature . 44°F to 90°F {7°C to 32°C) Display accuracy Power source -Battery power from 2 AA Alkaline batteries Operating temperature -32°F to +105°F (0° to +41°C) Operating humidity -80% non-condensing maximum Dimensions of thermostat .. .. 2.75"W x 4.5"H x 1.375"D Frequency 916 MHz Sending Data _. Every 5 minutes Reading Tempe rat Every 60 seconds Contact Us Port IAG Ing. S.